Training
Before training the prediction networks, you need to create a model of your robot in Gazebo and match the closed-loop responses of the low-level velocity/attitude controllers in simulation with your real robot.
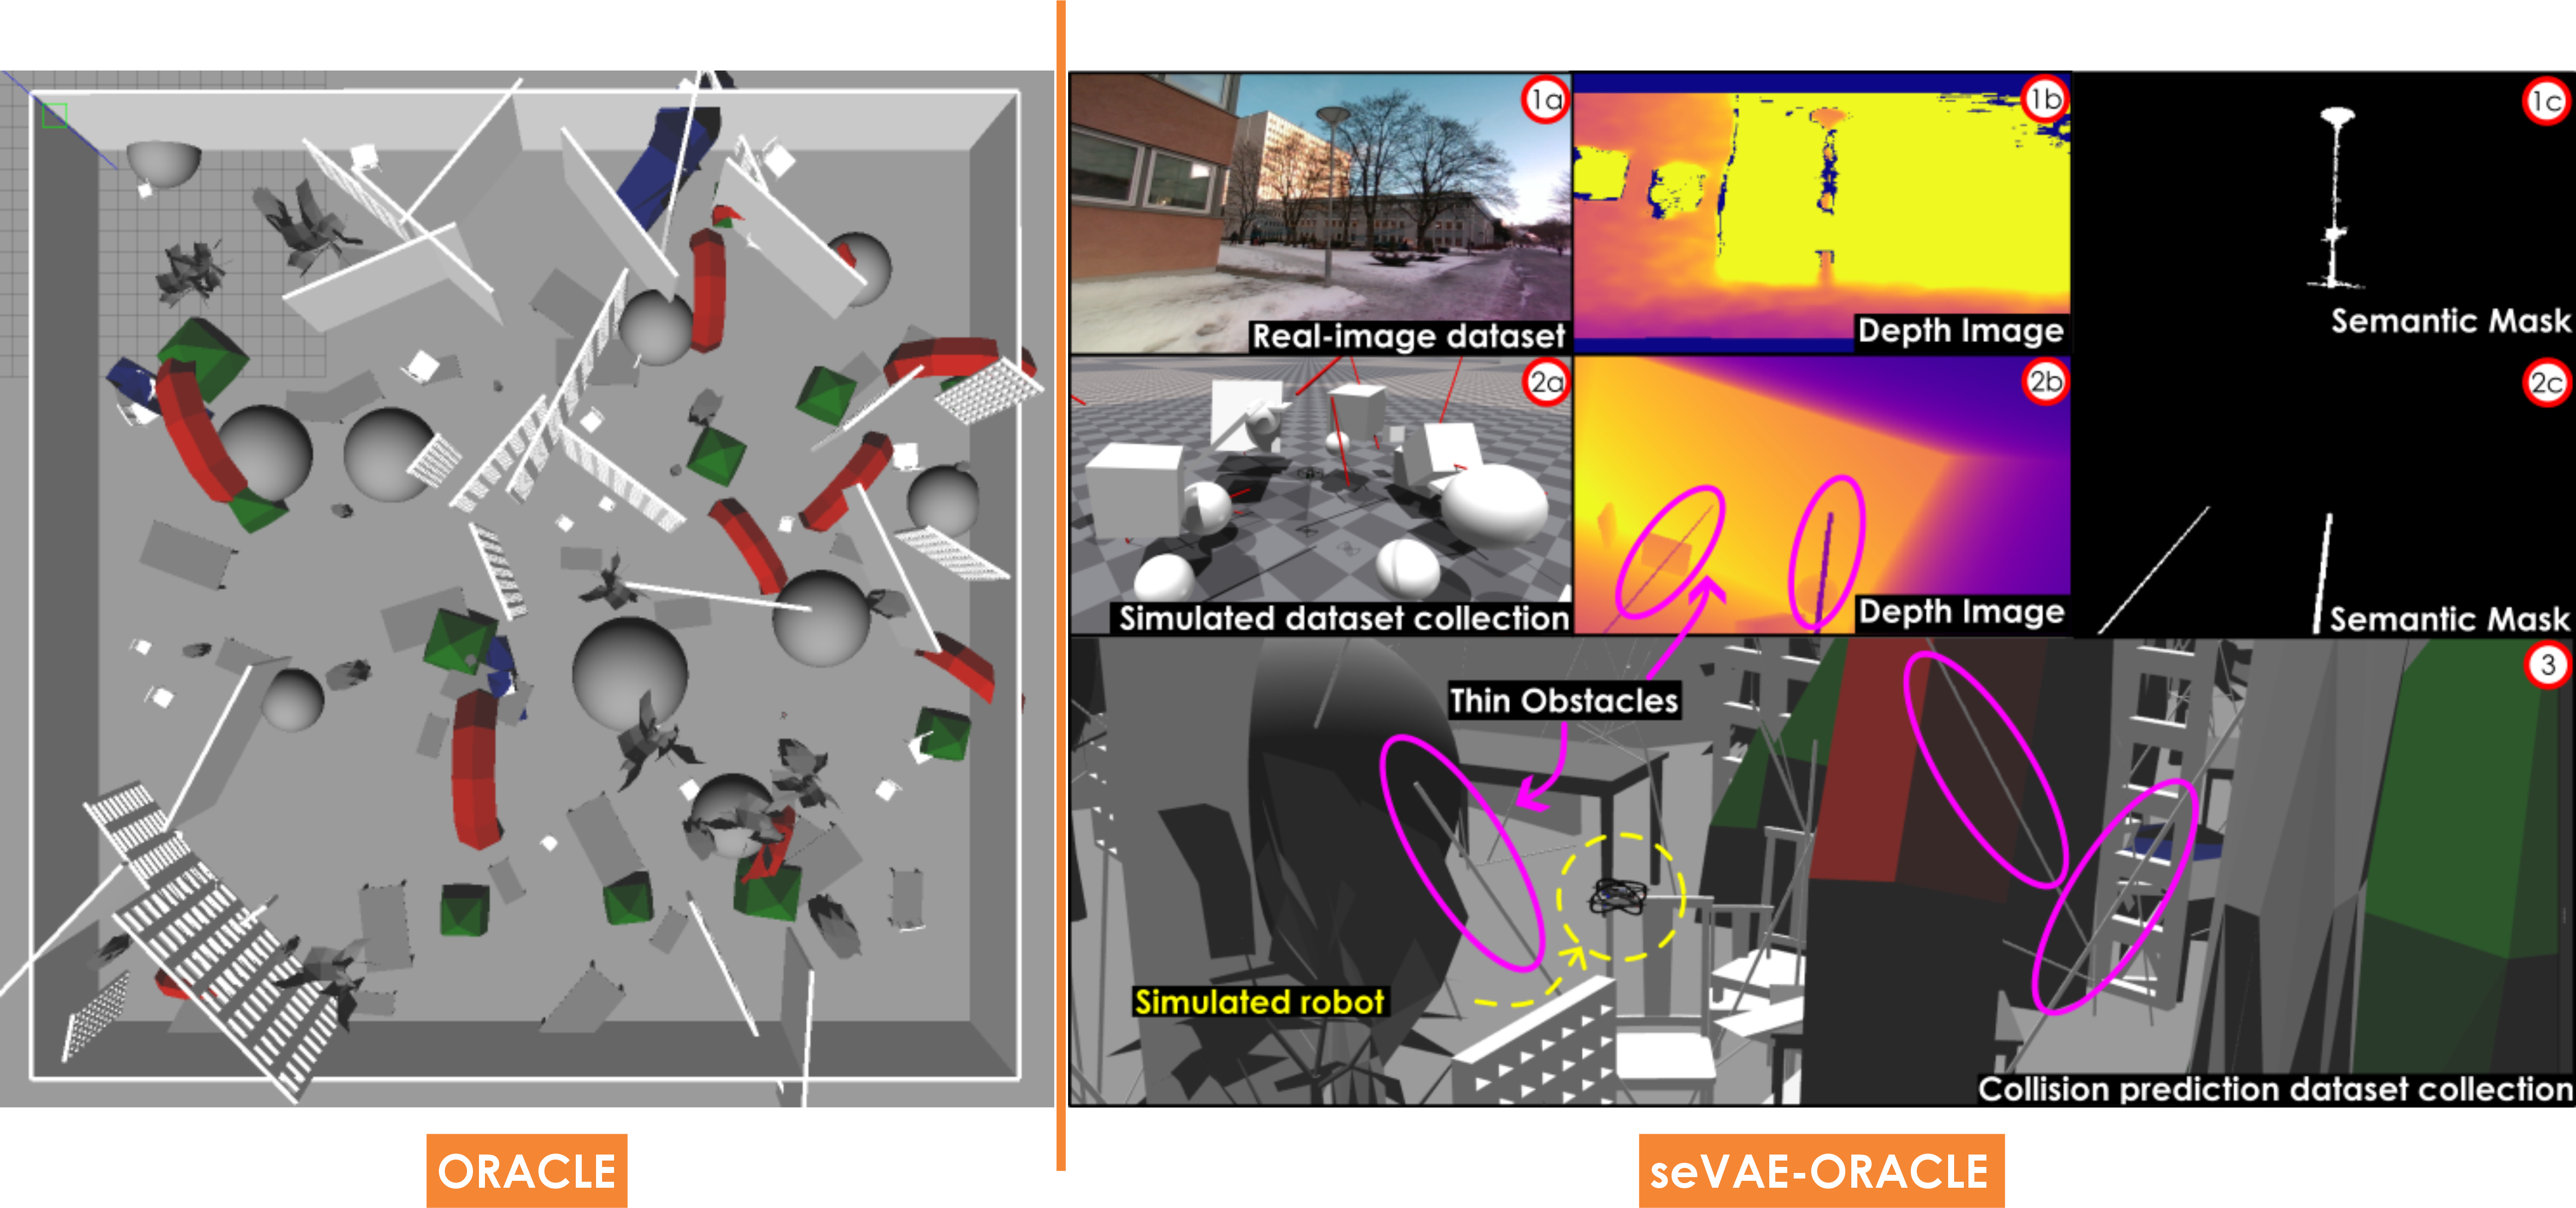
Gazebo simulator is used to generate training data to predict collision events. An indicative Gazebo environment for collecting data for ORACLE is visualized on the left side of the above figure while the last line on the right side illustrates seVAE-ORACLE training environments with thin obstacles populated. Note that for seVAE-ORACLE, we also need to train the VAE with both real-world and simulated depth images, utilizing labeled semantic mask, as can be seen on the right side of the above image.
Set EVALUATE_MODE = False and RUN_IN_SIM = True in config.py file.
Run in one terminal (NOT in conda virtual environment)
# for ORACLE or A-ORACLE
roslaunch rmf_sim rmf_sim.launch
# OR for seVAE-ORACLE
roslaunch rmf_sim rmf_sim_sevae.launch
Open another terminal, source lmf_sim_ws workspace and run inside deep_collision_predictor folder (Note: remember to set PLANNING_TYPE=1 in config.py for seVAE-ORACLE!)
# conda activate oracle_env
python generate/generate_data_info_gain.py --save_path=path_to_folder
If --save_path is not specified, the default path in common_flags.py is used.
Set TRAIN_INFOGAIN = False (for generating ORACLE data) or True (for labeling A-ORACLE data with Voxblox) in config.py file.
If labeling data for A-ORACLE, we need to run in one terminal (NO need to run this for ORACLE)
roslaunch voxblox_ros voxblox_gazebo.launch
In another terminal, run
# conda activate oracle_env
python process/data_processing.py --load_path=path_to_folder --save_tf_path=path_to_folder
Run the script in seVAE repo to create the di_latent.p and di_flipped_latent.p pickle files. Put the latent pickles in the same folder as the other pickle files in step 2 above.
Then run
# conda activate oracle_env
python process/data_processing_sevae.py --load_path=path_to_folder --save_tf_path=path_to_folder
If --load_path or --save_tf_path is not specified, the default path in common_flags.py is used.
The tfrecord files created from data_processing.py are saved in save_tf_path.
Split the tfrecord files into 2 folders for training and validation (80/20 ratio).
Train ORACLE (collision prediction): the training typically takes around 200-300 epochs to converge to a good network.
# conda activate oracle_env
python train/training.py --training_type=0 --train_tf_folder=path_to_folder --validate_tf_folder=path_to_folder --model_save_path=path_to_folder
Train seVAE-ORACLE (collision prediction): the training typically takes around 500 epochs to converge to a good network.
# conda activate oracle_env
python train/training.py --training_type=1 --train_tf_folder=path_to_folder --validate_tf_folder=path_to_folder --model_save_path=path_to_folder
or train Attentive ORACLE (info-gain prediction): the training typically takes around 200-300 epochs to converge to a good network.
# conda activate oracle_env
python train/training.py --training_type=2 --train_tf_folder=path_to_folder --validate_tf_folder=path_to_folder --model_save_path=path_to_folder
If --train_tf_folder or --validate_tf_folder or --model_save_path is not specified, the default path in common_flags.py is used.
Note: you can view the training/validation losses and metrics by running
# conda activate oracle_env
tensorboard --logdir=logs
Note:
- The TensorRT files cannot be used across platforms. You need to re-create them for different platforms (GPU, NVIDIA software) that you use.
- For multi-GPU systems, you may need to
export CUDA_VISIBLE_DEVICES=0to run TensorRT, otherwise, you can get some runtime errors.
Set the path to the .hdf5 file using --checkpoint_path when calling Python scripts in the optimize folder. The resulting .trt or .onnx files will be created in the main folder of this package. Please copy these .trt files to a folder listed in CPN_TRT_CHECKPOINT_PATH (ORACLE) or seVAE_CPN_TRT_CHECKPOINT_PATH (seVAE-ORACLE) or IPN_TRT_CHECKPOINT_PATH (A-ORACLE).
# conda activate oracle_env
python3 optimize/convert_keras_cnn_to_tensorrt_engine.py --checkpoint_path=PATH_TO_HDF5_FILE
python3 optimize/convert_keras_combiner_tensorrt_engine.py --checkpoint_path=PATH_TO_HDF5_FILE
python3 optimize/convert_keras_rnn_to_tensorrt_engine.py --checkpoint_path=PATH_TO_HDF5_FILE
# conda activate oracle_env
python3 optimize/convert_keras_combiner_tensorrt_engine_sevae.py --checkpoint_path=PATH_TO_HDF5_FILE
python3 optimize/convert_keras_rnn_to_tensorrt_engine_sevae.py --checkpoint_path=PATH_TO_HDF5_FILE
Note: The optimize scripts for the IPN are only verified with CUDA 10.1 + cuDNN 7.6 + TensorRT 6.0.1 or CUDA 10.2 + cuDNN 8.0 + TensorRT 7.1.3 (Jetpack 4.4). You may receive cuda error message with other setup. In that case, please use Tensorflow inference for the IPN (set INFOGAIN_USE_TENSORRT = False in config.py)
# conda activate oracle_env
python3 optimize/convert_keras_infogain_cnn_to_tensorrt_engine.py --checkpoint_path=PATH_TO_HDF5_FILE
python3 optimize/convert_keras_infogain_predictor_to_tensorrt_engine.py --checkpoint_path=PATH_TO_HDF5_FILE
or for predicting the information gain of only one step in every ... step in the future (use SKIP_STEP_INFERENCE_INFOGAIN param in config.py):
# conda activate oracle_env
python3 optimize/convert_keras_infogain_predictor_to_tensorrt_engine_light_inference.py --checkpoint_path=PATH_TO_HDF5_FILE
This can lead to even faster inference speed but will hurt the performance (SKIP_STEP_INFERENCE_INFOGAIN = 2 or 4 is recommended).
Choose PLANNING_TYPE in config.py file (for evaluating A-ORACLE in sim, enable the RGB camera xacro in rmf_sim/rmf_sim/rotors/urdf/delta.gazebo)
If using Tensorflow model for inference, set COLLISION_USE_TENSORRT = False or INFOGAIN_USE_TENSORRT = False in config.py file and update the path to the weight files (.hdf5 files) in config.py.
If using TensorRT model for inference, set COLLISION_USE_TENSORRT = True or INFOGAIN_USE_TENSORRT = True in config.py file and update the path to the weight folders (containing .trt files) in config.py. Note: for multi-GPU systems, you may need to export CUDA_VISIBLE_DEVICES=0 to run TensorRT, otherwise you can get some runtime errors.
Change the world_file argument in rmf_sim.launch to choose the testing environment. We provide some testing environments in rmf_sim/worlds folder. Additionally, set rviz_en to true in rmf_sim.launch for visualization of the network's prediction. Please refer to the wiki for detailed instructions to run the demo simulations as well as documentation of parameters in config.py.
Set EVALUATE_MODE = True and RUN_IN_SIM = True in config.py file.
Run in one terminal (NOT in conda virtual environment)
roslaunch rmf_sim rmf_sim.launch
In another terminal, run
# conda activate oracle_env
source PATH_TO_lmf_sim_ws/devel/setup.bash
source PATH_TO_ros_stuff_ws/devel/setup.bash # only if your ROS version < Noetic
python evaluate/evaluate.py
Wait until you see the green text START planner printed out in the second terminal, then call the service to start the planner
rosservice call /start_planner "{}"
In the real robot (see more info about the robot here)
Follow the instructions here: LMF_ws to set up the software in the real robot.
Set RUN_IN_SIM = False in config.py file. Run
# conda activate oracle_env
source PATH_TO_lmf_ws/devel/setup.bash
python evaluate/evaluate.py
Wait until you see the green text START planner printed out in your terminal, then call the service to start the planner
rosservice call /start_planner "{}"