Curve源码及核心流程深度解读
由于Curve项目之前只有CurveBS,因此一些目录结构也都是只考虑了BS项目,当前我们新增了CurveFS,所以目录结构目前有点乱,后续我们会进行相应的整理优化。
.
├── bazel                       // CurveBS第三方组件bazel编译配置
├── conf                        // CurveBS配置文件示例
├── coverage                    // 覆盖率统计脚本
├── curve-ansible               // CurveBS ansible部署工具,已废弃,请使用curveadm部署
├── curve-chunkserver           // Debian环境下CurveBS各组件服务deb打包配置,下同
├── curve-mds
├── curve-monitor
├── curve-nginx
├── curve-sdk
├── curve-snapshotcloneserver
├── curve-snapshotcloneserver-nginx
├── curve-tools
├── curvefs                     // CurveFS 目录
│   ├── conf                    // CurveFS 配置文件示例
│   ├── devops                  // CurveFS ansible部署工具,已废弃,请使用curveadm部署
│   ├── docker                  // CurveFS docker镜像制作相关,Dockfile及entrypoint.sh
│   ├── proto                   // CurveFS brpc proto文件
│   ├── src                     // CurveFS 源码目录
│   │   ├── client              // CurveFS client端源码,进程为curve-fuse
│   │   ├── common              // CurveFS 通用组件源码
│   │   ├── mds                 // CurveFS MDS源码,进程为curvefs-mds
│   │   ├── metaserver          // CurveFS 源码,进程为curvefs-mdsmetasermetaserver
│   │   └── tools               // CurveFS 命令行工具源码,二进制为curvefs_tool
│   ├── test                    // CurveFS 测试代码目录
│   └── util                    // CurveFS 杂项工具及脚本
├── curvefs_python              // CurveBS python sdk
├── curvesnapshot_python        // CurveBS 快照工具python sdk
├── deploy                      // CurveBS 旧的docker方式部署脚本,已废弃
├── docker                      // CurveBS docker镜像制作相关,Dockfile及entrypoint.sh
├── docs                        // 文档目录
├── include                     // CurveBS 部分头文件目录
├── k8s                         // CurveBS 内部业务对接依赖的deb打包脚本,对外无用
├── monitor                     // CurveBS 监控配置相关
│   ├── grafana                 // grafana 面板相关配置
│   └── prometheus              // prometheus 面板相关配置
├── nbd                         // CurveBS curve-nbd组件相关代码及打包配置
├── nebd                        // CurveBS nebd-server组件相关代码及打包配置
├── proto                       // CurveBS brpc proto文件
├── robot                       // CurveBS 自动化故障测试相关代码
├── src                         // CurveBS 源码目录
│   ├── chunkserver             // CurveBS chunkserver源码
│   ├── client                  // CurveBS client源码
│   ├── common                  // CurveBS common组件源码
│   ├── fs                      // CurveBS 本地文件系统操作相关源码,注意与CurveFS的区别
│   ├── idgenerator             // CurveBS etcd批量id生成组件库
│   ├── kvstorageclient         // CurveBS etcd client库
│   ├── leader_election         // CurveBS 基于etcd的选主实现库,用来mds选主
│   ├── mds                     // CurveBS mds源码
│   ├── snapshotcloneserver     // CurveBS snapshotcloneserver源码
│   └── tools                   // CurveBS 命令行工具源码
├── test                        // CurveBS 测试代码
├── thirdparties                // 第三方组件补丁
├── tools                       // CurveBS 命令行工具代码
└── util                        // CurveBS 编译安装打包等脚本
Protocol Buffers(简称:ProtoBuf)是一种开源跨平台的序列化数据结构的协议。其对于存储资料或在网络上进行通信的程序是很有用的。这个方法包含一个接口描述语言,描述一些数据结构,并提供程序工具根据这些描述产生代码,这些代码将用来生成或解析代表这些数据结构的字节流。其官网见: https://developers.google.com/protocol-buffers
Google最初开发了Protocol Buffers用于内部使用。Protocol Buffers的设计目标是简单和性能。特别地,它被设计地与XML相比更小且更快。
Protocol Buffers在Google内被广泛用来存储和交换各种类型的结构化数据。在Google,它被当作一个RPC系统的基础,并被用于几乎所有的跨服务器通信。
Protocol Buffers和Apache Thrift和Ion等协议很相似,同时也提供了一个RPC协议栈gRPC来给上层服务使用。
protobuf提供了如下类,用以实现rpc,目前brpc也采用这套框架类,包括:
RPCChannel 抽象一种称为"通道"的概念,rpc请求的发送和接收在“通道”中进行,注意其跟socket连接的区别。rpc channel与socket连接是多对多的关系:
- 一个socket上可以有多个rpc channel,也就是说多个rpc channel可以公用同一个socket连接,例如:同一个client发往同一个server 的EndPoint(IP+端口)的多个方法的rpc调用,可以共用同一个socket连接;
- 一个rpc channel也可以使用多个socket连接,这种方式称为“socket pool”,即连接池,brpc提供了连接池的连接方式,允许在一个channel上发送请求时,使用连接池中的任意一条连接;
RPCChannel提供CallMethod方法的纯虚函数,用于RPC代码中重写以实现其方法
virtual void RpcChannel::CallMethod(
            const MethodDescriptor * method,
            RpcController * controller,
            const Message * request,
            Message * response,
            Closure * done) = 0
RPCController 是对一次PRC调用的抽象,RPCController用于管理一次rpc调用的成功与失败,失败情况下可以从RPCController中获取到错误,其提供接口如下一组接口,供RPC代码中具体实现其方法:
    Client Side method:
    virtual void RpcController::Reset() = 0    // 重置RpcController,可用于多次rpc请求复用同一个RPCController
    virtual bool RpcController::Failed() const = 0  // 判断一次rpc请求是否失败
    virtual string RpcController::ErrorText() const = 0  // 获取rpc请求的错误信息
    virtual void RpcController::StartCancel() = 0  // 取消某次rpc请求的接口

    Server Side method:
    virtual void RpcController::SetFailed(const string & reason) = 0  // 设置当前rpc请求为失败
    virtual bool RpcController::IsCanceled() const = 0  // 判断当前rpc请求是否取消
    virtual void RpcController::NotifyOnCancel(Closure * callback) = 0 // 通知rpc取消,并调用回调
- 继承自::google::protobuf::Service, 并提供 Echo 同名方法: EchoService是rpc service端的实现,这里以Echo方法为例,其定义了Echo 同名方法,需要在rpc的使用者去定义service方法,这里提供了一个默认实现,即当rpc使用者没有定位该方法时,设置本次rpc调用失败;该方法通常是由protoc程序自动生成,rpc的使用者,只需继承并重新该方法的实现即可。
    void EchoService::Echo(::google::protobuf::RpcController* controller,
        ┊  ┊  ┊  ┊  ┊  ┊const ::echo::EchoRequest*,
        ┊  ┊  ┊  ┊  ┊  ┊::echo::EchoResponse*,
        ┊  ┊  ┊  ┊  ┊  ┊::google::protobuf::Closure* done)
    {
        controller->SetFailed("Method Echo() not implemented.");
        done->Run();
    }
- 提供CallMethod方法 该方法也是由protoc程序自动生成,rpc的实现者和使用者不需要对齐进行更改;该方法的实现是将service端的CallMethod调用通过service_descriptor_ 转换为调用service具体的Echo方法;这个方法通常被RPC的实现者调用,例如当从channel上读取到message信息后,解析并通过该方法调用需要调用的rpc service函数。
    void EchoService::CallMethod(const ::google::protobuf::MethodDescriptor* method,
        ┊  ┊  ┊  ┊  ┊  ┊  ┊::google::protobuf::RpcController* controller,
        ┊  ┊  ┊  ┊  ┊  ┊  ┊const ::google::protobuf::Message* request,
        ┊  ┊  ┊  ┊  ┊  ┊  ┊::google::protobuf::Message* response,
        ┊  ┊  ┊  ┊  ┊  ┊  ┊::google::protobuf::Closure* done)
    {
      GOOGLE_DCHECK_EQ(method->service(), EchoService_descriptor_);
      switch(method->index()) {
        case 0:
        ┊ Echo(controller,
        ┊  ┊  ┊::google::protobuf::down_cast<const ::echo::EchoRequest*>(request),
        ┊  ┊  ┊::google::protobuf::down_cast< ::echo::EchoResponse*>(response),
        ┊  ┊  ┊done);
        ┊ break;
        case 1:
        ┊ Dummy(controller,
        ┊  ┊  ┊::google::protobuf::down_cast<const ::echo::DummyRequest*>(request),
        ┊  ┊  ┊::google::protobuf::down_cast< ::echo::DummyResponse*>(response),
        ┊  ┊  ┊done);
        ┊ break;
        default:
        ┊ GOOGLE_LOG(FATAL) << "Bad method index; this should never happen.";
        ┊ break;
      }
    }
以下两个方法是protocol buffer为rpc client端实现提供的方法,其提供一个stub函数,rpc的使用者通过创建一个stub,并调用stub.Echo同名方法,开始调用一次rpc。
- 提供构造函数
EchoService_Stub(::google::protobuf::RpcChannel* channel) 将rpcChannel传递给内部channel_;
- 提供 Echo 同名方法: 该方法实际上就是调用了channel的CallMethod方法
    void EchoService_Stub::Echo(::google::protobuf::RpcController* controller,
         ┊  ┊  ┊  ┊  ┊  ┊  ┊ const ::echo::EchoRequest* request,
         ┊  ┊  ┊  ┊  ┊  ┊  ┊ ::echo::EchoResponse* response,
         ┊  ┊  ┊  ┊  ┊  ┊  ┊ ::google::protobuf::Closure* done)
    {
        channel_->CallMethod(descriptor()->method(0),
         ┊  ┊  ┊  ┊  ┊  controller, request, response, done);
    }
bthread是brpc使用的M:N线程库,目的是在提高程序的并发度的同时,降低编码难度,并在核数日益增多的CPU上提供更好的scalability和cache locality。”M:N“是指M个bthread会映射至N个pthread。
ExecutionQueue的功能
brpc提供了一种高效的无锁数据结构,他是一种多生产者,单消费者的wait-free的执行队列,提供一下功能:
- 异步有序执行:执行顺序严格与提交顺序一致
- Multi Producer: MPSC 多生产者单消费者
- 支持cancel
- 支持stop
- 支持高优先级任务插队
ExecutionQueue vs Mutex的优缺点 优点:
- 角色划分比较清晰,概念理解上比较简单,实现中无需考虑锁带来的问题(比如死锁)
- 保证任务的执行顺序,mutex的唤醒顺序不能严格保证
- 各个线程都在做有用的事情,wait free
- 在繁忙、卡顿的情况下能更好的批量执行,整体上获得较高的吞吐
缺点:
- 一个流程的代码往往散落在多个地方,代码理解和维护成本高
- 为了提高并发度,一件事情往往被拆分到多个ExecutionQueue进行流水线处理,这样会导致在多核之间不停的进行切换,会付出额外的调度及同步cache的开销,尤其是竞争的临界区非常小的情况下,这些开销不能忽略。
- 同时原子的操作多个资源实现会变得复杂,使用mutex可以同时锁住多个mutex,使用ExecutionQueue需要依赖额外的dispatch queue。
- 由于所有操作都是单线程的,某个任务运行慢了就会阻塞同一个ExecutionQueue的其他操作。
- 并发控制变得复杂,ExecutionQueue可能会由于缓存的任务过多占用过多的内存。
Tradeoff:
- 如果临界区非常小,竞争又不是很激烈,优先选择使用mutex
- 需要有序执行,或者无法消除的激烈竞争,但是可以通过批量执行来提高吞吐,可以选择使用ExecutionQueue
相关接口 启动一个ExecutionQueue
template <typename T>
int execution_queue_start(
        ExecutionQueueId<T>* id,
        const ExecutionQueueOptions* options,
        int (*execute)(void* meta, TaskIterator<T>& iter),
        void* meta);
- 创建返回值是一个64位的id,相当于ExecutionQueue实例的一个弱引用,可以wait-free的在O(1)时间内定位一个ExecutionQueue。
- 必须保证meta的生命周期,在对应的ExecutionQueue真正停止前不会释放
停止一个ExecutionQueue
template <typename T>
int execution_queue_stop(ExecutionQueueId<T> id);

template <typename T>
int execution_queue_join(ExecutionQueueId<T> id);
- stop和join都可以多次调用
- 和fd的close类似,如果stop不被调用, 相应的资源会永久泄露。
提交任务
struct TaskOptions {
    TaskOptions();
    TaskOptions(bool high_priority, bool in_place_if_possible);

    // Executor would execute high-priority tasks in the FIFO order but before
    // all pending normal-priority tasks.
    // NOTE: We don't guarantee any kind of real-time as there might be tasks still
    // in process which are uninterruptible.
    //
    // Default: false
    bool high_priority;

    // If |in_place_if_possible| is true, execution_queue_execute would call
    // execute immediately instead of starting a bthread if possible
    //
    // Note: Running callbacks in place might cause the dead lock issue, you
    // should be very careful turning this flag on.
    //
    // Default: false
    bool in_place_if_possible;
};

const static TaskOptions TASK_OPTIONS_NORMAL = TaskOptions(/*high_priority=*/ false, /*in_place_if_possible=*/ false);
const static TaskOptions TASK_OPTIONS_URGENT = TaskOptions(/*high_priority=*/ true, /*in_place_if_possible=*/ false);
const static TaskOptions TASK_OPTIONS_INPLACE = TaskOptions(/*high_priority=*/ false, /*in_place_if_possible=*/ true);

// Thread-safe and Wait-free.
// Execute a task with defaut TaskOptions (normal task);
template <typename T>
int execution_queue_execute(ExecutionQueueId<T> id,
                            typename butil::add_const_reference<T>::type task);

// Thread-safe and Wait-free.
// Execute a task with options. e.g
// bthread::execution_queue_execute(queue, task, &bthread::TASK_OPTIONS_URGENT)
// If |options| is NULL, we will use default options (normal task)
// If |handle| is not NULL, we will assign it with the hanlder of this task.
template <typename T>
int execution_queue_execute(ExecutionQueueId<T> id,
                            typename butil::add_const_reference<T>::type task,
                            const TaskOptions* options);
template <typename T>
int execution_queue_execute(ExecutionQueueId<T> id,
                            typename butil::add_const_reference<T>::type task,
                            const TaskOptions* options,
                            TaskHandle* handle);
- high_priority的task之间的执行顺序也会严格按照提交顺序, 意味着你没有办法将任何任务插队到一个high priority的任务之前执行.
- 开启inplace_if_possible, 在无竞争的场景中可以省去一次线程调度和cache同步的开销. 但是可能会造成死锁或者递归层数过多(比如不停的ping-pong)的问题,开启前请确定你的代码中不存在这些问题。
取消一个已提交任务
/// [Thread safe and ABA free] Cancel the corresponding task.
// Returns:
//  -1: The task was executed or h is an invalid handle
//  0: Success
//  1: The task is executing
int execution_queue_cancel(const TaskHandle& h);
返回非0仅仅意味着ExecutionQueue已经将对应的task递给过execute, 真实的逻辑中可能将这个task缓存在另外的容器中,所以这并不意味着逻辑上的task已经结束,你需要在自己的业务上保证这一点。
bvar是多线程环境下的计数器类库,方便记录和查看用户程序中的各类数值,它利用了thread local存储减少了cache bouncing,几乎不会给程序增加性能开销,也快于竞争频繁的原子操作。brpc集成了bvar,/vars可查看所有曝光的bvar;
增加C++ bvar的方法请看快速介绍.
client端发送rpc的方式参考brpc client端文档,这里主要从源码角度分析rpc是如何发送出去的。
第一步,先需要初始化channel,首先看下Channel::Init函数做了什么,Channel::Init将调用内部的Channel::InitSingle,其作用就是插入一个socket对象到socketmap中,如下:
int Channel::InitSingle(const butil::EndPoint& server_addr_and_port,
                        const char* raw_server_address,
                        const ChannelOptions* options) {
    GlobalInitializeOrDie();  // 进行一些全局初始化工作
    if (InitChannelOptions(options) != 0) { // 初始化channel options
        return -1;
    }
	...
    if (SocketMapInsert(SocketMapKey(server_addr_and_port, sig),
                        &_server_id, ssl_ctx) != 0) { // 插入一个socket到socketmap中,并将该socketid保存到channel的_server_id中
        LOG(ERROR) << "Fail to insert into SocketMap";
        return -1;
    }
    return 0;
int SocketMap::Insert(const SocketMapKey& key, SocketId* id,
                      const std::shared_ptr<SocketSSLContext>& ssl_ctx) {
    std::unique_lock<butil::Mutex> mu(_mutex);
    SingleConnection* sc = _map.seek(key);     // 从socketmap中根据key寻找socket
    if (sc) {   // 如果已存在
        if (!sc->socket->Failed() ||
            sc->socket->health_check_interval() > 0/*HC enabled*/) {
            ++sc->ref_count;     // 增加引用计数
            *id = sc->socket->id();  // 返回socket id
            return 0;
        }
        ...
    }
    SocketId tmp_id;
    SocketOptions opt;
    opt.remote_side = key.peer.addr;
    opt.initial_ssl_ctx = ssl_ctx;
    if (_options.socket_creator->CreateSocket(opt, &tmp_id) != 0) {  // 创建一个新的socket
        PLOG(FATAL) << "Fail to create socket to " << key.peer;
        return -1;
    }
    SocketUniquePtr ptr;
    if (Socket::Address(tmp_id, &ptr) != 0) {
        LOG(FATAL) << "Fail to address SocketId=" << tmp_id;
        return -1;
    }
    SingleConnection new_sc = { 1, ptr.release(), 0 };
    _map[key] = new_sc;    // 将新的socket插入socketmap
    *id = tmp_id;  // 返回新的socketid
	...
	return 0;
其中SingleConnection如下,仅仅包含一个socket对象的指针和一个引用计数
    struct SingleConnection {
        int ref_count;
        Socket* socket;
        int64_t no_ref_us;
    };
其中比较重要的是socket的创建过程,会将创建好的socket插入了event_dispatcher中,以等待rpc回复事件的到来,从而触发rpc回复事件回调,这一关键代码如下:
int Socket::Create(const SocketOptions& options, SocketId* id) {
    butil::ResourceId<Socket> slot;
    Socket* const m = butil::get_resource(&slot, Forbidden());  // 从资源池中获取一个socket对象
    ...
    m->_on_edge_triggered_events = options.on_edge_triggered_events;  // 赋值该socket的事件触发回调函数
    ...
    m->_this_id = MakeSocketId(
            VersionOfVRef(m->_versioned_ref.fetch_add(
                    1, butil::memory_order_release)), slot); // 创建socket id
    ...
    m->_ssl_state = (options.initial_ssl_ctx == NULL ? SSL_OFF : SSL_UNKNOWN);  // 默认SSL_OFF
    ...
    if (m->ResetFileDescriptor(options.fd) != 0) { // 将当前socket对象注册到event dispatcher
       ...
       return -1;
    }
    *id = m->_this_id;
    return 0;
int Socket::ResetFileDescriptor(int fd) {
...
    if (_on_edge_triggered_events) {
        if (GetGlobalEventDispatcher(fd).AddConsumer(id(), fd) != 0) { // 如果存在事件触发回调函数,则注册到EventDispatcher中
            PLOG(ERROR) << "Fail to add SocketId=" << id()
                        << " into EventDispatcher";
            _fd.store(-1, butil::memory_order_release);
            return -1;
        }
    }
    return 0;
接下来,就是开始RPC调用,前面protobuf对rpc支持这一节,讲了rpc调用的入口是Channel::CallMethod函数,如下。CallMethod函数一开始将method、response、done保存到cntl中,然后序列化request到cntl的_request_buf中,并启动rpc超时相关的timer,并设置超时回调函数,最后调用cntl的IssueRPC接口发送RPC。如何是同步rpc,则还需要等待rpc完成,join cid。
void Channel::CallMethod(const google::protobuf::MethodDescriptor* method,
                         google::protobuf::RpcController* controller_base,
                         const google::protobuf::Message* request,
                         google::protobuf::Message* response,
                         google::protobuf::Closure* done) {
    const int64_t start_send_real_us = butil::gettimeofday_us();
    Controller* cntl = static_cast<Controller*>(controller_base);
    cntl->OnRPCBegin(start_send_real_us);
	...
	const CallId correlation_id = cntl->call_id();   // 获取callid
    const int rc = bthread_id_lock_and_reset_range(
                    correlation_id, NULL, 2 + cntl->max_retry());
	...
	cntl->_response = response;  // 保存response到cntl中
    cntl->_done = done;          // 保存done到cntl中
    cntl->_pack_request = _pack_request;
    cntl->_method = method;      // 保存method到cntl中
    cntl->_auth = _options.auth;
	if (SingleServer()) {            // 默认SingleServer
        cntl->_single_server_id = _server_id;  // 保存_server_id到cntl中
        cntl->_remote_side = _server_address;
    }
	...
	_serialize_request(&cntl->_request_buf, cntl, request);  // 序列化request到cntl的_request_buf中
	...
    if (cntl->backup_request_ms() >= 0 &&
        (cntl->backup_request_ms() < cntl->timeout_ms() ||
         cntl->timeout_ms() < 0)) {
		...
        const int rc = bthread_timer_add(
            &cntl->_timeout_id,
            butil::microseconds_to_timespec(
                cntl->backup_request_ms() * 1000L + start_send_real_us),
            HandleBackupRequest, (void*)correlation_id.value); // 启动BackupRequest timer和注册超时回调函数
		...
    } else if (cntl->timeout_ms() >= 0) {
		...
        const int rc = bthread_timer_add(
            &cntl->_timeout_id,
            butil::microseconds_to_timespec(cntl->_deadline_us),
            HandleTimeout, (void*)correlation_id.value); // 启动rpc请求timer和注册超时回调函数
		...
    } else {
	    ...
    }

    cntl->IssueRPC(start_send_real_us);   // 调用cntl发送RPC
    if (done == NULL) {     // 是同步rpc
        Join(correlation_id);  // 等待rpc完成
		...
        cntl->OnRPCEnd(butil::gettimeofday_us());
    }
}
Controller完成对rpc请求的进一步打包,并在对应的socket的write接口完成对请求数据的写出。其中需要注意的是socket的来源,默认使用单连接,其socket id来源于_single_server_id,而该_single_server_id在上文Channel::CallMethod中来源于Channel的_server_id,而这个_server_id又来源于前文中Channel::InitSingle中的SocketMapInsert(SocketMapKey(server_addr_and_port, sig), &_server_id, ssl_ctx) 这一句,因此,我们可以看到此处最终用来发送的socket,就是在Channel::InitSingle创建的socket对象。
void Controller::IssueRPC(int64_t start_realtime_us) {
    const CallId cid = current_id();
	...
	SocketUniquePtr tmp_sock;
    if (SingleServer()) { // 默认SingleServer
	    const int rc = Socket::Address(_single_server_id, &tmp_sock);  // 获取socket
	    ...
	    _current_call.peer_id = _single_server_id;
	} else {
		...
	}
	...
    if (_connection_type == CONNECTION_TYPE_SINGLE ||
        _stream_creator != NULL) { // 如果是单连接(默认是长连接)
        _current_call.sending_sock.reset(tmp_sock.release());  // 设置当前调用的sending_sock
        _current_call.sending_sock->set_preferred_index(_preferred_index);
    } else {
        int rc = 0;
        if (_connection_type == CONNECTION_TYPE_POOLED) { // 如果是连接池
            rc = tmp_sock->GetPooledSocket(&_current_call.sending_sock); // 从连接池中获取一个socket, 设置到当前调用的sending_sock
        } else if (_connection_type == CONNECTION_TYPE_SHORT) { // 如果是短连接
            rc = tmp_sock->GetShortSocket(&_current_call.sending_sock); // 获取短连接的socket, 设置到当前调用的sending_sock
        } else {
		...
        }
	    _current_call.sending_sock->set_preferred_index(_preferred_index);
		...
	}
	...
	butil::IOBuf packet;
    SocketMessage* user_packet = NULL;
    _pack_request(&packet, &user_packet, cid.value, _method, this,
                  _request_buf, using_auth);  // 将_request_buf和相关元数据进一步打包请求到user_packet
    SocketMessagePtr<> user_packet_guard(user_packet);
    ...
    Socket::WriteOptions wopt;
    wopt.id_wait = cid;
    wopt.abstime = pabstime;
    wopt.pipelined_count = _pipelined_count;
    wopt.with_auth = has_flag(FLAGS_REQUEST_WITH_AUTH);
    wopt.ignore_eovercrowded = has_flag(FLAGS_IGNORE_EOVERCROWDED);
    int rc;
    size_t packet_size = 0;
    if (user_packet_guard) {
        if (span) {
            packet_size = user_packet_guard->EstimatedByteSize();
        }
        rc = _current_call.sending_sock->Write(user_packet_guard, &wopt);  // 调用socket的write接口,写出请求数据到socket
    } else {
        packet_size = packet.size();
        rc = _current_call.sending_sock->Write(&packet, &wopt);
    }
	...
	CHECK_EQ(0, bthread_id_unlock(cid));  // 释放对cid的锁定
}
再来看下socket对象是如何写出请求的,该代码在Socket::Write函数中,如下
int Socket::Write(SocketMessagePtr<>& msg, const WriteOptions* options_in) {
	...
    WriteRequest* req = butil::get_object<WriteRequest>();
	...
	req->next = WriteRequest::UNCONNECTED;
    req->id_wait = opt.id_wait;
    req->set_pipelined_count_and_user_message(opt.pipelined_count, msg.release(), opt.with_auth);
    return StartWrite(req, opt);
}
Socket::Write函数中对象池中拿取一个WriteRequest对象,然后调用StartWrite接口实际执行写出,StartWrite采用原子的交换的方式,将当前request插入链表中,并根据prev_head是否存在区分当前是否有线程正在写入,如果当前有线程正在写入,则将请求交给当前正在写的线程处理,直接返回0. 如果当前没有请求正在写,则会调用ConnectIfNot,发起连接。ConnectIfNot有3种返回值,如果小于0,则表示连接错误,报错;如果ret == 1, 表示ConnectIfNot发起了连接,并将在keepwrite中异步处理写请求,此处直接返回;否则,其余的ret == 0的部分,表示之前已经连接过,则在本线程中原地写出。最后判断当前请求是否写完,以及是否有更多的请求,如何没有写完,则启动KeepWrite线程异步地继续在后台写。 这个过程比较复杂,主要是考虑到了cpu的内存本地性,使得当前请求尽量在本线程中原地写出,减少了cpu cache的同步开销,提高了rpc的性能。
int Socket::StartWrite(WriteRequest* req, const WriteOptions& opt) {
    WriteRequest* const prev_head =
        _write_head.exchange(req, butil::memory_order_release); // 采用原子的交换prev_head的方式,将当前request插入到链表中
    if (prev_head != NULL) { // 如果prev_head存在,说明当前有人在写,将其连接到当前req的next,并返回0,该请求会被当前正在写的线程所处理
	    req->next = prev_head;
        return 0;
    }
    ...
    req->next = NULL;  // 当前没有人在写,于是本线程开始执行写请求
    int ret = ConnectIfNot(opt.abstime, req);  // 如何没有connet,则发起连接,并在ConnectIfNot执行写
    if (ret < 0) {
	... // 连接失败,报错
    } else if (ret == 1) {
	    return 0;   // 返回成功,ret == 1 时,表示发起了连接,并在keepwrite中处理写请求了,直接返回
	} // 其余的ret == 0的部分,表示之前已经连接过,则在本线程中原地写出
	...
	if (_conn) {
        butil::IOBuf* data_arr[1] = { &req->data };
        nw = _conn->CutMessageIntoFileDescriptor(fd(), data_arr, 1);
    } else {
        nw = req->data.cut_into_file_descriptor(fd());
    }
    ...
    if (IsWriteComplete(req, true, NULL)) {  // 判断当前请求是否写完,以及是否有更多的请求
        ReturnSuccessfulWriteRequest(req);
        return 0;
    }
KEEPWRITE_IN_BACKGROUND:
	...
	if (bthread_start_background(&th, &BTHREAD_ATTR_NORMAL,
                                 KeepWrite, req) != 0) {  // 未写完,则启动KeepWrite线程异步地继续在后台写
        LOG(FATAL) << "Fail to start KeepWrite";
        KeepWrite(req);
    }
    return 0;
	...
其中,ConnectIfNot如下,可以看到如果是本次连接的请求,则会在KeepWriteIfConnected的回调中异步执行写请求。
int Socket::ConnectIfNot(const timespec* abstime, WriteRequest* req) {
    if (_fd.load(butil::memory_order_consume) >= 0) {
       return 0; // fd存在,说明已连接,返回0
    }

    // Have to hold a reference for `req'
    SocketUniquePtr s;
    ReAddress(&s);
    req->socket = s.get();
    if (_conn) {
        if (_conn->Connect(this, abstime, KeepWriteIfConnected, req) < 0) {
            return -1;
        }
    } else {
        if (Connect(abstime, KeepWriteIfConnected, req) < 0) {
            return -1;
        }
    }
    s.release();
    return 1; // 本次连接的,返回1
}
前文讲到,在channel::Init函数中会调用SocketMap::Insert函数,插入socket到socketmap中,并注册到event_dispatcher中,创建socket过程中最终注册的回调函数是InputMessenger::OnNewMessages,其代码如下:
server端的起点是server::start函数,启动brpc server,开始监听,其内部调用Server::StartInternal,其逻辑如下,主要是调用tcp_listen监听对应的ip和端口,并调用BuildAcceptor创建Acceptor对象,启动StartAccept,开始接收client端过来的连接。
int Server::StartInternal(const butil::ip_t& ip,
                          const PortRange& port_range,
                          const ServerOptions *opt) {
    ...
    if (InitializeOnce() != 0) {  // 全局初始化
        LOG(ERROR) << "Fail to initialize Server[" << version() << ']';
        return -1;
    }
    ...
    if (_options.has_builtin_services &&
        _builtin_service_count <= 0 &&
        AddBuiltinServices() != 0) { // 添加内建的service
        LOG(ERROR) << "Fail to add builtin services";
        return -1;
    }
	...
	_listen_addr.ip = ip;
    for (int port = port_range.min_port; port <= port_range.max_port; ++port) {
        _listen_addr.port = port;
        butil::fd_guard sockfd(tcp_listen(_listen_addr));  // 监听fd
        if (sockfd < 0) {
            if (port != port_range.max_port) { // 继续监听下一个端口
                continue;
            }
            if (port_range.min_port != port_range.max_port) {  // 尝试完所有端口,监听失败
                LOG(ERROR) << "Fail to listen " << ip
                           << ":[" << port_range.min_port << '-'
                           << port_range.max_port << ']';
            } else {
                LOG(ERROR) << "Fail to listen " << _listen_addr;
            }
            return -1;
        }
		...
        if (_am == NULL) {
            _am = BuildAcceptor();  // 创建Acceptor
            if (NULL == _am) {
                LOG(ERROR) << "Fail to build acceptor";
                return -1;
            }
        }
        _status = RUNNING;
		...
        if (_am->StartAccept(sockfd, _options.idle_timeout_sec,
                             _default_ssl_ctx) != 0) {  // 启动acceptor接收连接
            LOG(ERROR) << "Fail to start acceptor";
            return -1;
        }
        sockfd.release();
        break; // stop trying
    }
	...
    return 0;
}
接下来看StartAcceptor做了什么,主要是调用Socket::Create函数创建socket,并注册连接事件回调函数OnNewConnections。这个Socket::Create正是前面client端发送章节的同一个的函数,其作用就是创建一个socket并注册到event_dispatcher, 并注册socket的事件回调函数OnNewConnections,这个函数这里不再重复展开。
int Acceptor::StartAccept(int listened_fd, int idle_timeout_sec,
                          const std::shared_ptr<SocketSSLContext>& ssl_ctx) {
	...
    if (_status == UNINITIALIZED) {
        if (Initialize() != 0) {
            LOG(FATAL) << "Fail to initialize Acceptor";
            return -1;
        }
        _status = READY;
    }
	...
    if (idle_timeout_sec > 0) {
        if (bthread_start_background(&_close_idle_tid, NULL,
                                     CloseIdleConnections, this) != 0) { // 启动后台线程,关闭闲置的连接
            LOG(FATAL) << "Fail to start bthread";
            return -1;
        }
    }
    ...
    SocketOptions options;
    options.fd = listened_fd;
    options.user = this;
    options.on_edge_triggered_events = OnNewConnections;  // 连接事件的回调函数
    if (Socket::Create(options, &_acception_id) != 0) {   // 创建socket并监听事件,注册上面的回调函数
        // Close-idle-socket thread will be stopped inside destructor
        LOG(FATAL) << "Fail to create _acception_id";
        return -1;
    }

    _listened_fd = listened_fd;
    _status = RUNNING;
    return 0;
}
接下来看下OnNewConnections,其内部调用了OnNewConnectionsUntilEAGAIN
void Acceptor::OnNewConnections(Socket* acception) {
    int progress = Socket::PROGRESS_INIT; //     static const int PROGRESS_INIT = 1; 初始值为-1
    do {
        OnNewConnectionsUntilEAGAIN(acception);
        if (acception->Failed()) {
            return;
        }
    } while (acception->MoreReadEvents(&progress));
}
OnNewConnectionsUntilEAGAIN顾名思义,就是调用accept系统调用,接受连接,并调用Socket::Create创建socket对象,并注册事件回调函数InputMessenger::OnNewMessages,这个Socket::Create前文已经讲过。
void Acceptor::OnNewConnectionsUntilEAGAIN(Socket* acception) {
    while (1) {
        struct sockaddr in_addr;
        socklen_t in_len = sizeof(in_addr);
        butil::fd_guard in_fd(accept(acception->fd(), &in_addr, &in_len));  // 调用accept接受连接
        if (in_fd < 0) {
            if (errno == EAGAIN) {  // 接受连接直到EAGAIN错误
                return;
            }
            ...
            continue;
        }
		...
        SocketId socket_id;
        SocketOptions options;
        options.keytable_pool = am->_keytable_pool;
        options.fd = in_fd;
        options.remote_side = butil::EndPoint(*(sockaddr_in*)&in_addr);
        options.user = acception->user();
        options.on_edge_triggered_events = InputMessenger::OnNewMessages;  // 新连接的socket的事件处理回调函数
        options.initial_ssl_ctx = am->_ssl_ctx;
        if (Socket::Create(options, &socket_id) != 0) { // 此处socket对象会注册到event dispatcher中
            LOG(ERROR) << "Fail to create Socket";
            continue;
        }
        in_fd.release(); // transfer ownership to socket_id
        SocketUniquePtr sock;
        if (Socket::AddressFailedAsWell(socket_id, &sock) >= 0) {
            bool is_running = true;
            {
                BAIDU_SCOPED_LOCK(am->_map_mutex);
                is_running = (am->status() == RUNNING);
                am->_socket_map.insert(socket_id, ConnectStatistics());  // 先加收到事件的socket加入到socketmap中,后续可能要发送response消息
            }
            ...
        }
    }
}
如果不了解raft,建议先阅读raft论文。这里主要简单介绍braft的工程实践。
braft的基本I/O线程模型如下:

braft主要有三个队列:
- 第一个队列是Braft node中的apply_queue,用来将任务转发给log manager,并放入投票箱。
- 第二个队列是log manager中的disk_queue,用于持久化log entry
- 第三个队列是有限状态机的队列,在braft内部状态发生变化时会构造任务丢进这个队列,然后再去调用用户的函数。
在了解线程模型之后,我们将学习两部分,一是braft的使用,二是braft对raft算法几个重要流程的实现:leader选举、日志复制、快照、配置变更
请参考:https://github.com/baidu/braft/blob/master/docs/cn/server.md
选举超时
在调用raft node的init初始化节点的时候,会初始化四个定时器。
CHECK_EQ(0, _vote_timer.init(this, options.election_timeout_ms));
CHECK_EQ(0, _election_timer.init(this, options.election_timeout_ms));
CHECK_EQ(0, _stepdown_timer.init(this, options.election_timeout_ms));
CHECK_EQ(0, _snapshot_timer.init(this, options.snapshot_interval_s * 1000));
vote_timer是成为Candidate后的超时时间,如果超过这个时间没赢得选举的话会(重新prevote/vote) election_timer是选举超时的定时器,定时器被触发后, stepdown_timer是leader的一个定时器,如果在一段时间内leader和大多数副本都失去了联系,那么会主动退步为follower snapshot_timer是所有节点都有的定时器,被触发后每个副本会独立打快照
具体的代码可以看node.cpp中对应的的handle_xxx_timeout()。
prevote
超时节点发起prevote, 它会遍历所有peer,向它们发送preVote Rpc请求,回调为 OnPreVoteRPCDone,其 run 函数会调用 NodeImpl::handle_pre_vote_response。
void NodeImpl::pre_vote(std::unique_lock<raft_mutex_t>* lck) {
    ...

    for (std::set<PeerId>::const_iterator iter = peers.begin(); iter != peers.end(); ++iter) {
        if (*iter == _server_id) {
            continue;
        }
        ...

        OnPreVoteRPCDone* done = new OnPreVoteRPCDone(*iter, _current_term, this);

        ...

        RaftService_Stub stub(&channel);
        stub.pre_vote(&done->cntl, &done->request, &done->response, done);
    }

    ...
}
收到prevote rpc的节点处理请求:比较request里面的term和自己的当前term。如果对方的term比自己的小,则设置response的granted为false。否则比较两者的日志,对方的日志较新才会granted。
void RaftServiceImpl::pre_vote(google::protobuf::RpcController* cntl_base,
                          const RequestVoteRequest* request,
                          RequestVoteResponse* response,
                          google::protobuf::Closure* done) {
    ...

    // TODO: should return butil::Status
    int rc = node->handle_pre_vote_request(request, response);
    ...
}
int NodeImpl::handle_pre_vote_request(const RequestVoteRequest* request,
                                      RequestVoteResponse* response) {
    ...

    bool granted = false;
    do {
        if (request->term() < _current_term) {
            // ignore older term
            ...
            break;
        }
        ...
        LogId last_log_id = _log_manager->last_log_id(true);
        ...

        granted = (LogId(request->last_log_index(), request->last_log_term())
                        >= last_log_id);
        ...

    } while (0);

    ...
    return 0;
}
发起prevote的node在收到RPC响应后会调用回调,也就是NodeImpl::handle_pre_vote_response。检查response中的term,如果大于自身的term,则会通过 step_down 退位成 follower 状态,并设置 term 值。如果response.granted为true,说明收到选票,更新_pre_vote_ctx,_pre_vote_ctx中存储着当前的投票情况,它的成员_quorum初始化为peer数量的一半加一,每次被grant就会减一,_pre_vote_ctx.granted是检查_quorum是否小于等于0。_pre_vote_ctx.granted为true,说明获得了大多数的选票,调用elect_self开始选举。
void NodeImpl::handle_pre_vote_response(const PeerId& peer_id, const int64_t term,
                                            const RequestVoteResponse& response) {
    ...
    if (response.term() > _current_term) {
        ...
        step_down(response.term(), false, status);
        return;
    }
    ...
    if (response.granted()) {
        _pre_vote_ctx.grant(peer_id);
        if (_pre_vote_ctx.granted()) {
            elect_self(&lck);
        }
    }
}
进行选举
在 elect_self 函数中
void NodeImpl::elect_self(std::unique_lock<raft_mutex_t>* lck) {
    LOG(INFO) << "node " << _group_id << ":" << _server_id
              << " term " << _current_term << " start vote and grant vote self";
    ...
    // 1. 如果当前是follower状态,则停止_election_timer
    if (_state == STATE_FOLLOWER) {
        BRAFT_VLOG << "node " << _group_id << ":" << _server_id
                   << " term " << _current_term << " stop election_timer";
        _election_timer.stop();
    }
    // 2. 将leader设置为空
    ...
    reset_leader_id(empty_id, status);

    // 3. 把状态设置为candidate,_current_term加一,然后给自己投票
    _state = STATE_CANDIDATE;
    _current_term++;
    _voted_id = _server_id;

    // 4. 启动_vote_timer,该定时器负责选举阶段的超时
    ...
    _vote_timer.start();
    _vote_ctx.init(_conf.conf, _conf.stable() ? NULL : &_conf.old_conf);

    // 5. 获取最新的log
    ...
    const LogId last_log_id = _log_manager->last_log_id(true);
    ...

    // 6. prevote类似,获取所有peer,并向其他节点发起RequestVoteRPC。不过它调用的是RaftService的request_vote函数,回调是OnRequestVoteRPCDone
    for (std::set<PeerId>::const_iterator
        iter = peers.begin(); iter != peers.end(); ++iter) {
        ...
        OnRequestVoteRPCDone* done = new OnRequestVoteRPCDone(*iter, _current_term, this);
        ...
        RaftService_Stub stub(&channel);
        stub.request_vote(&done->cntl, &done->request, &done->response, done);
    }

    // 7. 给自己投票,并检查投票结果:
    _meta_storage->set_term_and_votedfor(_current_term, _server_id);
    _vote_ctx.grant(_server_id);
    if (_vote_ctx.granted()) {
        become_leader();
    }
}
收到RequestVoteRPC的节点处理请求:
int NodeImpl::handle_request_vote_request(const RequestVoteRequest* request,
                                          RequestVoteResponse* response) {
    ...

    do {
        // 1. 如果request中的term大于自己的term,则回退到follower状态并重启election_timeout
        if (request->term() >= _current_term) {
            ...
            if (request->term() > _current_term) {
                ...
                step_down(request->term(), false, status);
            }
        } else {
            ...
        }

        // 2. 获取最新log_id:
        ...
        LogId last_log_id = _log_manager->last_log_id(true);
        ...

        // 3. 如果request中的log比自身的新,而且当前节点还没投票的话,就回退到Follower并给candidate投票。

        bool log_is_ok = (LogId(request->last_log_index(), request->last_log_term())
                          >= last_log_id);
        if (log_is_ok && _voted_id.is_empty()) {
            ...
            step_down(request->term(), false, status);
            _voted_id = candidate_id;
            _meta_storage->set_votedfor(candidate_id);
        }
    } while (0);
    ...
}
发起rpc的节点收到response后处理请求:
void NodeImpl::handle_request_vote_response(const PeerId& peer_id, const int64_t term,
                                            const RequestVoteResponse& response) {
    BAIDU_SCOPED_LOCK(_mutex);

    // 1. 首先要确认当前状态是不是candidate(因为可能选举已经成功,节点已经成为leader了)
    if (_state != STATE_CANDIDATE) {
        ...
    }
    // 2. 然后检查term是不是等于当前term(有可能收到来自上一次rpc的response)
    if (term != _current_term) {
        ...
    }
    // 3. 如果收到的term大于自身的term,则回退到follower状态。
    if (response.term() > _current_term) {
        ...
        step_down(response.term(), false, status);
        return;
    }

    // 4. 最后检查response的granted,设置 _vote_ctx的granted,然后检查当前是否赢得选举(策略和prevote一样),如果赢了,就调用become_leader
    if (response.granted()) {
        _vote_ctx.grant(peer_id);
        if (_vote_ctx.granted()) {
            become_leader();
        }
    }
}
如果vote_timer被触发的时候节点还处于candidate状态(也就是没选出leader)的话,就会调用NodeImpl::handle_vote_timeout, 如果设置了raft_step_down_when_vote_timedout,就回退到follower开始新的prevote,否则就直接开始新的选举。
提交任务
当客户端请求过来的时候,服务端需要将request转化为log(IOBuf),并构造一个braft::Task,将Task的data设置为log,并将回调函数done构造Closure传给Task的done,当函数最终成功执行或者失败的时候会执行回调。下面是example里面的counter的一个接口:
    // Impelements Service methods
    void fetch_add(const FetchAddRequest* request,
                   CounterResponse* response,
                   google::protobuf::Closure* done) {
        ...
        braft::Task task;
        task.data = &log;
        task.done = new FetchAddClosure(this, request, response,
                                        done_guard.release());
        ...
        return _node->apply(task);
    }
将任务提交到_apply_queue, 它会把task和回调一起放到_apply_queue去执行
void NodeImpl::apply(const Task& task) {
    LogEntry* entry = new LogEntry;
    ...
    if (_apply_queue->execute(m, &bthread::TASK_OPTIONS_INPLACE, NULL) != 0) {
        ...
    }
}
调用NodeImpl::apply(LogEntryAndClosure tasks[], size_t size)执行每个任务
void NodeImpl::apply(LogEntryAndClosure tasks[], size_t size) {
    ...
    // 1. 检查当前的状态是否为leader,以及task的expected_term是否等于当前term等。一旦出错就会调用task的done返回给用户
    if (_state != STATE_LEADER || reject_new_user_logs) {
        ...
    }

    // 2. 遍历所有task
    for (size_t i = 0; i < size; ++i) {
        ...
        // 2.1 把task里面的entry放到entries数组里面
        entries.push_back(tasks[i].entry);
        ...
        // 2.2 并将task放到ballot的pending_task用于投票
        _ballot_box->append_pending_task(_conf.conf,
                                         _conf.stable() ? NULL : &_conf.old_conf,
                                         tasks[i].done);
    }

    // 3. append_entries
    _log_manager->append_entries(&entries,
                               new LeaderStableClosure(
                                        NodeId(_group_id, _server_id),
                                        entries.size(),
                                        _ballot_box));
    // 4. 更新当前配置
    _log_manager->check_and_set_configuration(&_conf);
}
void LogManager::append_entries(
            std::vector<LogEntry*> *entries, StableClosure* done) {
    ...
    // 1. 分配index, 并缓存到内存中
    if (!entries->empty()) {
        done->_first_log_index = entries->front()->id.index;
        _logs_in_memory.insert(_logs_in_memory.end(), entries->begin(), entries->end());
    }
    ...

    // 2. 提交任务到_disk_queue
    int ret = bthread::execution_queue_execute(_disk_queue, done);
    ...
}
发送空entries
当一个节点当选为leader之后,会为所有其他节点创建一个replicator,然后调用Replicator::start,该函数最后会调用Replicator::_send_empty_entries向其他节点发送空的AppendEntries RPC。follower收到leader的append entries之后,会去比较request中的log id和term。最后会调用回调_on_rpc_returned。
void Replicator::_on_rpc_returned(ReplicatorId id, brpc::Controller* cntl,
                     AppendEntriesRequest* request,
                     AppendEntriesResponse* response,
                     int64_t rpc_send_time) {
    // 1. 进行一系列的检查
    ...
    // 2. 正式发起_send_entries
    r->_send_entries();
    return;
}
发送用户数据entry
void Replicator::_send_entries() {
    // 1. 调用_fill_common_fields填充request
    ...
    if (_fill_common_fields(request.get(), _next_index - 1, false) != 0) {
       // 1.1 填充失败,意味着当前index为0,需要安装快照
        _reset_next_index();
        return _install_snapshot();
    }

    // 2. 获取entry并添加到request中
    for (int i = 0; i < max_entries_size; ++i) {
        ...
        request->add_entries()->Swap(&em);
    }

    // 3. 没有entry, 等待新任务到来
    if (request->entries_size() == 0) {
        ...
        return _wait_more_entries();
    }
    ...

    // 4. 发送entries
    stub.append_entries(cntl.release(), request.release(),
                        response.release(), done);
    _wait_more_entries();
}
follower收到entry
前面的步骤和收到空的entries是一样的,然后构造一个FollowerStableClosure传给LogManager::append_entries试图追加entries。
void LogManager::append_entries(
            std::vector<LogEntry*> *entries, StableClosure* done) {
    ...
    // 1. 检查并解决冲突
    if (!entries->empty() && check_and_resolve_conflict(entries, done) != 0) {
        ...
    }

    // 2. 插入缓存
    for (size_t i = 0; i < entries->size(); ++i) {
            ...
            _config_manager->add(conf_entry);
            ...
    }
    ...

    // 3. 提交到_disk_queue持久化
    int ret = bthread::execution_queue_execute(_disk_queue, done);
    ...
}
持久化成功后调用done->Run(),也就是FollowerStableClosure::Run(),该函数最后会检查一下term来判断leader有没有变化,如果一切正常,则调用BallotBox::set_last_committed_indexcommit index更新commit index 如果更新成功,就调用FsmCaller的on_committed,on_committed将构造一个任务提交到execution_queue里面,最后调用FSMCaller::do_committed去调用用户传入的自定义的StateMachine::on_apply函数执行状态机的操作。
leader收到follower响应 当follower返回RPC后会调用_on_rpc_returned,前面的部分和空的rpc一样,但是有一个分支不一样,它会调用BallotBox::commit_at去投票并决定是否更新commit index
请参考:https://github.com/baidu/braft/blob/master/docs/cn/server.md#%E5%AE%9E%E7%8E%B0snapshot
braft提供了一系列API用来控制复制主或者具体节点, 可以选择在程序里面调用API或者使用braft_cli来给节点发远程控制命令。请参考:https://github.com/baidu/braft/blob/master/docs/cn/cli.md
修改成员
void NodeImpl::ConfigurationCtx::next_stage() {
    CHECK(is_busy());
    switch (_stage) {
    case STAGE_CATCHING_UP:
        ...
    case STAGE_JOINT:
        ...
    case STAGE_STABLE:
        ...
    case STAGE_NONE:
        ...
    }
}
leader切换
请参考:https://github.com/baidu/braft/blob/master/docs/cn/server.md#%E8%BD%AC%E7%A7%BBleader
和修改成员一样,transfer_leader接口也会先获取leader,然后向CliService发起transfer_leader请求。收到的服务器获取对应的node,然后调用NodeImpl::transfer_leadership_to
int NodeImpl::transfer_leadership_to(const PeerId& peer) {
    ...
    // 1. 没有指定peer,就从replicator_group找出next_index最大的follower作为目标。
    if (peer_id == ANY_PEER) {
        ...
        if (_replicator_group.find_the_next_candidate(&peer_id, _conf) != 0) {
            return -1;
        }
    }

    ...
    // 2. 发起leader切换
    const int rc = _replicator_group.transfer_leadership_to(peer_id, last_log_index);
    ...
}
如果一切正常,获取当前的last_log_index然后调用ReplicatorGroup::transfer_leadership_to向follower发起RaftService::timeout_now请求
int Replicator::_transfer_leadership(int64_t log_index) {
   ...
        _send_timeout_now(true, false);
   ...
}
follower收到timeout_now请求后调用NodeImpl::handle_timeout_now_request,在response里面将term设置为_current_term + 1,然后调用elect_self发起选举。 leader成功发送timeout_now请求后,将_state设置为transferring,调用状态机的on_leader_stop,然后开启_transfer_timer定时器,如果超时还没有transfer成功,就调用NodeImpl::handle_transfer_timeout停止transfer,并将_state设置回leader.
Curve由于历史遗留问题,一部分模块使用了自己编写的配置管理模块来管理配置项和配置文件,另一部分则使用了gflags进行管理,二者的区别主要是,gflags支持通过进程命令行、宏定义(支持默认值)、配置文件导入等方式来初始化配置项的值;而curve自己实现的配置管理模块则只支持从配置文件导入,并且不支持代码中设置配置项的默认值(如果不在配置文件中显式配置则会导致进程fatal退出)。如后续新增配置项,请优先使用gflags管理方式。
关于gflags的使用说明,官方文档和brpc的使用说明文档都可以作为参考,gflags在Curve项目的使用方式与brpc的方式没有区别。
- https://github.com/apache/incubator-brpc/blob/master/docs/cn/flags.md
- https://gflags.github.io/gflags/
下面我们举一个Curve项目中实际的例子来了解gflags的基本用法:
// src\chunkserver\chunkserver.cpp
DEFINE_string(conf, "ChunkServer.conf", "Path of configuration file");
conf.SetConfigPath(FLAGS_conf.c_str());
如上代码所示,分别定义了配置项FLAGS_conf及默认值,以及用来指定配置文件路径。
另外在进程启动时,也可以在启动参数中指定该配置项的值(配置文件中也可以指定,但是本身这个配置项的目的就是指定配置文件路径,所以不太适合放在配置文件中),例如:
./curve-chunkserver -conf=/etc/curve/chunkserver.conf
如果同一个配置项在启动参数中同时指定多次,则以最后一次的值为准;优先级顺序为:启动参数 > 配置文件 > 代码宏定义默认值。
另外brpc还支持通过dummy http服务导出配置项的值(通过代码配合,还能支持在线修改配置项的值),举例如下:
// curvefs\src\client\common\config.cpp
namespace brpc {
DECLARE_int32(defer_close_second);
DECLARE_int32(health_check_interval);
}

void SetBrpcOpt(Configuration *conf) {
    curve::common::GflagsLoadValueFromConfIfCmdNotSet dummy;
    dummy.Load(conf, "defer_close_second", "rpc.defer.close.second",
               &brpc::FLAGS_defer_close_second);
    dummy.Load(conf, "health_check_interval", "rpc.healthCheckIntervalSec",
               &brpc::FLAGS_health_check_interval);
}
自有配置管理模块位于src\common\configuration.cpp,头文件为configuration.h,该模块实现了如下几项功能:
- 加载并解析配置文件:Configuration::LoadConfig()
- 按配置项的类型(int、bool、string等)读取配置文件中配置项的值:Configuration::GetIntValue(const std::string &key, int *out)
- 按配置项的类型(int、bool、string等)读取配置文件中配置项的值,并且强制要求配置文件中配置该项,如读取不到则进程fatal退出:Configuration::GetValueFatalIfFail
- 打印配置项
- 保存配置项到文件
- 暴露配置项给metric展示
该模块实现的比较简单轻量,功能也略少,建议新增的配置项优先采用gflags方式。
这里举两个例子,CurveBS和CurveFS各一个。
这里又分为客户端异步和同步两种情况,例如AIO和非AIO的读写接口,非AIO比较简单,这里仅以AIO模式举例。
为了管理异步IO,客户端首先需要创建线程池来发送IO,其次还要处理服务端返回的响应,并且期望二者可以尽量并发执行,但对于IO操作来说又要求保序(异常重试场景下请求保序存在问题,后续版本会进行修复),这些逻辑是通过如下模块实现的: Curve实现了通用的模块来负责线程池的创建,请求队列的初始化和绑定到线程池:
src\common\concurrent\task_thread_pool.h:TaskThreadPool::start()      // 启动线程池
src\common\concurrent\task_thread_pool.h:TaskThreadPool::queue_       // 线程池请求队列
src\common\concurrent\task_thread_pool.h:TaskThreadPool::Enqueue()    // 请求队列入队
src\common\concurrent\task_thread_pool.h:TaskThreadPool::Take()       // 请求队列出队
src\common\concurrent\task_thread_pool.h:TaskThreadPool::ThreadFunc() // 处理队列IO请求任务
// src\client\iomanager4file.cpp
bool IOManager4File::Initialize(const std::string& filename,
                                const IOOption& ioOpt,
                                MDSClient* mdsclient) {
    ......
    // 启动io线程池
    ret = taskPool_.Start(ioopt_.taskThreadOpt.isolationTaskThreadPoolSize,
                          ioopt_.taskThreadOpt.isolationTaskQueueCapacity);
    if (ret != 0) {
        LOG(ERROR) << "task thread pool start failed!";
        return false;
}
请求队列是一个task queue,每个请求都是std::function类型的函数指针,在出队后使用函数指针调用这个函数,即可完成实际的IO请求任务或者回调任务。上面提到IO请求需要保序,这里是通过Enqueue()的加锁和队列的唯一性来保证的(FIFO)。
// src\client\iomanager4file.cpp
int IOManager4File::AioRead(CurveAioContext* ctx, MDSClient* mdsclient,
                            UserDataType dataType) {
    ......
    inflightCntl_.IncremInflightNum();
    auto task = [this, ctx, mdsclient, temp]() {
        temp->StartAioRead(ctx, mdsclient, this->GetFileInfo(),
                           throttle_.get());
    };

    taskPool_.Enqueue(task);  // 入队IO请求,之后异步的在TaskThreadPool::ThreadFunc()处理
    return LIBCURVE_ERROR::OK;
}
上述示例是file层面的IO请求处理逻辑,其次还涉及到IO的跨chunk的拆分和合并,这部分逻辑也是异步的,具体是在如下几个模块中实现(实现逻辑与taskPool逻辑类似,相关代码不再详细分析,IO流程分析章节会有描述):
src\client\request_scheduler.cpp:RequestScheduler::Run()
    --> src\common\concurrent\thread_pool.cpp:ThreadPool::Start()       // 启动线程池
src\client\request_scheduler.h:RequestScheduler::queue_                 // 线程池队列
src\client\request_scheduler.cpp:RequestScheduler::ScheduleRequest()    // 请求入队
src\client\request_scheduler.cpp:RequestScheduler::Process()            // 请求出队/处理
// 初始化线程池和队列
bool IOManager4File::Initialize(const std::string& filename,
                                const IOOption& ioOpt,
                                MDSClient* mdsclient) {
    ......
    scheduler_ = new (std::nothrow) RequestScheduler();
    if (scheduler_ == nullptr) {
        return false;
    }

    int ret = scheduler_->Init(ioopt_.reqSchdulerOpt, &mc_, fileMetric_);
    if (-1 == ret) {
        LOG(ERROR) << "Init scheduler_ failed!";
        delete scheduler_;
        scheduler_ = nullptr;
        return false;
    }
    scheduler_->Run();  // 启动线程池
此类异步模型可简化为:IO请求 --> 队列 <-- 线程池,实现了IO请求入队之后即可进入后台异步处理,不影响其他IO请求的处理。
上述异步操作的回调过程: 根据chunk拆分后的IO回调,包括回调及其上下文参数的初始化(通常是以XxContext命名的class,回调则是以XxClosure命名的class),是在
// src\client\splitor.cpp
int Splitor::SingleChunkIO2ChunkRequests(
    IOTracker* iotracker, MetaCache* metaCache,
    std::vector<RequestContext*>* targetlist, const ChunkIDInfo& idinfo,
    butil::IOBuf* data, off_t offset, uint64_t length, uint64_t seq) {
    ......
    // 这里会初始化ctx(RequestContext),并调用ctx->Init()初始化done_(RequestClosure)
    RequestContext* newreqNode = RequestContext::NewInitedRequestContext();
    ......
    newreqNode->done_->SetIOTracker(iotracker);  // 设置RequestClosure的特殊参数,调用回调的时候会用到
拆分出来的IO请求,被封装成RequestContext对象之后,入队到请求队列,异步线程从队列里取出后再封装一次(如AioRead会被CopysetClient::ReadChunk封装成RPC task),之后执行task将请求发送到server端处理(RequestSender::ReadChunk,发送给chunkserver),这里client-server通信是通过brpc的service实现的,请求返回后客户端会使用brpc的ClosureGuard机制,调用done的Run()函数来执行具体回调处理流程,因此RequestClosure::Run()会被调用。
// src\client\request_closure.cpp
void RequestClosure::Run() {
    ......
    tracker_->HandleResponse(reqCtx_);
}

// src\client\io_tracker.cpp
void IOTracker::HandleResponse(RequestContext* reqctx) {
    ......
    if (1 == reqcount_.fetch_sub(1, std::memory_order_acq_rel)) {
        Done();    // 如果所有拆分的IO请求都已经返回,则调用更上层的回调函数
    }
}
Done()会继续调用用户传入的回调函数,也即用户AIO请求的完成通知:aioctx_->cb(aioctx_)。
服务端收到客户端请求之后,一般都要经过比较长的处理流程,因此需要异步处理,防止一个IO请求阻塞后续的请求,另外也是为了提升处理IO请求的并发度,提升服务端的QPS能力。等IO请求在服务端处理完毕后再把处理结果返回给客户端(这部分逻辑通常作为回调封装起来,方便在各个模块之间传递不会丢失)。仍然以AioRead请求举例:
// src\chunkserver\chunk_service.cpp
void ChunkServiceImpl::ReadChunk(RpcController *controller,
                                 const ChunkRequest *request,
                                 ChunkResponse *response,
                                 Closure *done) {  // brpc自带的回调,由框架创建,递给服务回调,包含了调用服务回调后的后续动作,包括检查response正确性,序列化,打包,发送等逻辑。
    ChunkServiceClosure* closure = // 自定义的回调,目前主要用于metric统计信息更新
        new (std::nothrow) ChunkServiceClosure(inflightThrottle_,
                                               request,
                                               response,
                                               done);
    ......
    std::shared_ptr<ReadChunkRequest> req =    // 封装请求,转到对应的模块处理
        std::make_shared<ReadChunkRequest>(nodePtr,
                                           chunkServiceOptions_.cloneManager,
                                           controller,
                                           request,
                                           response,
                                           doneGuard.release());
    req->Process();  // 这里还是同步处理阶段
}

// src\chunkserver\op_request.cpp
void ReadChunkRequest::Process() {
    brpc::ClosureGuard doneGuard(done_);    // 仍然是brpc自带的回调
    ......
    auto task = std::bind(&ReadChunkRequest::OnApply,  // 封装为异步task
                              thisPtr,
                              node_->GetAppliedIndex(),
                              doneGuard.release());
        concurrentApplyModule_->Push(  // task入队列,逻辑与client端类似
            request_->chunkid(), request_->optype(), task);
        return;
    }
    ......
}

// src\chunkserver\concurrent_apply\concurrent_apply.cpp
void ConcurrentApplyModule::Run(ThreadPoolType type, int index) {
    cond_.Signal();
    while (start_) {
        switch (type) {
        case ThreadPoolType::READ:
            rapplyMap_[index]->tq.Pop()();    // task出队及执行
            break;
        ......
        }
    }
}
task被执行时,会从存储引擎层读取客户端请求所需的数据,填充到response的attachment中,设置响应码,通过brpc的ClosureGuard回调完成请求的返回。
// src\chunkserver\op_request.cpp
void ReadChunkRequest::OnApply(uint64_t index,
                               ::google::protobuf::Closure *done) {
    // 先清除response中的status,以保证CheckForward后的判断的正确性
    response_->clear_status();
    ......
        // 如果是ReadChunk请求还需要从本地读取数据
        if (request_->optype() == CHUNK_OP_TYPE::CHUNK_OP_READ) {
            ReadChunk();    // 从引擎层读取数据
        }
    .....
    brpc::ClosureGuard doneGuard(done);  // brpc自带回调,本函数结束后执行,完成brpc请求的响应
    auto maxIndex =
        (index > node_->GetAppliedIndex() ? index : node_->GetAppliedIndex());
    response_->set_appliedindex(maxIndex);
}

// src\chunkserver\op_request.cpp
void ReadChunkRequest::ReadChunk() {
    char *readBuffer = nullptr;
    size_t size = request_->size();

    readBuffer = new(std::nothrow)char[size];
    ......
    auto ret = datastore_->ReadChunk(request_->chunkid(),  // 从引擎层读取数据
                                     request_->sn(),
                                     readBuffer,
                                     request_->offset(),
                                     size);
    butil::IOBuf wrapper;
    wrapper.append_user_data(readBuffer, size, ReadBufferDeleter);
    if (CSErrorCode::Success == ret) {
        cntl_->response_attachment().append(wrapper);    // 把读到的数据放入response的attachment
        response_->set_status(CHUNK_OP_STATUS::CHUNK_OP_STATUS_SUCCESS);    // 设置响应码
    }
    ......
}
这里也以客户端、服务端异步模式分别举例。
首先是FUSE层,这部分也是通过注册各类posix接口的操作回调(或者叫hook钩子函数更合适)方式来完成用户请求处理的,这部分是在curvefs\src\client\main.c中注册的(调用fuse_session_new注册curve_ll_oper),这里不详细分析,后面有专门的小节对FUSE进行分析。
客户端大部分操作都是同步的,我们以InodeWrapper::FlushAttrAsync为例举例说明客户端异步及回调实现:
// curvefs\src\client\inode_wrapper.cpp
void InodeWrapper::FlushAttrAsync() {    // 该函数的调用方不再详述,可自行查找
    if (dirty_) {
        LockSyncingInode();
        auto *done = new UpdateInodeAsyncDone(shared_from_this());  // 创建回调,第一层
        metaClient_->UpdateInodeAsync(inode_, done);
        dirty_ = false;
    }
}

// curvefs\src\client\rpcclient\metaserver_client.cpp
void MetaServerClientImpl::UpdateInodeAsync(
    const Inode &inode, MetaServerClientDone *done,
    InodeOpenStatusChange statusChange) {
    auto task = AsyncRPCTask {
        ......
        auto *rpcDone = new UpdateInodeRpcDone(taskExecutorDone,  // RPC回调(第三层)
            metaserverClientMetric_);

        curvefs::metaserver::MetaServerService_Stub stub(channel);
        stub.UpdateInode(cntl, &request, &rpcDone->response, rpcDone);  // 异步发送RPC请求到server端
        return MetaStatusCode::OK;
    };

    auto taskCtx = std::make_shared<TaskContext>(    // 创建RPC task,以便异步处理
        MetaServerOpType::UpdateInode, task, inode.fsid(), inode.inodeid());
    auto excutor = std::make_shared<UpdateInodeExcutor>(opt_,
        metaCache_, channelManager_, taskCtx);
    TaskExecutorDone *taskDone = new TaskExecutorDone(    // 第二层回调
        excutor, done);
    excutor->DoAsyncRPCTask(taskDone);   // 异步执行task
}
上述第一、二、三层回调是从注册顺序来排序的,实际回调执行顺序正好与之相反,回调都是调用的类的Run()函数,这里也不再细述。brpc的同步和异步访问的区别可以参考这篇文档:client访问模式
以UpdateInode操作为例说明:
// curvefs\src\metaserver\metaserver_service.cpp
void MetaServerServiceImpl::UpdateInode(
    ::google::protobuf::RpcController* controller,
    const ::curvefs::metaserver::UpdateInodeRequest* request,
    ::curvefs::metaserver::UpdateInodeResponse* response,
    ::google::protobuf::Closure* done) {  // brpc Closure回调,用来封装、返回响应
    OperatorHelper helper(copysetNodeManager_, inflightThrottle_);
    helper.operator()<UpdateInodeOperator>(controller, request, response, done,
                                           request->poolid(),
                                           request->copysetid());
}

// curvefs\src\metaserver\metaserver_service.cpp
struct OperatorHelper {
    OperatorHelper(CopysetNodeManager* manager, InflightThrottle* throttle)
        : manager(manager), throttle(throttle) {}

    template <typename OperatorT, typename RequestT, typename ResponseT>
    void operator()(google::protobuf::RpcController* cntl,
                    const RequestT* request, ResponseT* response,
                    google::protobuf::Closure* done, PoolId poolId,
                    CopysetId copysetId) {
        ......
        brpc::ClosureGuard doneGuard(done);     // brpc回调
        ......
        auto* op = new OperatorT(    // 封装op,包括回调
            node, cntl, request, response,
            new MetaServiceClosure(throttle, doneGuard.release()));  // 第一层回调,其中封装了brpc回调
        timer.stop();
        g_oprequest_in_service_before_propose_latency << timer.u_elapsed();
        op->Propose();    // 处理请求
    }
    ......
};

// curvefs\src\metaserver\copyset\meta_operator.cpp
void MetaOperator::Propose() {
    brpc::ClosureGuard doneGuard(done_);    // brpc回调,正常是不执行的
    ......
    // propose to raft
    if (ProposeTask()) {
        doneGuard.release();    // 正常情况下主动释放掉,不会在函数退出时调用回调
    }
}

bool MetaOperator::ProposeTask() {
    timerPropose.start();
    butil::IOBuf log;
    bool success = RaftLogCodec::Encode(GetOperatorType(), request_, &log);
    ......
    braft::Task task;    // 创建raft task
    task.data = &log;
    task.done = new MetaOperatorClosure(this);  // 第二层回调,在raft apply持久化完成后在on_apply里会被调用Run()方法
    task.expected_term = node_->LeaderTerm();

    node_->Propose(task);    // CopysetNode::Propose提交给raft层持久化,异步执行apply完成后会调用CopysetNode::on_apply回调

    return true;
}

// curvefs\src\metaserver\copyset\copyset_node.cpp
void CopysetNode::on_apply(braft::Iterator& iter) {
    for (; iter.valid(); iter.next()) {
        braft::AsyncClosureGuard doneGuard(iter.done());     // 第二层回调,函数结束后执行

        if (iter.done()) {
            MetaOperatorClosure* metaClosure =
                dynamic_cast<MetaOperatorClosure*>(iter.done());
        ......
            auto task =    // 创建异步task
                std::bind(&MetaOperator::OnApply, metaClosure->GetOperator(),
                          iter.index(), doneGuard.release(),
                          TimeUtility::GetTimeofDayUs());
            applyQueue_->Push(metaClosure->GetOperator()->HashCode(),    // 入队列等待线程池处理
                              std::move(task));
       ......
    }
}
applyQueue_的相关实现在curvefs\src\metaserver\copyset\apply_queue.h,源文件为curvefs\src\metaserver\copyset\apply_queue.cpp,实现了一个线程池和队列的绑定,入队的task最终会被ApplyQueue::TaskWorker::Work()调用:
void ApplyQueue::TaskWorker::Work() {
    while (running.load(std::memory_order_relaxed)) {
        tasks.Pop()();    // 实际调用的是MetaOperator::OnApply(多态实际指向UpdateInodeOperator::OnApply)
    }    // UpdateInodeOperator::OnApply里会调用MetaStoreImpl::UpdateInode执行实际的inode更新操作
}

// curvefs\src\metaserver\copyset\meta_operator_closure.cpp
void MetaOperatorClosure::Run() {    // 第二层回调执行过程
    std::unique_ptr<MetaOperatorClosure> selfGuard(this);
    std::unique_ptr<MetaOperator> operatorGuard(operator_);
    brpc::ClosureGuard doneGuard(operator_->Closure());    // 调用第一层回调MetaServiceClosure::Run()
    ......
}

// curvefs\src\metaserver\metaservice_closure.h
class MetaServiceClosure : public google::protobuf::Closure {
 public:
    ......
    void Run() override {
        std::unique_ptr<MetaServiceClosure> selfGuard(this);
        rpcDone_->Run();    // 调用brpc回调,返回response给客户端
        throttle_->Decrement();
    }
    ......
}
1)client端元数据缓存
首先client端有专门的缓存管理模块,实现了chunkinfo、copysetinfo等信息的缓存查询、维护和更新等操作:
// src\client\metacache.h
class MetaCache {
 public:
    using LogicPoolCopysetID = uint64_t;
    using ChunkInfoMap = std::unordered_map<ChunkID, ChunkIDInfo>;
    using CopysetInfoMap =
        std::unordered_map<LogicPoolCopysetID, CopysetInfo<ChunkServerID>>;
    using ChunkIndexInfoMap = std::unordered_map<ChunkIndex, ChunkIDInfo>;
    ......
 private:
    MDSClient *mdsclient_;
    MetaCacheOption metacacheopt_;

    // chunkindex到chunkidinfo的映射表
    CURVE_CACHELINE_ALIGNMENT ChunkIndexInfoMap chunkindex2idMap_;

    CURVE_CACHELINE_ALIGNMENT RWLock rwlock4Segments_;
    CURVE_CACHELINE_ALIGNMENT std::unordered_map<SegmentIndex, FileSegment>
        segments_;  // NOLINT

    // logicalpoolid和copysetid到copysetinfo的映射表
    CURVE_CACHELINE_ALIGNMENT CopysetInfoMap lpcsid2CopsetInfoMap_;

    // chunkid到chunkidinfo的映射表
    CURVE_CACHELINE_ALIGNMENT ChunkInfoMap chunkid2chunkInfoMap_;

    // 三个读写锁分别保护上述三个映射表
    CURVE_CACHELINE_ALIGNMENT RWLock rwlock4chunkInfoMap_;
    CURVE_CACHELINE_ALIGNMENT RWLock rwlock4ChunkInfo_;
    CURVE_CACHELINE_ALIGNMENT RWLock rwlock4CopysetInfo_;

    // chunkserverCopysetIDMap_存放当前chunkserver到copyset的映射
    // 当rpc closure设置SetChunkserverUnstable时,会设置该chunkserver
    // 的所有copyset处于leaderMayChange状态,后续copyset需要判断该值来看
    // 是否需要刷新leader

    // chunkserverid到copyset的映射
    std::unordered_map<ChunkServerID, std::set<CopysetIDInfo>>
        chunkserverCopysetIDMap_;  // NOLINT
    // 读写锁保护unStableCSMap
    CURVE_CACHELINE_ALIGNMENT RWLock rwlock4CSCopysetIDMap_;

    // 当前文件信息
    FInfo fileInfo_;
    UnstableHelper unstableHelper_;
}
缓存在IO流程里用到,主要是在对文件也就是卷以及chunk进行IO操作的过程中使用,减少对MDS的RPC请求次数,降低IO时延,其初始化过程如下:
// src\client\iomanager4chunk.h
class IOManager4Chunk : public IOManager {
    ......
 private:
    // metacache存储当前snapshot client元数据信息
    MetaCache  mc_;
    ......
}
// src\client\iomanager4chunk.cpp
bool IOManager4Chunk::Initialize(IOOption ioOpt, MDSClient* mdsclient) {
    ioopt_ = ioOpt;
    mc_.Init(ioopt_.metaCacheOpt, mdsclient);
    Splitor::Init(ioopt_.ioSplitOpt);
    scheduler_ = new (std::nothrow) RequestScheduler();
    ......
    scheduler_->Run();
    return true;
}

// src\client\iomanager4file.h
class IOManager4File : public IOManager {
    ......
 private:
    // metacache存储当前文件的所有元数据信息
    MetaCache mc_;
    ......
}
// src\client\iomanager4file.cpp
bool IOManager4File::Initialize(const std::string& filename,
                                const IOOption& ioOpt,
                                MDSClient* mdsclient) {
    ......
    mc_.Init(ioopt_.metaCacheOpt, mdsclient);
    ......
    scheduler_ = new (std::nothrow) RequestScheduler();
    if (scheduler_ == nullptr) {
        return false;
    }

    int ret = scheduler_->Init(ioopt_.reqSchdulerOpt, &mc_, fileMetric_);
    ......
    scheduler_->Run();
    ......
}
接下来我们举例说明下缓存的具体使用过程:
// src\client\request_scheduler.cpp
int RequestScheduler::Init(const RequestScheduleOption& reqSchdulerOpt,
                           MetaCache* metaCache,
                           FileMetric* fm) {
    ......
    // metaCache是iomanager4chunk或iomanager4file相关函数中初始化的,传递给RequestScheduler
    rc = client_.Init(metaCache, reqschopt_.ioSenderOpt, this, fm);    // CopysetClient
    ......
}
// src\client\copyset_client.cpp
bool CopysetClient::FetchLeader(LogicPoolID lpid, CopysetID cpid,
    ChunkServerID* leaderid, butil::EndPoint* leaderaddr) {
    // 1. 先去当前metacache中拉取leader信息
    if (0 == metaCache_->GetLeader(lpid, cpid, leaderid,
        leaderaddr, false, fileMetric_)) {  // 这里是查缓存
        return true;
    }

    // 2. 如果metacache中leader信息拉取失败,就发送RPC请求获取新leader信息
    if (-1 == metaCache_->GetLeader(lpid, cpid, leaderid,
        leaderaddr, true, fileMetric_)) {    // 这里是通过RPC请求更新leader信息,并更新到缓存中
    ......
}
GetLeader函数内容不再分析,注释写的已经比较清楚了:
// src\client\metacache.h
    /**
     * sender发送数据的时候需要知道对应的leader然后发送给对应的chunkserver
     * 如果get不到的时候,外围设置refresh为true,然后向chunkserver端拉取最新的
     * server信息,然后更新metacache。
     * 如果当前copyset的leaderMayChange置位的时候,即使refresh为false,也需要
     * 先去拉取新的leader信息,才能继续下发IO.
     * @param: lpid逻辑池id
     * @param: cpid是copysetid
     * @param: serverId对应chunkserver的id信息,是出参
     * @param: serverAddr为serverid对应的ip信息
     * @param: refresh,如果get不到的时候,外围设置refresh为true,
     *         然后向chunkserver端拉取最新的
     * @param: fm用于统计metric
     * @param: 成功返回0, 否则返回-1
     */
    virtual int GetLeader(LogicPoolID logicPoolId, CopysetID copysetId,
                          ChunkServerID *serverId, butil::EndPoint *serverAddr,
                          bool refresh = false, FileMetric *fm = nullptr);
2)server端缓存
server端具体使用的地方是引擎层的chunkfile信息缓存(严格意义来说其实不算缓存,只是chunkid到chunkfile操作指针的map):
// src\chunkserver\datastore\chunkserver_datastore.h
class CSMetaCache {
    ......
    CSChunkFilePtr Get(ChunkID id) {
        ReadLockGuard readGuard(rwLock_);
        if (chunkMap_.find(id) == chunkMap_.end()) {
            return nullptr;
        }
        return chunkMap_[id];
    }

    CSChunkFilePtr Set(ChunkID id, CSChunkFilePtr chunkFile) {
        WriteLockGuard writeGuard(rwLock_);
       // When two write requests are concurrently created to create a chunk
       // file, return the first set chunkFile
        if (chunkMap_.find(id) == chunkMap_.end()) {
            chunkMap_[id] = chunkFile;
        }
        return chunkMap_[id];
    }
    ......
 private:
    RWLock      rwLock_;
    ChunkMap    chunkMap_;
};
初始化过程:
// src\chunkserver\datastore\chunkserver_datastore.h
class CSDataStore {
    ......
 private:
    ......
    // the mapping of chunkid->chunkfile
    CSMetaCache metaCache_;
    ......
}

// src\chunkserver\datastore\chunkserver_datastore.cpp
bool CSDataStore::Initialize() {
    ......
    // If loaded before, reload here
    metaCache_.Clear();
    ......
}
用法示例:
// src\chunkserver\datastore\chunkserver_datastore.cpp
CSErrorCode CSDataStore::loadChunkFile(ChunkID id) {
    // If the chunk file has not been loaded yet, load it into metaCache
    if (metaCache_.Get(id) == nullptr) {    // 查询缓存
        ......
        CSChunkFilePtr chunkFilePtr =
            std::make_shared<CSChunkFile>(lfs_,
                                          chunkFilePool_,
                                          options);
        CSErrorCode errorCode = chunkFilePtr->Open(false);
        if (errorCode != CSErrorCode::Success)
            return errorCode;
        metaCache_.Set(id, chunkFilePtr);    // 更新缓存
    }
    return CSErrorCode::Success;
}
3)mds端缓存
mds端缓存了fileinfo、segmentinfo等信息,实际是一个简单的kv存储,使用的是LRU缓存淘汰算法,其初始化过程如下:
// src\mds\server\mds.cpp
void MDS::InitNameServerStorage(int mdsCacheCount) {
    // init LRUCache
    auto cache = std::make_shared<LRUCache>(mdsCacheCount,
        std::make_shared<CacheMetrics>("mds_nameserver_cache_metric"));
    LOG(INFO) << "init LRUCache success.";
    // init NameServerStorage
    nameServerStorage_ = std::make_shared<NameServerStorageImp>(etcdClient_,
                                                                cache);
    LOG(INFO) << "init NameServerStorage success.";
}
// src\mds\nameserver2\namespace_storage.cpp
NameServerStorageImp::NameServerStorageImp(
    std::shared_ptr<KVStorageClient> client, std::shared_ptr<Cache> cache)
    : client_(client), cache_(cache), discardMetric_() {}
LRU缓存实现是在src\common\lru_cache.h:LRUCache中,这里不再详细分析,可以自行查看相关代码。
使用示例:
// src\mds\nameserver2\namespace_storage.cpp
StoreStatus NameServerStorageImp::GetFile(InodeID parentid,
                                          const std::string &filename,
                                          FileInfo *fileInfo) {
    std::string storeKey;
    if (GetStoreKey(FileType::INODE_PAGEFILE, parentid, filename, &storeKey)  // 根据文件类型等信息编码key
        != StoreStatus::OK) {
        LOG(ERROR) << "get store key failed, filename = " << filename;
        return StoreStatus::InternalError;
    }

    int errCode = EtcdErrCode::EtcdOK;
    std::string out;
    if (!cache_->Get(storeKey, &out)) {    // 通过key查缓存,没有命中
        errCode = client_->Get(storeKey, &out);    // 从etcd查询

        if (errCode == EtcdErrCode::EtcdOK) {
            cache_->Put(storeKey, out);    // 文件信息保存到缓存
        }
    }
    ......
}
1)client端
client端缓存了inode和dentry信息,缓存可以极大地减少对metaserver的查询次数,节省大量的RPC耗时,从而显著降低IO时延,以inode缓存举例(LRU缓存实现是在src\common\lru_cache.h:LRUCache中,这里不再详细分析,可以自行查看相关代码。):
// curvefs\src\client\fuse_client.h
class FuseClient {
 public:
    FuseClient()
      : mdsClient_(std::make_shared<MdsClientImpl>()),
        metaClient_(std::make_shared<MetaServerClientImpl>()),
        inodeManager_(std::make_shared<InodeCacheManagerImpl>(metaClient_)),  // 初始化缓存管理模块
        dentryManager_(std::make_shared<DentryCacheManagerImpl>(metaClient_)),
        dirBuf_(std::make_shared<DirBuffer>()),
        fsInfo_(nullptr),
        mdsBase_(nullptr),
        isStop_(true),
        init_(false),
        enableSumInDir_(false) {}
    ......
}

// curvefs\src\client\inode_cache_manager.h
class InodeCacheManagerImpl : public InodeCacheManager {
 public:
    InodeCacheManagerImpl()
      : metaClient_(std::make_shared<MetaServerClientImpl>()),
        iCache_(nullptr) {}

    explicit InodeCacheManagerImpl(
        const std::shared_ptr<MetaServerClient> &metaClient)
      : metaClient_(metaClient),
        iCache_(nullptr) {}

    CURVEFS_ERROR Init(uint64_t cacheSize, bool enableCacheMetrics) override {  // 初始化cache管理对象
        if (enableCacheMetrics) {
            iCache_ = std::make_shared<
                LRUCache<uint64_t, std::shared_ptr<InodeWrapper>>>(cacheSize,
                    std::make_shared<CacheMetrics>("icache"));
        } else {
            iCache_ = std::make_shared<
                LRUCache<uint64_t, std::shared_ptr<InodeWrapper>>>(cacheSize);
        }
        return CURVEFS_ERROR::OK;
    }

    CURVEFS_ERROR GetInode(uint64_t inodeid,
        std::shared_ptr<InodeWrapper> &out) override;    // NOLINT
    ......
}

// curvefs\src\client\fuse_client.cpp
CURVEFS_ERROR FuseClient::Init(const FuseClientOption &option) {
    ......
    CURVEFS_ERROR ret3 = inodeManager_->Init(option.iCacheLruSize, option.enableICacheMetrics);  // 初始化cache空间
    if (ret3 != CURVEFS_ERROR::OK) {
        return ret3;
    }
    ret3 = dentryManager_->Init(option.dCacheLruSize, option.enableDCacheMetrics);
    return ret3;
}
用法示例:
// curvefs\src\client\fuse_client.cpp
CURVEFS_ERROR FuseClient::FuseOpLookup(fuse_req_t req, fuse_ino_t parent,
                                       const char *name, fuse_entry_param *e) {
    ......
    Dentry dentry;
    CURVEFS_ERROR ret = dentryManager_->GetDentry(parent, name, &dentry);  // 查询缓存的dentry
    ......
    std::shared_ptr<InodeWrapper> inodeWrapper;
    fuse_ino_t ino = dentry.inodeid();
    ret = inodeManager_->GetInode(ino, inodeWrapper);  // 查询缓存的inode
    ......
}
// curvefs\src\client\inode_cache_manager.cpp
CURVEFS_ERROR InodeCacheManagerImpl::GetInode(uint64_t inodeid,
    std::shared_ptr<InodeWrapper> &out) {
    NameLockGuard lock(nameLock_, std::to_string(inodeid));
    bool ok = iCache_->Get(inodeid, &out);    // 查缓存的inode信息
    ......
    Inode inode;
    MetaStatusCode ret2 = metaClient_->GetInode(fsId_, inodeid, &inode);    // 如果缓存未命中,查询metaserver中的inode信息
    ......
    out = std::make_shared<InodeWrapper>(
        std::move(inode), metaClient_);

    std::shared_ptr<InodeWrapper> eliminatedOne;
    bool eliminated = iCache_->Put(inodeid, out, &eliminatedOne);  // 将inode信息保存到缓存中,返回淘汰的inode
    if (eliminated) {
        eliminatedOne->FlushAsync();
    }
    return CURVEFS_ERROR::OK;
}
2)metaserver端
metaserver端实现了元数据内存全缓存,或者说当前是把所有元数据信息加载到内存中进行管理,并通过raft来实现持久化,当客户端发起修改元数据请求时,metaserver先写入raft的wal,之后再on_apply的时候更新内存中的元数据信息,然后定期通过raft snapshot来dump内存中的数据到硬盘,故障或者宕机时从snapshot恢复到内存中,之后再从其他节点上同步最新数据。基于rocksdb的元数据存储引擎目前在开发中,2.2版本将会支持。 这里以全内存元数据存储方式介绍元数据缓存模式(内存版本元数据引擎具体实现的类是MemoryInodeStorage,实际上已经不能算是缓存了,就是内存版本的元数据存储引擎),其初始化过程为:
// curvefs\src\metaserver\copyset\copyset_node.cpp
int CopysetNode::on_snapshot_load(braft::SnapshotReader* reader) {
    ......
    // load metadata
    metaStore_->Clear();
    std::string metadataFile = reader->get_path() + "/" + kMetaDataFilename;
    if (options_.localFileSystem->FileExists(metadataFile)) {
        if (!metaStore_->Load(metadataFile)) {    // 加载元数据到内存
    ......
}
// curvefs\src\metaserver\metastore.cpp
bool MetaStoreImpl::Load(const std::string& pathname) {
    ......
    // Load from raft snap file to memory
    WriteLockGuard writeLockGuard(rwLock_);
    auto succ = LoadFromFile(pathname, callback);
    if (!succ) {
        partitionMap_.clear();
        LOG(ERROR) << "Load metadata failed.";
    }
    ......
}
// curvefs\src\metaserver\storage.h
template<typename Callback>
inline bool LoadFromFile(const std::string& pathname,
                         Callback callback) {
    auto dumpfile = DumpFile(pathname);
    if (dumpfile.Open() != DUMPFILE_ERROR::OK) {
        return false;
    }

    auto defer = absl::MakeCleanup([&dumpfile]() { dumpfile.Close(); });

    auto iter = dumpfile.Load();  // 加载dump的metadata文件,并遍历解析
    for (iter->SeekToFirst(); iter->Valid(); iter->Next()) {
        auto key = iter->Key();
        auto value = iter->Value();

        auto ret = Extract(key);
        auto entryType = ret.first;
        auto partitionId = ret.second;
        switch (entryType) {
            CASE_TYPE_CALLBACK(INODE, Inode);
            CASE_TYPE_CALLBACK(DENTRY, Dentry);
            CASE_TYPE_CALLBACK(PARTITION, PartitionInfo);
            CASE_TYPE_CALLBACK(PENDING_TX, PrepareRenameTxRequest);
            // TODO(Wine93): add pending tx
            default:
                LOG(ERROR) << "Unknown entry type, key = " << key;
                return false;
        }
    }

    return dumpfile.GetLoadStatus() == DUMPFILE_LOAD_STATUS::COMPLETE;
}
// 以inode的加载为例
// curvefs\src\metaserver\metastore.cpp
bool MetaStoreImpl::LoadInode(uint32_t partitionId, void* entry) {
    auto partition = GetPartition(partitionId);
    ......
    auto inode = reinterpret_cast<Inode*>(entry);
    MetaStatusCode rc = partition->InsertInode(*inode);
    ......
}
// curvefs\src\metaserver\partition.cpp
MetaStatusCode Partition::InsertInode(const Inode& inode) {
    if (!IsInodeBelongs(inode.fsid(), inode.inodeid())) {
        return MetaStatusCode::PARTITION_ID_MISSMATCH;
    }

    return inodeManager_->InsertInode(inode);
}
// curvefs\src\metaserver\inode_manager.cpp
MetaStatusCode InodeManager::InsertInode(const Inode &inode) {
    ......
    // 2. insert inode
    MetaStatusCode ret = inodeStorage_->Insert(inode);  // inodeStorage_就是MemoryInodeStorage,是在Partition对象构造的时候创建的
    ......
}
3)mds端
暂未使用缓存
CurveBS:
CurveBS目前并没有实现专门数据缓存模块或者数据结构,所有数据都是从客户端接收上层应用读写请求后,直接转发到chunkserver端,进行引擎层的读写操作,唯一能算作数据缓存的就是内核的pagecache了,因为CurveBS的存储引擎是基于ext4文件系统的,所以对chunkfile的读写实质上是ext4文件系统的IO读写操作,pagecache天然生效,这块也不再细述,感兴趣的话可以自行查阅相关资料。
CurveFS:
这里重点讲一下CurveFS FUSE client端的数据内存缓存机制。
针对S3存储后端的数据缓存分为4个层级:FsCacheManager --> FileCacheManager --> ChunkCacheManager --> DataCache,通过inodeId找到file,通过index找到chunk,然后通过offset~len找到是否有合适的datacache或者new datacache,前3个层级都是保存的下一个层级的指针,只有datacache才分配或管理实际的缓存buffer。相关class定义在curvefs\src\client\s3\client_s3_cache_manager.h中。
相关流程的处理逻辑为:
1)Write流程
- 加锁,根据inode和fsid找到对应的fileCacheManager,如果没有则生成新的fileCacheManager,解锁,调用fileCacheManager的Write函数(S3ClientAdaptorImpl::Write --> FsCacheManager::FindOrCreateFileCacheManager --> FileCacheManager::Write)
- 根据请求offset,计算出对应的chunk index和chunkPos;将请求拆分成多个chunk的WriteChunk调用(FileCacheManager::Write)
- 考虑到同一个client同一个文件同时只能一个线程进行文件写,所以在Write函数中加写锁(FileCacheManager::WriteChunk)
- 在WriteChunk内,根据index找到对应的ChunkCacheManager,根据请求的chunkPos和len从dataCacheMap中找到一个可写的DataCache:
- 4.1) chunkPos~len的区间和当前DataCache有交集(包括刚好是边界的情况)即可写。
- 4.2) 同时计算后续的多个DataCache是否和chunkPos~len有交集,如果有则一并获取(FileCacheManager::WriteChunk)
- 如果有可写的DataCache,则调用Write接口将数据合并到DataCache中;如果没有可写的DataCache则new一个,加入到ChunkCacheManager的Map中(FileCacheManager::WriteChunk)
- 完成后返回成功
2)Read流程
- 加锁,根据inode和fsid找到对应的fileCacheManager,如果没有则生成新的fileCacheManager,解锁,调用fileCacheManager的Read函数(S3ClientAdaptorImpl::Read --> FsCacheManager::FindOrCreateFileCacheManager --> FileCacheManager::Read)
- 根据请求offset,计算出对应的chunk index和chunkPos。将请求拆分成多个chunk的ReadChunk调用(FileCacheManager::Read)
- 在ReadChunk内,根据index找到对应的ChunkCacheManager,根据请求的chunkPos和len从dataCacheMap中找到一个可读的DataCache,由于DataCache都是最小粒度为blockSize的缓存,所以存在3种情况:要读的chunkPos~len的区间全部被缓存,部分被缓存,以及无缓存。将缓存部分buf直接copy到接口的buf指针对应的偏移位置,无缓存或者说未命中的部分保存到4. ReadRequest vector(FileCacheManager::ReadChunk)
- 遍历未命中的ReadRequest vector,根据每个request的offset找到inode中对应index的S3ChunkInfoList,根据S3ChunkInfoList构建s3ReadRequest,最后生成S3ReadRequest vector(FileCacheManager::Read)
- 遍历S3ReadRequest vector中request,采用异步接口(ReadFromS3)读取数据(FileCacheManager::Read)
- 等待所有的request返回,更新读缓存(FileCacheManager::ReadFromS3),获取返回数据填充readBuf(FileCacheManager::Read)
针对CurveBS volume后端的数据缓存:TODO
CurveFS client端(当前支持S3Client,CurveBS Volume Client后续会支持)的数据磁盘缓存的设计文档可参考:
本地磁盘缓存分为读写两种类型,可通过配置项diskCache.maxUsableSpaceBytes控制缓存总容量,并且支持IO限速(可参考1.6节相关内容)。
这里仅对读写流程做简单介绍,首先看写流程:
- S3Client模块接收到写入后先写入写内存缓存页,如果满足持久化的条件后,那么则准备持久化(DataCache::Flush)
- 如果未配置本地硬盘作为写缓存,那么直接持久化到远端的对象存储;如果配置了本地硬盘作为写缓存,那么则尝试先写入本地硬盘写缓存目录(DataCache::Flush --> S3ClientAdaptorImpl::IsReadWriteCache && DiskCacheManager::IsDiskCacheFull)
- 写本地硬盘缓存目录之前先判断缓存目录容量是否已达到阈值,如果已经达到阈值,那么则直接写入到远端对象存储(DiskCacheManager::IsDiskCacheFull);否则,则写入到本地硬盘写缓存目录中(DiskCacheManagerImpl::Write)
- 文件写入本地硬盘写缓存目录后,从本地硬盘读缓存目录做一个硬链接链接到该文件(DiskCacheManagerImpl::WriteDiskFile --> DiskCacheRead::LinkWriteToRead)
- 本次io在本地硬盘缓存目录写入成功之后,异步上传模块会适时把本地硬盘写缓存目录中的文件上传到远端对象存储集群(DiskCacheManager::AsyncUploadEnqueue丢队列,之后在DiskCacheWrite::AsyncUploadFunc异步上传),上传成功后,删除本地写缓存目录中的对应文件(硬链接方式保留读缓存)(DiskCacheWrite::UploadFile --> DiskCacheWrite::RemoveFile)
- 同时,缓存清理模块会定时检查本地硬盘缓存目录容量情况,如果容量已经达到阈值了,则进行文件的清理工作(只清理读缓存,写缓存对象如果存在表示还未上传,需要等待上传完成)(DiskCacheManager::TrimRun --> DiskCacheManager::TrimCache)
读数据的流程:
可以简单描述为首先尝试从内存缓存中读,如果读不到,则尝试从S3后端读取,并且在读取过程中会首先查询本地磁盘读缓存是否存在,如果存在则读取本地缓存数据后返回,否则从S3后端读取。(FuseS3Client::FuseOpRead --> S3ClientAdaptorImpl::Read --> FileCacheManager::Read --> FileCacheManager::ReadFromS3 --> DiskCacheManagerImpl::Read --> DiskCacheManager::ReadDiskFile --> DiskCacheRead::ReadDiskFile)
1、内存缓存使用超出警戒线处理
写入线程会进行sleep等待缓存下刷到S3或者本地磁盘缓存,sleep时间通过公式计算得出(sleep time = base sleep time * exceed ratio * factor;其中base sleep time为配置项,默认值500us;exceed ratio = mem buffer used ratio - nearfull ratio,其中nearfull ratio为配置项,默认值70;factor = pow(2, exceed ratio/10)),通过计算公式也可以看出,内存缓存使用量超出警戒线越多,sleep等待时间就越长。这部分限流逻辑目前仅是通过sleep等待来实现,后续要考虑通过更完善的限流模块来解决,防止写入性能的大幅震荡,使得写入性能尽量平滑稳定。这部分代码逻辑是在curvefs\src\client\s3\client_s3_adaptor.cpp:S3ClientAdaptorImpl::Write函数中,实现比较简单不再细述。
2、client端QoS限流(含数据面和本地磁盘缓存)
详细设计文档可以参考:
QoS限流模块统一实现在src\common\throttle.cpp:Throttle类中(依赖src\common\leaky_bucket.cpp),其使用了双漏桶(逻辑概念,实际上是只有一个桶,通过level和burstLevel来分别控制普通流量和突发流量的水位)算法来实现普通限速以及突发流量控制功能。基本流程是初始化漏桶用来存放IO请求所需的tokens(每个请求所需的token数量是不同的,比如限制qps的每个请求需要一个token,限制bps的则根据请求的length确定所需token),client把token放入漏桶中(level和burstLevel都增加水位)。漏桶中剩余容量为min(普通流量容量-level,突发流量容量-burstLevel),漏桶会设置定时器反复的根据设定的interval来处理漏桶中的请求(普通流量流速低于突发流量流速),因此一般来说漏桶的剩余可用容量为普通流量剩余量,保证尽量不突发或突发流量持续时间可控,使得请求可以尽量平滑的被处理掉。
漏桶的初始化示例:
// src\common\s3_adapter.cpp
void S3Adapter::Init(const S3AdapterOption &option) {
    ......
    ReadWriteThrottleParams params;   // 初始化QoS限制参数,只设置了普通流量,未这是突发流量,因此不支持burst
    params.iopsTotal.limit = option.iopsTotalLimit;
    params.iopsRead.limit = option.iopsReadLimit;
    params.iopsWrite.limit = option.iopsWriteLimit;
    params.bpsTotal.limit = option.bpsTotalMB * kMB;
    params.bpsRead.limit = option.bpsReadMB * kMB;
    params.bpsWrite.limit = option.bpsWriteMB * kMB;
    // 设置突发流量的示例可以参考:curvefs\src\client\s3\disk_cache_manager.cpp:DiskCacheManager::InitQosParam()
    throttle_ = new Throttle();
    throttle_->UpdateThrottleParams(params);   // 限制FUSE client请求(qps、bps)

    inflightBytesThrottle_.reset(new AsyncRequestInflightBytesThrottle(  // 限制S3异步请求qps
        option.maxAsyncRequestInflightBytes == 0
            ? UINT64_MAX
            : option.maxAsyncRequestInflightBytes));
}
// src\common\throttle.cpp
const std::vector<Throttle::Type> kDefaultEnabledThrottleTypes = {
    Throttle::Type::IOPS_TOTAL, Throttle::Type::IOPS_READ,
    Throttle::Type::IOPS_WRITE, Throttle::Type::BPS_TOTAL,
    Throttle::Type::BPS_READ,   Throttle::Type::BPS_WRITE};

Throttle::Throttle() : throttleParams_(), throttles_() {
    for (auto type : kDefaultEnabledThrottleTypes) {
        throttles_.emplace_back(
            type, false,
            new common::LeakyBucket(ThrottleTypeToName(type)));
    }
}
请求入桶:
// src\common\s3_adapter.cpp
int S3Adapter::PutObject(const Aws::String &key, const char *buffer,
                         const size_t bufferSize) {
    ......
    if (throttle_) {
        throttle_->Add(false, bufferSize);  // Throttle::CalcTokens --> LeakyBucket::Add --> LeakyBucket::Bucket::Add,add发现桶满了会wait(ThrottleClosure::wait)
    }
    ......
}

// src\common\leaky_bucket.cpp
void LeakyBucket::Add(uint64_t tokens) {
    ThrottleClosure done;
    if (Add(tokens, &done)) {  // 漏桶可用容量不足则需要wait
        done.Wait();
    }
}

bool LeakyBucket::Add(uint64_t tokens, google::protobuf::Closure* done) {
    std::lock_guard<bthread::Mutex> lock(mtx_);
    if (bucket_.avg == 0) {
        return false;
    }

    bool wait = false;
    if (!pendings_.empty()) {  // 前面还有排队等待的请求
        wait = true;
        pendings_.emplace_back(tokens, done);   // 放到等待队列队尾
    } else {
        auto left = bucket_.Add(tokens);    // left表示剩余未能放入漏桶的请求或者说token数量
        if (left > 0.0) {    // 容量不足放不下,剩下的需要等待
            wait = true;
            pendings_.emplace_back(left, done);
        }
    }

    return wait;
}

double LeakyBucket::Bucket::Add(double tokens) {
    ......
    double available = 0;
    levelInitial = false;
    burstLevelInitial = false;
    if (burst > 0) {   // 配置了突发流量
        // if burst is enabled, available tokens is limit by two conditions
        // 1. bucket-level is limited by bucket capacity which is calculate by [burst * burstSeconds]  // NOLINT
        // 2. bucket-burst-level is limited by burst limit which is equal to [burst]  // NOLINT
        available = std::max(
            std::min(capacity - level, burst - burstLevel), 0.0);    // 前者控制突发流量的持续时间,后者控制突发流量的处理速度
            // 在没有突发流量的情况下,burstLevel通常为0
        if (available >= tokens) {    // 剩余容量充足
            level += tokens;    // 普通流量水位增加
            burstLevel += tokens;    // 突发流量水位同步增加

            return 0;
        } else {    // 剩余容量不足
            level += available;
            burstLevel += available;

            return tokens - available;
        }
    } else {    // 未配置突发流量
        // if burst is not enable, available token is limit only by bucket
        // capacity which is equal to [avg]
        available = std::max(avg - level, 0.0);  // 只关注普通流量可用情况
        if (available >= tokens) {
            level += tokens;    // 只增加普通流量水位
            return 0;
        } else {
            level += available;
            return tokens - available;
        }
    }
}
处理桶中的请求(IO请求出桶):
// src\common\leaky_bucket.cpp
void LeakyBucket::RegisterLeakTask() {
    timespec abstime = butil::milliseconds_from_now(FLAGS_bucketLeakIntervalMs);
    timerId_ = timer_.schedule(&LeakyBucket::LeakTask, this, abstime);  // 配置定时器
}

void LeakyBucket::LeakTask(void* arg) {
    LeakyBucket* throttle = static_cast<LeakyBucket*>(arg);

    std::lock_guard<bthread::Mutex> lock(throttle->stopMtx_);
    if (throttle->stopped_) {
        throttle->stopCond_.notify_one();
        return;
    }

    throttle->Leak();    // 漏水,也就是处理请求,之后水位会下降,可以放入新的请求token
    throttle->RegisterLeakTask();    // 再次设置定时器
}

void LeakyBucket::InitTimerThread() {    // 初始化定时器
    bthread::TimerThreadOptions options;
    options.bvar_prefix = "leaky_bucket_throttle";
    int rc = timer_.start(&options);
    if (rc == 0) {
        LOG(INFO) << "init throttle timer thread success";
    } else {
        LOG(FATAL) << "init throttle timer thread failed, " << berror(rc);
    }
}

void LeakyBucket::Leak() {
    std::deque<PendingRequest> tmpPendings;

    {
        std::lock_guard<bthread::Mutex> lock(mtx_);
        bucket_.Leak();  // 开始漏水 --> LeakyBucket::Bucket::Leak()

        while (!pendings_.empty()) {   // 处理排队等待的请求
            auto& request = pendings_.front();
            double left = bucket_.Add(request.left);
            if (left > 0.0) {
                request.left = left;
                break;
            }

            tmpPendings.push_back(std::move(pendings_.front()));
            pendings_.pop_front();
        }
    }

    for (auto& b : tmpPendings) {
        b.done->Run();  // 通知等待线程请求已入桶,可以继续后续流程
    }
}

void LeakyBucket::Bucket::Leak() {
    ......
    BucketInitial();  // 处理瞬时流量可能超过期望峰值的问题
    if (levelInitial)
        return;

    double leak = static_cast<double>(avg) * FLAGS_bucketLeakIntervalMs /
                  TimeUtility::MilliSecondsPerSecond;    // 普通流量漏水量
    level = std::max(level - leak, 0.0);    // 普通流量水位
    VLOG(9) << "leak is: " << leak
            << ", level is: " << level;
    if (burst > 0) {
        BucketInitial(true);
        if (burstLevelInitial)
            return;

        leak = static_cast<double>(burst) * FLAGS_bucketLeakIntervalMs /
               TimeUtility::MilliSecondsPerSecond;    // 突发流量漏水量,其中 burst > avg
        burstLevel = std::max(burstLevel - leak, 0.0);    // 突发流量水位,由于漏水速率更快,所以burstLevel < level,并且通常为0
        VLOG(9) << "leak is: " << leak
                << ", burstLevel is: " << burstLevel;
    }
}
3、本地磁盘缓存目录容量限制
目录容量限制逻辑比较简单,首先在客户端启动时配置一个可用空间总量,并用df -sb命令获取一次配置的缓存目录已用容量(DiskCacheManager::SetDiskInitUsedBytes),然后在写入或者清理缓存文件时同步更新缓存空间使用量,另外启动trim线程定期检查目录已用容量(DiskCacheManager::TrimCache),如果超出full水位则开始清理缓存,清理到安全水位为止。在IO写入流程中,则在write或flush流程中检查是不是有可用磁盘缓存空间,如没有则sleep等待或者直接上传到后端S3存储引擎(S3ClientAdaptorImpl::Write、DataCache::Flush等)。
// curvefs\src\client\common\config.cpp
void InitDiskCacheOption(Configuration *conf,
                         DiskCacheOption *diskCacheOption) {
    ......
    conf->GetValueFatalIfFail("diskCache.fullRatio",
                              &diskCacheOption->fullRatio);    // 开始清理缓存空间的起始容量百分比,
    // 需要注意的是这里的百分比是相对缓存磁盘的总容量来说的,而不是下面配置的最多可用容量的百分比,下同
    // 举例来说,1块1T容量的盘用作缓存盘,共有3个fuse客户端共用这块缓存盘,full百分比是80,那么当磁盘使用量达到800G的时候就开始清理缓存
    // 因为缓存空间可能会被超卖或者超分配,比如3个fuse客户端各配置500G缓存总空间,如果按各自的80%水位来发起清理操作,1.5T*0.8=1.2T,则会导致磁盘容量提前用满
    conf->GetValueFatalIfFail("diskCache.safeRatio",
                              &diskCacheOption->safeRatio);    // 缓存空间清理的终止容量百分比
    conf->GetValueFatalIfFail("diskCache.maxUsableSpaceBytes",
                              &diskCacheOption->maxUsableSpaceBytes);    // 最多可用的缓存空间容量
    ......
}
// curvefs\src\client\s3\disk_cache_manager.cpp
bool DiskCacheManager::IsDiskCacheFull() {
    int64_t ratio = diskFsUsedRatio_.load(std::memory_order_seq_cst);
    uint64_t usedBytes = GetDiskUsedbytes();    // 历史统计值,非实时命令行查询
    if (ratio >= fullRatio_ || usedBytes >= maxUsableSpaceBytes_) {
        VLOG(3) << "disk cache is full"
                << ", ratio is: " << ratio << ", fullRatio is: " << fullRatio_
                << ", used bytes is: " << usedBytes;
        return true;
    }
    return false;
}

int DiskCacheManager::WriteDiskFile(const std::string fileName, const char *buf,
                                    uint64_t length, bool force) {
    // write throttle
    diskCacheThrottle_.Add(false, length);
    int ret = cacheWrite_->WriteDiskFile(fileName, buf, length, force);
    if (ret > 0)
        AddDiskUsedBytes(ret);    // 更新已用容量的统计值
    return ret;
}
1)CurveBS ChunkServer端
chunkserver端支持限制inflight io数量,默认限制5000个,可通过配置项(copyset.max_inflight_requests,配置项名称有点不恰当,实际与copyset无关,已提issue后续解决)进行修改。具体实现逻辑是每次接收到IO请求就统计记录当前chunkserver inflight的请求数量,然后与配置的限制值比较,超出则返回客户端错误,实现比较简单,这里不再细述。 相关class为:src\chunkserver\inflight_throttle.h:InflightThrottle。 chunkserver inflight请求超出限制之后返回的错误码为:CHUNK_OP_STATUS::CHUNK_OP_STATUS_OVERLOAD,客户端收到这个错误码之后会sleep等待一定时间后进行retry。
2)CurveBS MDS端
暂无相关实现
3)CurveBS SnapshotCloneServer端
接收请求的服务端没有限流(可以在Nginx服务器上增加限流插件来实现),但是在S3上传模块有限流,相关限流参数在s3.conf中配置(如s3.throttle.iopsTotalLimit=5000),代码中初始化操作是在src\common\s3_adapter.cpp:S3Adapter::Init中(UpdateThrottleParams),限流算法与1.6.1节中描述的CurveFS client端QoS限流方案完全一致,这里不再细述。
4)CurveFS MDS端
暂无相关实现
5)CurveFS MataServer端
与第一小节中描述的chunkserver端实现完全相同。
1)卷QoS的设置方法
$ curve_ops_tool update-throttle --example
Example:
curve_ops_tool update-throttle -fileName=/test -throttleType=(IOPS_TOTAL|IOPS_READ|IOPS_WRITE|BPS_TOTAL|BPS_READ|BPS_WRITE) -limit=20000 [-burst=30000] [-burstLength=10]
每次可以设置一项类型的QoS参数(如IOPS_TOTAL或IOPS_READ)。
QoS更新流程不再详细描述,src\tools\namespace_tool.cpp:NameSpaceTool::RunCommand函数中会调用到MDS服务的RPC接口UpdateFileThrottleParams把QoS信息持久化到卷信息fileInfo中(最终存储到etcd)。
2)卷QoS生效逻辑
设置好QoS后,如果配置了QoS开关(throttle.enable=True),IOManager4File::Initialize中会初始化Throttle类throttle_.reset(new common::Throttle()),之后在Open卷的时候会从MDS返回卷的相关信息,其中就包括了QoS参数信息,之后就把这些信息缓存到客户端中用来对卷的IO操作限流:
// src\client\file_instance.cpp
int FileInstance::Open(const std::string& filename,
                       const UserInfo& userinfo,
                       std::string* sessionId) {
    ......
    ret = mdsclient_->OpenFile(filename, finfo_.userinfo, &finfo_, &lease);
    if (ret == LIBCURVE_ERROR::OK) {
        iomanager4file_.UpdateFileThrottleParams(finfo_.throttleParams);
        ret = leaseExecutor_->Start(finfo_, lease) ? LIBCURVE_ERROR::OK
                                                   : LIBCURVE_ERROR::FAILED;
    ......
}
如果卷已经在使用中(已经Open过),则通过租约续期操作定期获取卷的QoS参数信息来缓存到客户端中:
// src\client\lease_executor.cpp
bool LeaseExecutor::RefreshLease() {
    ......
        CheckNeedUpdateFileInfo(response.finfo);
    ......
}
void LeaseExecutor::CheckNeedUpdateFileInfo(const FInfo& fileInfo) {
    ......
    // update throttle params
    iomanager_->UpdateFileThrottleParams(fileInfo.throttleParams);
}
3)限流方案(QoS算法)
从上一小节可以看出,CurveBS卷的QoS限流算法与1.6.1节中描述的CurveFS client端QoS限流方案完全一致,这里不再细述。
参考资料:
简单来说就是预先分配一批chunkfile文件并且覆盖写一遍,之后copyset分配空间的时候从这批chunkfile里面mv到其目录下使用,这么做的好处主要就是可以减少写入IO的放大。 由于是在部署阶段预分配,代码流程里基本不涉及这块,只涉及是从chunkfilepool中挑选chunkfile使用还是新创建chunkfile。
与chunkfilepool逻辑类似,只是用途的区别,walfile是指raft的log文件。walfilepool可以和chunkfilepool共用,部署阶段可以配置这个选项walfilepool.use_chunk_file_pool,copyset.raft_log_uri=curve://./0/copysets这个配置项表示是否开启walfilepool,curve表示开启,local表示不开启。
Curve锁类型定义在src\common\concurrent\concurrent.h中,主要包括:
C++标准锁类型或同步原语的封装:
- Atomic:std::atomic
- Mutex:std::mutex
- ConditionVariable:std::condition_variable
Curve自定义锁类型(继承自pthread或bthread锁)或组件(具体实现是在src\common\concurrent\rw_lock.h,src\common\concurrent\spinlock.h):
- RWLock:读写锁
- SpinLock:自旋锁
- ReadLockGuard:读锁lock guard
- WriteLockGuard:写锁lock guard
关于读写锁可以参考:
- pthread:https://developer.aliyun.com/article/256578
- bthread:https://github.com/apache/incubator-brpc/issues/1152
brpc上游分支没有实现bthread_rwlock_init等函数,Curve则是对brpc打了补丁:
- thirdparties\brpc\brpc.patch,https://github.com/apache/incubator-brpc/pull/1034
关于自旋锁可以参考:
关于lock guard可以参考:
自旋锁通常用于短时间的互斥场景,目前只用在src\client\metacache_struct.h中,用于更新client端的metacache中的copyset对应的chunkserver信息,更新操作会加锁。 读写锁通常用于读写公共资源共存的场景,这样可以做到尽量保证读不受锁的限制,减少对读多写少场景的读性能影响。读写锁使用场景非常多,比如基本所有的缓存更新和查询场景都会用到,更新缓存加写锁,查询缓存加读锁,很显然在缓存场景下查询缓存的次数要远远多于更新缓存次数,因此使用读写锁就非常合适。简单举例:
// src\client\metacache.cpp
MetaCacheErrorType MetaCache::GetChunkInfoByIndex(ChunkIndex chunkidx,
                                                  ChunkIDInfo* chunxinfo) {
    ReadLockGuard rdlk(rwlock4ChunkInfo_);
    auto iter = chunkindex2idMap_.find(chunkidx);
    if (iter != chunkindex2idMap_.end()) {
        *chunxinfo = iter->second;
        return MetaCacheErrorType::OK;
    }
    return MetaCacheErrorType::CHUNKINFO_NOT_FOUND;
}

void MetaCache::UpdateChunkInfoByIndex(ChunkIndex cindex,
                                       const ChunkIDInfo& cinfo) {
    WriteLockGuard wrlk(rwlock4ChunkInfo_);
    chunkindex2idMap_[cindex] = cinfo;
}
默认的glibc malloc、free等内存分配、回收接口实现方案,在空间分配性能、空间回收效率(回收率和回收及时性)、空间碎片化程度以及多线程场景下的表现等方面都有一定的不足,因此业界开发了jemalloc、tcmalloc等的内存管理库,经过我们根据chunkserver的内存使用模型下的对比测试,我们默认使用jemalloc库(5.2.1版本优于4.5.0,但会占用更多的CPU资源),其次推荐tcmalloc。 关于jemalloc的使用方法,我们会在部署过程中创建docker容器时设置LD_PRELOAD环境变量,预加载jemalloc库:
- https://github.com/opencurve/curveadm/blob/master/internal/task/task/common/create_container.go#L203
关于jemalloc的介绍:
关于tcmalloc的介绍:
对外提供了数据面SDK(C语言)和管控面SDK(Python语言),均为动态库方式,其中数据面SDK主要是给Qemu虚拟机进程使用,管控面SDK主要是给OpenStack或其他管控服务使用。
数据面SDK使用示例:
管控面SDK使用示例:
数据面SDK目前有两种实现方案,一种是通过brpc直接对接CurveBS集群;另一种是经过本地的Unix domain socket对接nebd-server,经过nebd-server中转后通过brpc对接CurveBS集群,这种方案的的好处是可以动态升级数据面SDK(与Qemu对接的接口变动很小,也很轻量,因此如果需要更新客户端SDK只需要重启nebd-server即可,Qemu不需要重启),另一方面的好处是可以收敛客户端到CurveBS集群的网络连接数量,同一台计算节点上的多台Qemu虚拟机可以共用同一个与chunkserver的连接,详细设计可参考:
对应两种实现方案的头文件分别是:
- 非nebd方式:src\client\libcbd.h
- nebd方式:nebd\src\part1\libnebd.h
管控面SDK源码在curvefs_python\curvefs.py,Python只是一层封装,最终仍然是调用的C接口。
暂未提供相关SDK,后续会发布。
有bug修复或功能更新时,client sdk可能会频繁更新,更新过程中如果上层应用如QEMU或curve-nbd等需要重启才能重新加载动态库,显然这对业务的影响比较大,因此我们设计了NEBD服务,作为IO请求中转服务,插入到QEMU和后端Curve server之间,对接QEMU的适配层没有业务逻辑,只有接口适配和请求转发,因此相对非常稳定极少需要更新,client sdk调用及相关处理逻辑都集中在nebd-server中,重启nebd-server过程中QEMU的IO处于悬挂状态,重启完毕后继续重试处理,QEMU的part1和nebd-server的part2直接使用Unix domain socket进行通信,以减少tcp协议栈相关时延。
NEBD相关代码主要在:
- nebd/src/part1和nebd/src/part2:分别对应客户端和服务端实现
- thirdparties/brpc/brpc.patch:brpc的Unix domain socket传输协议补丁
相关代码比较独立且简单,因此不再详细描述。
NEBD服务会引入一定的性能开销(IO时延会升高,CPU利用率会增加),因此在对性能要求苛刻的业务场景下(如数据库场景等),建议使用直接对接chunkserver的libcbd SDK,不引入NEBD服务。
关于NEBD服务设计可以参考:NEBD服务设计
libcurve_file 使用 mdsclient 向 mds 发起创建空卷的rpc CreateFile 请求。
mds 的 namspace service 对 CreateFile 请求进行处理。 首先检查路径的合法性,然后检查权限,然后使用 CurveFS.CreateFile 创建文件,并根据返回的状态码设置response。
CurveFS.CreateFile:
- 检查filetype是否允许创建;
- 检查参数的合法性;
- 检查路径的合法性;
- 要创建的file是否存在
- 将要创建的file,使用存储管理 storage(NameServerStorage)进行保存。
与创建空卷类似,不再赘述。
- part1
libnebd.h是nebdlib库,也及入口
// 回调函数
struct NebdClientAioContext {
    off_t offset;             // 请求的offset
    size_t length;            // 请求的length
    LibAioCallBack cb;        // 异步请求的回调函数
    void* buf;                // 请求的buf
};

// 初始化nebd,仅在第一次调用的时候真正执行初始化逻辑
int nebd_lib_init(void);

// 文件相关操作
int nebd_lib_open(const char* filename);
int nebd_lib_close(int fd);
int nebd_lib_pread()
int nebd_lib_pwrite()
int nebd_lib_aio_pread()
int nebd_lib_aio_pwrite()
int nebd_lib_sync()
int nebd_lib_resize()
int nebd_lib_flush()
int64_t nebd_lib_getinfo()
int nebd_lib_invalidcache()
以上面的open函数为例,其调用nebd::client::nebdClient.Open(),也即下面的NebdClient类中的函数
// 通信服务的客户端
// 比如在open函数中会调用stub.OpenFile()
class NebdClient {

    // 初始化nebd,仅在第一次调用的时候真正执行初始化逻辑
    int Init(const char* confpath);

    // 打开/读写文件
    int Open(const char* filename, const NebdOpenFlags* flags);
    int Close(int fd);
    int AioRead(int fd, NebdClientAioContext* aioctx);
    int AioWrite(int fd, NebdClientAioContext* aioctx);

    // flush文件,异步函数
    int Flush(int fd, NebdClientAioContext* aioctx);

    // 获取文件info
    int64_t GetInfo(int fd);

    // 刷新cache,等所有异步请求返回
    int InvalidCache(int fd);

    // 心跳管理模块
    std::shared_ptr<HeartbeatManager> heartbeatMgr_;
    // 缓存模块
    std::shared_ptr<NebdClientMetaCache> metaCache_;

    NebdClientOption option_;
    brpc::Channel channel_;

};
以上面的open函数为例,其是brpc通信的客户端,服务端调用NebdFileServiceImp中对应的函数,该类介绍见下面的part2
- part2
file_service.h是part2服务端的入口:
// 通信服务的服务端
class NebdFileServiceImpl {
    void OpenFile()
    void Write()
    void Read()
    ...

    std::shared_ptr<NebdFileManager> fileManager_;
}

class NebdFileManager {
    // 启动FileManager
    int Run();

    // 打开/读写文件
    int Open();
    int Close(int fd);
    int AioRead();
    int AioWrite();

    // 分配新的可用的fd,fd不允许和已经存在的重复
    int GenerateValidFd();

    // 根据文件名获取/生成file entity
    // 如果entity存在,直接返回entity指针
    // 如果entity不存在,则创建新的entity,并插入map,然后返回
    NebdFileEntityPtr GetOrCreateFileEntity(const std::string& fileName);
    NebdFileEntityPtr GenerateFileEntity(int fd, const std::string& fileName);
    // 删除指定fd对应的file entity
    void RemoveEntity(int fd);

    // 文件名锁,对同名文件加锁
    NameLock nameLock_;
    // fd分配器
    FdAllocator fdAlloc_;
    // nebd server 文件记录管理


    // 文件fd和file entity的映射
    // 重点:保存了client端所有的file信息
    FileEntityMap fileMap_;

}

using FileEntityMap = std::unordered_map<int, NebdFileEntityPtr>;
class NebdFileEntity {

    // 初始化文件实体
    int Init(n);

    int Open(const OpenFlags* openflags);
    /**
     * 重新open文件,如果之前的后端存储的连接还存在则复用之前的连接
     * 否则与后端存储建立新的连接
     */
    virtual int Reopen(const ExtendAttribute& xattr);
    int Close();
    int Extend();
    int GetInfo();
    int AioRead();
    int AioWrite();
    int Flush();
    int InvalidCache();

    // nebd server为该文件分配的唯一标识符
    int fd_;
    // 文件名称
    std::string fileName_;
    // 文件当前状态,opened表示文件已打开,closed表示文件已关闭
    std::atomic<NebdFileStatus> status_;
    // 该文件上一次收到心跳时的时间戳
    std::atomic<uint64_t> timeStamp_;
    // 元数据持久化管理,上面的reopen函数需要用到
    MetaFileManagerPtr metaFileManager_;

    // 文件在executor open时返回上下文信息,用于后续文件请求处理
    NebdFileInstancePtr fileInstance_;
    // 文件对应的executor的指针
    NebdRequestExecutor* executor_;
}

// 具体RequestExecutor中会用到的文件实例上下文信息
// RequestExecutor需要用到的文件上下文信息都记录到FileInstance内
class NebdFileInstance {
 public:
    NebdFileInstance() {}
    virtual ~NebdFileInstance() {}
    // 需要持久化到文件的内容,以kv形式返回,例如curve open时返回的sessionid
    // 文件reopen的时候也会用到该内容
    ExtendAttribute xattr;
};

// 这里以open函数为例
int NebdFileEntity::Open(const OpenFlags* openflags) {
    NebdFileInstancePtr fileInstance = executor_->Open(fileName_, openflags);
}

std::shared_ptr<NebdFileInstance> CurveRequestExecutor::Open() {
    int fd = client_->Open(curveFileName, ConverToCurveOpenFlags(openFlags));

      if (fd >= 0) {
        // 元数据持久化管理,reopen时需要
        auto curveFileInstance = std::make_shared<CurveFileInstance>();
        curveFileInstance->fd = fd;
        curveFileInstance->fileName = curveFileName;
        curveFileInstance->xattr[kSessionAttrKey] = "";
        curveFileInstance->xattr[kOpenFlagsAttrKey] =openFlags->SerializeAsString();
        return curveFileInstance;
    }
    return nullptr;
}
上面的client_->Open()对应的即是下面FileInstance类的相关函数
// 每个文件一个file实例
class FileInstance {
    int Open()
    int Close();
    // 同步异步读写
    int Read(char* buf, off_t offset, size_t length, MDSClient* mdsclient);
    int Write();
    int AioRead();
    int AioWrite();

    int GetFileInfo(const std::string& filename, FInfo_t* fi);

    // 保存当前file的文件信息
    FInfo_t                 finfo_;

    // MDSClient是FileInstance与mds通信的唯一出口
    std::shared_ptr<MDSClient> mdsclient_;
    // 每个文件都持有与MDS通信的lease,LeaseExecutor是续约执行者
    std::unique_ptr<LeaseExecutor> leaseExecutor_;

    // IOManager4File用于管理所有向chunkserver端发送的IO
    IOManager4File          iomanager4file_;
}


class IOManager4File : public IOManager {

    /**
     * 初始化函数
     * @param: filename为当前iomanager服务的文件名
     * @param: ioopt为当前iomanager的配置信息
     * @param: mdsclient向下透传给metacache
     * @return: 成功true,失败false
     */
    bool Initialize(const std::string& filename,const IOOption& ioOpt,MDSClient* mdsclient);

    // 同步异步读写
    int Read(char* buf, off_t offset, size_t length, MDSClient* mdsclient);
    int Write();
    int AioRead();
    int AioWrite();

     /**
     * 因为curve client底层都是异步IO,每个IO会分配一个IOtracker跟踪IO
     * 当这个IO做完之后,底层需要告知当前io manager来释放这个IOTracker,
     * HandleAsyncIOResponse负责释放IOTracker
     * @param: iotracker是返回的异步io
     */
    void HandleAsyncIOResponse(IOTracker* iotracker) override;


    // 每个IOManager都有其IO配置,保存在iooption里
    IOOption ioopt_;

    // metacache存储当前文件的所有元数据信息
    MetaCache mc_;

    // IO最后由schedule模块向chunkserver端分发,scheduler由IOManager创建和释放
    RequestScheduler* scheduler_;

     // task thread pool为了将qemu线程与curve线程隔离
    curve::common::TaskThreadPool<bthread::Mutex, bthread::ConditionVariable>
        taskPool_;

    // 限流
    std::unique_ptr<common::Throttle> throttle_;

}
class MetaCache {
    // sender发送数据的时候需要知道对应的leader然后发送给对应的chunkserver
    GetLeader()
    // 更新某个copyset的leader信息
    UpdateLeader()
    // 更新copyset数据信息,包含serverlist
    UpdateCopysetInfo()
    // 通过chunk id更新chunkid信息
    UpdateChunkInfoByID()
    // 获取当前copyset的server list信息
    GetServerList()
    // 从mds更新copyset复制组信息
    UpdateCopysetInfoFromMDS()
    // 更新copyset的leader信息
    UpdateLeaderInternal()


 private:
    // chunkindex到chunkidinfo的映射表
    ChunkIndexInfoMap chunkindex2idMap_;

    // logicalpoolid和copysetid到copysetinfo的映射表
     CopysetInfoMap lpcsid2CopsetInfoMap_;

    // chunkid到chunkidinfo的映射表
    ChunkInfoMap chunkid2chunkInfoMap_;

    // chunkserverid到copyset的映射
    std::unordered_map<ChunkServerID, std::set<CopysetIDInfo>>
        chunkserverCopysetIDMap_;


    // 当前文件信息
    FInfo fileInfo_;

    // 当前文件对应的已经分配的所有FileSegment
    std::unordered_map<SegmentIndex, FileSegment> segments_;
}


class FileSegment {
 private:
    const SegmentIndex segmentIndex_;
    const uint32_t segmentSize_;

    // 这里的chunks好像再代码里没有用到
    // 该sgement对应的所有chunk信息
    std::unordered_map<ChunkIndex, ChunkIDInfo> chunks_;
}


 using CopysetInfoMap =
        std::unordered_map<LogicPoolCopysetID, CopysetInfo<ChunkServerID>>;

CopysetInfo {
    // 当前copyset的节点信息
    std::vector<CopysetPeerInfo<T>> csinfos_;

    // 当前copyset的id信息
    CopysetID cpid_ = 0;
    LogicPoolID lpid_ = 0;
}
// 主要是在函数Splitor::GetOrAllocateSegment中起作用
// 把从服务端返回来的相关信息保存在该数据结构里;然后再把SegmentInfo类中的相关成员赋值给MetaCache中对应的成员

// 保存每个segment的基本信息
typedef struct SegmentInfo {
    uint32_t segmentsize;
    uint32_t chunksize;
    uint64_t startoffset;

    // 该segment对应的所有chunk信息
    std::vector<ChunkIDInfo> chunkvec;
    // 保存logicalpool中segment对应的logicalpoolid和copysetid信息
    // 有了这个关键的key,就可以从lpcsid2CopsetInfoMap_找到对应的CopysetInfo了
    // 进而就可以找到leader的地址了
    LogicalPoolCopysetIDInfo lpcpIDInfo;
} SegmentInfo_t;

// 保存segment对应的logicalpool以及copysetid信息
typedef struct LogicalPoolCopysetIDInfo {
    LogicPoolID lpid;
    std::vector<CopysetID> cpidVec;
}
struct RequestContext {

    // chunk的ID信息,sender在发送rpc的时候需要附带其ID信息
    // 该类里面有copysetid以及LogicPoolID
    // 根据这两个参数,可以从lpcsid2CopsetInfoMap_中获得copyset的chunk server节点信息
    ChunkIDInfo         idinfo_;

     // 用户IO被拆分之后,其小IO有自己的offset和length
    off_t               offset_ = 0;
    OpType              optype_ = OpType::UNKNOWN;
    size_t              rawlength_ = 0;

    // read data of current request
    butil::IOBuf readData_;

    // write data of current request
    butil::IOBuf writeData_;

     // 因为RPC都是异步发送,因此在一个Request结束时,RPC回调调用当前的done
    // 来告知当前的request结束了
    RequestClosure*     done_ = nullptr;

}

typedef struct ChunkIDInfo {
    ChunkID cid_ = 0;
    CopysetID cpid_ = 0;
    LogicPoolID lpid_ = 0;
}
- 把请求丢入调度队列
IOTracker::DoWrite
 IO2ChunkRequests # 拆分
   SplitForNormal
    AssignInternal
      # 是否需要为该文件分配segment及空间
      NeedGetOrAllocateSegment
        GetOrAllocateSegment
          mdsClient->GetOrAllocateSegment
          # logicalpoolid和copysetid到copysetinfo的映射表
          UpdateCopysetInfo(更新lpcsid2CopsetInfoMap_)
      Splitor::SingleChunkIO2ChunkRequests // 拆分io丢到RequestContext队列

 # 把所有的RequestContext丢到调度队列
 scheduler_->ScheduleRequest(reqlist_);
- 工作队列处理请求
 RequestScheduler::Process
 -> RequestScheduler::ProcessAligned
   --> CopysetClient::WriteChunk
     --> DoRPCTask
       --> FetchLeader
       --> senderManager_->GetOrCreateSender()

bool CopysetClient::FetchLeader(LogicPoolID lpid, CopysetID cpid,
    ChunkServerID* leaderid, butil::EndPoint* leaderaddr) {
    // 1. 先去当前metacache中拉取leader信息
    if (0 == metaCache_->GetLeader(lpid, cpid, leaderid,
        leaderaddr, false, fileMetric_)) {
        return true;
    }

     // 2. 如果metacache中leader信息拉取失败,就发送RPC请求获取新leader信息
}

int MetaCache::GetLeader(LogicPoolID logicPoolId,
                         CopysetID copysetId,
                         ChunkServerID* serverId,
                         EndPoint* serverAddr,
                         bool refresh,
                         FileMetric* fm) {

    // 通过logicPoolId和copysetId获得key
    const auto key = CalcLogicPoolCopysetID(logicPoolId, copysetId);
    // 从CopysetInfoMap中找到对应的CopysetInfo
    auto iter = lpcsid2CopsetInfoMap_.find(key);
    // 得到CopysetInfo
    // CopysetInfo中包含copyset的基本信息,包含peer信息、leader信息、appliedindex信息
    targetInfo = iter->second;

    // 从CopysetInfo获得leader地址
    return targetInfo.GetLeaderInfo(serverId, serverAddr)
}
class ChunkServer {
 public:
    // 初始化Chunkserve各子模块
    int Run(int argc, char** argv);

private:
    // copysetNodeManager_ 管理chunkserver上所有copysetNode
    CopysetNodeManager* copysetNodeManager_;

    // cloneManager_ 管理克隆任务
    CloneManager cloneManager_;

    // scan copyset manager
    ScanManager scanManager_;

    // heartbeat_ 负责向mds定期发送心跳,并下发心跳中任务
    Heartbeat heartbeat_;

    // trash_ 定期回收垃圾站中的物理空间
    std::shared_ptr<Trash> trash_;
}
// io服务
class ChunkServiceImpl : public ChunkService {
 public:
  void DeleteChunk();
  void ReadChunk();
  void WriteChunk();

private:
    CopysetNodeManager  *copysetNodeManager_;
    std::shared_ptr<InflightThrottle> inflightThrottle_;
    uint32_t            maxChunkSize_;
}

// 复制组管理的Rpc服务
class CopysetServiceImpl : public CopysetService {
public:
    void CreateCopysetNode()
    void DeleteBrokenCopyset()
    void GetCopysetStatus()
 private:
    // 复制组管理者
    CopysetNodeManager* copysetNodeManager_;
}

// This is a service for braft configuration changes.
class BRaftCliServiceImpl2 : public CliService2 {
    void AddPeer(
    void RemovePeer()
    void ChangePeers()
    void GetLeader()
}

// 其他rpc服务
class ChunkOpRequest {
 public:

    // 处理request,实际上是Propose给相应的copyset
    virtual void Process();

    // 以下两个函数是纯虚函数,在子类中实现
    // request正常情况从内存中获取上下文on apply逻辑
    virtual void OnApply() = 0;
    virtual void OnApplyFromLog() = 0;

 protected:
    // chunk持久化接口
    std::shared_ptr<CSDataStore> datastore_;
    // 复制组
    std::shared_ptr<CopysetNode> node_;
    // rpc controller
    brpc::Controller *cntl_;
    // rpc 请求
    const ChunkRequest *request_;
    // rpc 返回
    ChunkResponse *response_;
    // rpc done closure
    ::google::protobuf::Closure *done_;
}

// 以下子类实现基类中的两个纯虚函数
class WriteChunkRequest : public ChunkOpRequest {
     void OnApply();
     void OnApplyFromLog();
}
class DeleteChunkRequest : public ChunkOpRequest {}
class ReadChunkRequest : public ChunkOpRequest {}
// 也是单例模式类对象
class CopysetNodeManager : public curve::common::Uncopyable {
public:
// 单例,仅仅在 c++11或者更高版本下正确
static CopysetNodeManager &GetInstance() {
static CopysetNodeManager instance;
return instance;
}
int Init(const CopysetNodeOptions ©setNodeOptions);
int Run();
int Fini();
// 加载目录下的所有copyset
int ReloadCopysets();
/**
* 创建copyset node,两种情况需要创建copyset node
* 1.集群初始化,创建copyset
* 2.恢复的时候add peer
*/
bool CreateCopysetNode();
/**
* 判断指定的copyset是否存在
* @param logicPoolId:逻辑池子id
* @param copysetId:复制组id
*/
bool IsExist(const LogicPoolID &logicPoolId, const CopysetID ©setId);
// 获取指定的copyset
virtual CopysetNodePtr GetCopysetNode(const LogicPoolID &logicPoolId, const CopysetID ©setId);
private:
using CopysetNodeMap = std::unordered_map<GroupId,std::shared_ptr<CopysetNode>>;
// 复制组map
CopysetNodeMap copysetNodeMap_;
// 控制copyset并发启动的数量
std::shared_ptr<TaskThreadPool<>> copysetLoader_;
// 表示copyset node manager当前是否已经完成加载
Atomic<bool> loadFinished_;
}
# 一个Copyset Node就是一个复制组的副本
class CopysetNode : public braft::StateMachine {
 public:
   // 初始化copyset node配置
    virtual int Init(const CopysetNodeOptions &options);
    // Raft Node init,使得Raft Node运行起来
    virtual int Run();

    // 返回当前副本是否在leader任期
    virtual bool IsLeaderTerm();
    // 返回leader id
    virtual PeerId GetLeaderId();

    // 复制组添加/删除/变更成员
    butil::Status AddPeer(const Peer& peer);
    butil::Status RemovePeer(const Peer& peer);
    butil::Status ChangePeer(const std::vector<Peer>& newPeers);

 /**
     * 下面的接口都是继承StateMachine实现的接口
     */
 public:
    /**
     * op log apply的时候回调函数
     * @param iter:可以batch的访问已经commit的log entries
     */
    void on_apply(::braft::Iterator &iter) override;
      /**
     * Follower或者Candidate发现新的leader后调用
     * @param ctx:leader变更上下,可以获取new leader和start following的原因
     */
    void on_start_following(const ::braft::LeaderChangeContext &ctx) override;
    ......

private:
    // 逻辑池 id
    LogicPoolID logicPoolId_;
    // 复制组 id
    CopysetID copysetId_;

    // CopysetNode对应的braft Node
    std::shared_ptr<RaftNode> raftNode_;

    // chunk file的绝对目录
    std::string chunkDataApath_;
    // chunk file的相对目录
    std::string chunkDataRpath_;
    // copyset绝对路径
    std::string copysetDirPath_;
    // 文件系统适配器
    std::shared_ptr<LocalFileSystem> fs_;
    // Chunk持久化操作接口
    std::shared_ptr<CSDataStore> dataStore_;

    // 并发模块
    ConcurrentApplyModule *concurrentapply_;
}
// chunkserver_main.cpp
int main(int argc, char* argv[]) {
::curve::chunkserver::ChunkServer chunkserver;
// 初始化Chunkserve各子模块
chunkserver.Run(argc, argv);
}
int ChunkServer::Run(int argc, char** argv) {
// ============================初始化各模块==========================//
// 初始化并发持久模块
ConcurrentApplyModule concurrentapply;
concurrentapply.Init(concurrentApplyOptions);
// 初始化本地文件系统
std::shared_ptr<LocalFileSystem> fs(
LocalFsFactory::CreateFs(FileSystemType::EXT4, ""));
fs->Init(lfsOption);
// 初始化chunk文件池
std::shared_ptr<FilePool> chunkfilePool =
std::make_shared<FilePool>(fs);
chunkfilePool->Initialize(chunkFilePoolOptions);
// Init Wal file pool
// 远端拷贝管理模块选项
// 克隆管理模块初始化
// 初始化注册模块
// trash模块初始化
// 初始化复制组管理模块
// 先把前面已经初始化好的各个模块赋值给copysetNodeOptions
CopysetNodeOptions copysetNodeOptions;
InitCopysetNodeOptions(&conf, ©setNodeOptions);
copysetNodeOptions.concurrentapply = &concurrentapply;
copysetNodeOptions.chunkFilePool = chunkfilePool;
copysetNodeOptions.walFilePool = walFilePool;
copysetNodeOptions.localFileSystem = fs;
copysetNodeOptions.trash = trash_;
copysetNodeManager_ = &CopysetNodeManager::GetInstance();
copysetNodeManager_->Init(copysetNodeOptions);
// init scan model
// 心跳模块初始化
// ========================添加rpc服务===============================//
// copyset service
CopysetServiceImpl copysetService(copysetNodeManager_);
server.AddService(©setService);
// chunk service
ChunkServiceOptions chunkServiceOptions;
chunkServiceOptions.copysetNodeManager = copysetNodeManager_;
chunkServiceOptions.cloneManager = &cloneManager_;
ChunkServiceImpl chunkService(chunkServiceOptions);
server.AddService(&chunkService)
// chunkserver service
ChunkServerServiceImpl chunkserverService(copysetNodeManager_);
server.AddService(&chunkserverService);
// braftclient service
BRaftCliServiceImpl2 braftCliService2;
server.AddService(&braftCliService2)
// scan copyset service
ScanServiceImpl scanCopysetService(&scanManager_);
server.AddService(&scanCopysetServiceE);
// 启动rpc service
server.Start(endPoint, NULL);
// =======================启动各模块==================================//
/**
* 将模块启动放到rpc 服务启动后面,主要是为了解决内存增长的问题
* 控制并发恢复的copyset数量,copyset恢复需要依赖rpc服务先启动
*/
LOG_IF(FATAL, trash_->Run() != 0)
<< "Failed to start trash.";
LOG_IF(FATAL, cloneManager_.Run() != 0)
<< "Failed to start clone manager.";
LOG_IF(FATAL, heartbeat_.Run() != 0)
<< "Failed to start heartbeat manager.";
LOG_IF(FATAL, copysetNodeManager_->Run() != 0)
<< "Failed to start CopysetNodeManager.";
LOG_IF(FATAL, scanManager_.Run() != 0)
<< "Failed to start scan manager.";
LOG_IF(FATAL, !chunkfilePool->StartCleaning())
<< "Failed to start file pool clean worker.";
}
int CopysetNodeManager::Run() {
    // 启动线程池
    if (copysetLoader_ != nullptr) {
        ret = copysetLoader_->Start(
            copysetNodeOptions_.loadConcurrency);
    }

    // 启动加载已有的copyset
    ret = ReloadCopysets();
    return ret;
}
// brpc服务端
void ChunkServiceImpl::WriteChunk(RpcController *controller,
                                  const ChunkRequest *request,
                                  ChunkResponse *response,
                                  Closure *done) {

    ChunkServiceClosure* closure =
        new (std::nothrow) ChunkServiceClosure(inflightThrottle_,
                                               request,
                                               response,
                                               done);
    brpc::ClosureGuard doneGuard(closure);

    // 达到限流
    if (inflightThrottle_->IsOverLoad()) {
        response->set_status(CHUNK_OP_STATUS::CHUNK_OP_STATUS_OVERLOAD);
        return;
    }

    brpc::Controller *cntl = dynamic_cast<brpc::Controller *>(controller);

     // 判断copyset是否存在
    auto nodePtr = copysetNodeManager_->GetCopysetNode(request->logicpoolid(),request->copysetid());
    if (nullptr == nodePtr) {
        response->set_status(CHUNK_OP_STATUS::CHUNK_OP_STATUS_COPYSET_NOTEXIST);
        return;
    }

    std::shared_ptr<WriteChunkRequest>
        req = std::make_shared<WriteChunkRequest>(nodePtr,
                                                  controller,
                                                  request,
                                                  response,
                                         doneGuard.release());
    req->Process();
}

void ChunkOpRequest::Process() {
    brpc::ClosureGuard doneGuard(done_);
    /**
     * 如果propose成功,说明request成功交给了raft处理,
     * 那么done_就不能被调用,只有propose失败了才需要提前返回
     */
    if (0 == Propose(request_, cntl_ ? &cntl_->request_attachment() :
                     nullptr)) {
        doneGuard.release();
    }
}

int ChunkOpRequest::Propose(const ChunkRequest *request,
                            const butil::IOBuf *data) {
    // 检查任期和自己是不是Leader
    if (!node_->IsLeaderTerm()) {
        RedirectChunkRequest();
        return -1;
    }
    // 打包op request为task
    braft::Task task;
    butil::IOBuf log;
    if (0 != Encode(request, data, &log)) {
        response_->set_status(CHUNK_OP_STATUS::CHUNK_OP_STATUS_FAILURE_UNKNOWN);
        return -1;
    }
    task.data = &log;
    task.done = new ChunkClosure(shared_from_this());
    /**
     * 由于apply是异步的,有可能某个节点在term1是leader,apply了一条log,
     * 但是中间发生了主从切换,在很短的时间内这个节点又变为term3的leader,
     * 之前apply的日志才开始进行处理,这种情况下要实现严格意义上的复制状态
     * 机,需要解决这种ABA问题,可以在apply的时候设置leader当时的term
     */
    task.expected_term = node_->LeaderTerm();

    node_->Propose(task);

    return 0;
}

void CopysetNode::Propose(const braft::Task &task) {
    raftNode_->apply(task);
}
class SnapshotTaskInfo : public TaskInfo {
 public:
     /**
      * @brief 构造函数
      *
      * @param snapInfo 快照信息
      */
    explicit SnapshotTaskInfo(const SnapshotInfo &snapInfo,
        std::shared_ptr<SnapshotInfoMetric> metric)
        : TaskInfo(),
          snapshotInfo_(snapInfo),
          metric_(metric) {}

    /**
     * @brief 获取快照信息
     *
     * @return 快照信息
     */
    SnapshotInfo& GetSnapshotInfo() {
        return snapshotInfo_;
    }

    /**
     * @brief 获取快照uuid
     *
     * @return 快照uuid
     */
    UUID GetUuid() const {
        return snapshotInfo_.GetUuid();
    }

    /**
     * @brief 获取文件名
     *
     * @return 文件名
     */
    std::string GetFileName() const {
        return snapshotInfo_.GetFileName();
    }

    void UpdateMetric() {
        metric_->Update(this);
    }

 private:
    // 快照信息
    SnapshotInfo snapshotInfo_;
    // metric 信息
    std::shared_ptr<SnapshotInfoMetric> metric_;
};


/**
 * @brief 创建快照任务
 */
class SnapshotCreateTask : public SnapshotTask {
 public:
     /**
      * @brief 构造函数
      *
      * @param taskId 快照任务id
      * @param taskInfo 快照任务信息
      * @param core 快照核心逻辑对象
      */
    SnapshotCreateTask(const TaskIdType &taskId,
        std::shared_ptr<SnapshotTaskInfo> taskInfo,
        std::shared_ptr<SnapshotCore> core)
        : SnapshotTask(taskId, taskInfo, core) {}

    /**
     * @brief 快照执行函数
     */
    void Run() override {
        core_->HandleCreateSnapshotTask(taskInfo_);
    }
};


class ChunkIndexData {
 public:
    ChunkIndexData() {}
    /**
     * 索引chunk数据序列化(使用protobuf实现)
     * @param 保存序列化后数据的指针
     * @return: true 序列化成功/ false 序列化失败
     */
    bool Serialize(std::string *data) const;

    /**
     * 反序列化索引chunk的数据到map中
     * @param 索引chunk存储的数据
     * @return: true 反序列化成功/ false 反序列化失败
     */
    bool Unserialize(const std::string &data);

    void PutChunkDataName(const ChunkDataName &name) {
        chunkMap_.emplace(name.chunkIndex_, name.chunkSeqNum_);
    }

    bool GetChunkDataName(ChunkIndexType index, ChunkDataName* nameOut) const;

    bool IsExistChunkDataName(const ChunkDataName &name) const;

    std::vector<ChunkIndexType> GetAllChunkIndex() const;

    void SetFileName(const std::string &fileName) {
        fileName_ = fileName;
    }

    std::string GetFileName() {
        return fileName_;
    }

 private:
    // 文件名
    std::string fileName_;
    // 快照文件索引信息map
    std::map<ChunkIndexType, SnapshotSeqType> chunkMap_;
};
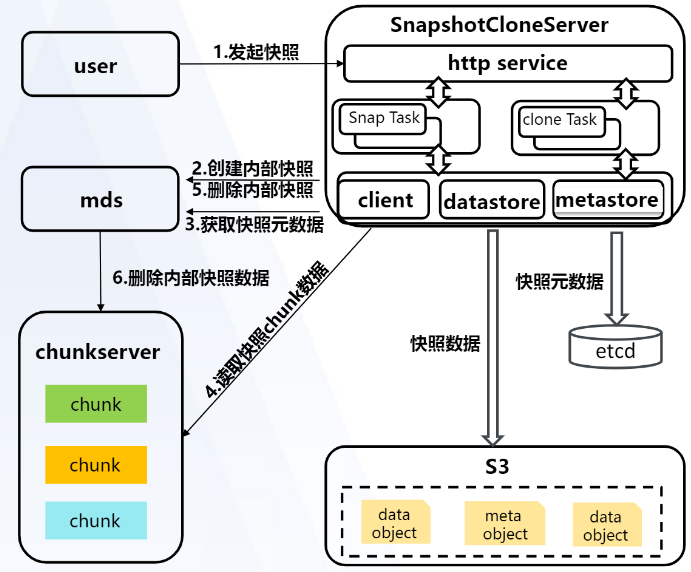
1.用户发起快照,生成快照任务,并持久化到etcd中,后台开始执行快照任务。 SnapshotCloneServiceImpl::default_method-> SnapshotCloneServiceImpl::HandleCreateSnapshotAction-> SnapshotServiceManager::CreateSnapshot
int SnapshotServiceManager::CreateSnapshot(const std::string &file,
    const std::string &user,
    const std::string &snapshotName,
    UUID *uuid) {
    SnapshotInfo snapInfo;
    // 前置检查,是否满足创建快照的条件,同时将pengding状态快照任务进行持久化
    int ret = core_->CreateSnapshotPre(file, user, snapshotName, &snapInfo);
    if (ret < 0) {
        if (kErrCodeTaskExist == ret) {
            // 任务已存在的情况下返回成功,使接口幂等
            *uuid = snapInfo.GetUuid();
            return kErrCodeSuccess;
        }
        LOG(ERROR) << "CreateSnapshotPre error, "
                   << " ret ="
                   << ret
                   << ", file = "
                   << file
                   << ", snapshotName = "
                   << snapshotName
                   << ", uuid = "
                   << snapInfo.GetUuid();
        return ret;
    }
    *uuid = snapInfo.GetUuid();

    auto snapInfoMetric = std::make_shared<SnapshotInfoMetric>(*uuid);
    std::shared_ptr<SnapshotTaskInfo> taskInfo =
        std::make_shared<SnapshotTaskInfo>(snapInfo, snapInfoMetric);
    taskInfo->UpdateMetric();
    // 构建task任务并加入到队列中
    std::shared_ptr<SnapshotCreateTask> task =
        std::make_shared<SnapshotCreateTask>(
            snapInfo.GetUuid(), taskInfo, core_);
    ret = taskMgr_->PushTask(task);
    if (ret < 0) {
        LOG(ERROR) << "Push Task error, "
                   << " ret = "
                   << ret;
        return ret;
    }
    return kErrCodeSuccess;
}
2.后台执行快照任务,调用SnapshotCoreImpl::HandleCreateSnapshotTask函数。 这里分几个步骤进行:
- 发送创建快照请求给mds
- 构建本次快照的chunkIndexData
- 构建构建该文件所有的快照数据映射表
- 转存快照数据到s3上
- 删除快照数据
- 更新快照状态为done
/**
 * @brief 异步执行创建快照任务并更新任务进度
 *
 * 快照进度规划如下:
 *
 *  |CreateSnapshotOnCurvefs| BuildChunkIndexData | BuildSnapshotMap | TransferSnapshotData | UpdateSnapshot | //NOLINT
 *  | 5%                    | 6%                  | 10%              | 10%~99%              | 100%           | //NOLINT
 *
 *
 *  异步执行期间发生error与cancel情况说明:
 *  1. 发生error将导致整个异步任务直接中断,并且不做任何清理动作:
 *  发生error时,一般系统存在异常,清理动作很可能不能完成,
 *  因此,不进行任何清理,只置状态,待人工干预排除异常之后,
 *  使用DeleteSnapshot功能去手动删除error状态的快照。
 *  2. 发生cancel时则以创建功能相反的顺序依次进行清理动作,
 *  若清理过程发生error,则立即中断,之后同error过程。
 *
 * @param task 快照任务
 */
void SnapshotCoreImpl::HandleCreateSnapshotTask(
    std::shared_ptr<SnapshotTaskInfo> task) {
    std::string fileName = task->GetFileName();

    // 如果当前有失败的快照,需先清理失败的快照,否则快照会再次失败
    int ret = ClearErrorSnapBeforeCreateSnapshot(task);
    if (ret < 0) {
        HandleCreateSnapshotError(task);
        return;
    }

    // 为支持任务重启,这里有三种情况需要处理
    // 1. 没打过快照, 没有seqNum且curve上没有快照
    // 2. 打过快照, 有seqNum且curve上有快照
    // 3. 打过快照并已经转储完删除快照, 有seqNum但curve上没有快照

    SnapshotInfo *info = &(task->GetSnapshotInfo());
    UUID uuid = task->GetUuid();
    uint64_t seqNum = info->GetSeqNum();
    bool existIndexData = false;
    // 场景1:没打过快照场景,没有indexData
    if (kUnInitializeSeqNum == seqNum) {
        ret = CreateSnapshotOnCurvefs(fileName, info, task);
        if (ret < 0) {
            LOG(ERROR) << "CreateSnapshotOnCurvefs error, "
                       << " ret = " << ret
                       << ", fileName = " << fileName
                       << ", uuid = " << task->GetUuid();
            HandleCreateSnapshotError(task);
            return;
        }
        seqNum = info->GetSeqNum();
        existIndexData = false;
    } else {
        FInfo snapInfo;
        ret = client_->GetSnapshot(fileName,
            info->GetUser(),
            seqNum, &snapInfo);
        // 场景3 直接更新快照status为done
        if (-LIBCURVE_ERROR::NOTEXIST == ret) {
            HandleCreateSnapshotSuccess(task);
            return;
        // 场景2 判断当前是否存在该快照的indexData
        } else if (LIBCURVE_ERROR::OK == ret) {
            ChunkIndexDataName name(fileName, seqNum);
            // judge Is Exist indexData
            existIndexData = dataStore_->ChunkIndexDataExist(name);
        } else {
            LOG(ERROR) << "GetSnapShot on curvefs fail, "
                       << " ret = " << ret
                       << ", fileName = " << fileName
                       << ", user = " << info->GetUser()
                       << ", seqNum = " << seqNum
                       << ", uuid = " << task->GetUuid();
            HandleCreateSnapshotError(task);
            return;
        }
    }

    task->SetProgress(kProgressCreateSnapshotOnCurvefsComplete);
    task->UpdateMetric();
    if (task->IsCanceled()) {
        return CancelAfterCreateSnapshotOnCurvefs(task);
    }

    ChunkIndexData indexData;
    ChunkIndexDataName name(fileName, seqNum);
    // the key is segment index
    std::map<uint64_t, SegmentInfo> segInfos;
    if (existIndexData) {
        // 获取indexData
        ret = dataStore_->GetChunkIndexData(name, &indexData);
        if (ret < 0) {
            LOG(ERROR) << "GetChunkIndexData error, "
                       << " ret = " << ret
                       << ", fileName = " << fileName
                       << ", seqNum = " << seqNum
                       << ", uuid = " << task->GetUuid();
            HandleCreateSnapshotError(task);
            return;
        }

        task->SetProgress(kProgressBuildChunkIndexDataComplete);
        task->UpdateMetric();
        // 构建所有的segment信息
        ret = BuildSegmentInfo(*info, &segInfos);
        if (ret < 0) {
            LOG(ERROR) << "BuildSegmentInfo error,"
                       << " ret = " << ret
                       << ", uuid = " << task->GetUuid();
            HandleCreateSnapshotError(task);
            return;
        }
    } else {
        // 不存在的场景直接构建indexData和segment信息
        ret = BuildChunkIndexData(*info, &indexData, &segInfos, task);
        if (ret < 0) {
            LOG(ERROR) << "BuildChunkIndexData error, "
                       << " ret = " << ret
                       << ", uuid = " << task->GetUuid();
            HandleCreateSnapshotError(task);
            return;
        }
        // 上传indexData到s3
        ret = dataStore_->PutChunkIndexData(name, indexData);
        if (ret < 0) {
            LOG(ERROR) << "PutChunkIndexData error, "
                       << " ret = " << ret
                       << ", uuid = " << task->GetUuid();
            HandleCreateSnapshotError(task);
            return;
        }

        task->SetProgress(kProgressBuildChunkIndexDataComplete);
        task->UpdateMetric();
    }

    if (task->IsCanceled()) {
        return CancelAfterCreateChunkIndexData(task);
    }

    FileSnapMap fileSnapshotMap;
    // 构建该文件所有的快照数据映射表
    ret = BuildSnapshotMap(fileName,
        seqNum,
        &fileSnapshotMap);
    if (ret < 0) {
        LOG(ERROR) << "BuildSnapshotMap error, "
                   << " fileName = " << task->GetFileName()
                   << ", seqNum = " << seqNum
                   << ", uuid = " << task->GetUuid();
        HandleCreateSnapshotError(task);
        return;
    }
    task->SetProgress(kProgressBuildSnapshotMapComplete);
    task->UpdateMetric();

    if (existIndexData) {
        ret = TransferSnapshotData(indexData,
            *info,
            segInfos,
            [this] (const ChunkDataName &chunkDataName) {
                return dataStore_->ChunkDataExist(chunkDataName);
            },
            task);
    } else {
        ret = TransferSnapshotData(indexData,
            *info,
            segInfos,
            [&fileSnapshotMap] (const ChunkDataName &chunkDataName) {
                return fileSnapshotMap.IsExistChunk(chunkDataName);
            },
            task);
    }
    if (ret < 0) {
        LOG(ERROR) << "TransferSnapshotData error, "
                   << " ret = " << ret
                   << ", uuid = " << task->GetUuid();
        HandleCreateSnapshotError(task);
        return;
    }
    task->SetProgress(kProgressTransferSnapshotDataComplete);
    task->UpdateMetric();

    if (task->IsCanceled()) {
        return CancelAfterTransferSnapshotData(
            task, indexData, fileSnapshotMap);
    }

    ret = DeleteSnapshotOnCurvefs(*info);
    if (ret < 0) {
        LOG(ERROR) << "DeleteSnapshotOnCurvefs fail"
                   << ", uuid = " << task->GetUuid();
        HandleCreateSnapshotError(task);
        return;
    }

    LockGuard lockGuard(task->GetLockRef());
    if (task->IsCanceled()) {
        return CancelAfterTransferSnapshotData(
            task, indexData, fileSnapshotMap);
    }
    // 更新快照状态为done
    HandleCreateSnapshotSuccess(task);
    return;
}
转储快照函数TransferSnapshotData
int SnapshotCoreImpl::TransferSnapshotData(
    const ChunkIndexData indexData,
    const SnapshotInfo &info,
    const std::map<uint64_t, SegmentInfo> &segInfos,
    const ChunkDataExistFilter &filter,
    std::shared_ptr<SnapshotTaskInfo> task) {
    int ret = 0;
    uint64_t segmentSize = info.GetSegmentSize();
    uint64_t chunkSize = info.GetChunkSize();
    uint64_t chunkPerSegment = segmentSize/chunkSize;

    if (0 == chunkSplitSize_ || chunkSize % chunkSplitSize_ != 0) {
        LOG(ERROR) << "error!, ChunkSize is not align to chunkSplitSize"
                   << ", uuid = " << task->GetUuid();
        return kErrCodeChunkSizeNotAligned;
    }
    // 通过indexData获取chunkIndex的列表
    std::vector<ChunkIndexType> chunkIndexVec = indexData.GetAllChunkIndex();

    uint32_t totalProgress = kProgressTransferSnapshotDataComplete -
        kProgressTransferSnapshotDataStart;
    uint32_t transferDataNum = chunkIndexVec.size();
    double progressPerData =
        static_cast<double>(totalProgress) / transferDataNum;
    uint32_t index = 0;
    // 遍历chunkIndex的列表
    for (auto &chunkIndex : chunkIndexVec) {
        uint64_t segNum = chunkIndex / chunkPerSegment;

        auto it = segInfos.find(segNum);
        if (it == segInfos.end()) {
            LOG(ERROR) << "TransferSnapshotData has encounter an interanl error"
                       << ": The ChunkIndexData is not match to SegmentInfo!!!"
                       << " chunkIndex = " << chunkIndex
                       << ", segNum = " << segNum
                       << ", uuid = " << task->GetUuid();
            return kErrCodeInternalError;
        }

        uint64_t chunkIndexInSegment = chunkIndex % chunkPerSegment;
        if (chunkIndexInSegment >= it->second.chunkvec.size()) {
            LOG(ERROR) << "TransferSnapshotData, "
                       << "chunkIndexInSegment >= "
                       << "segInfos[segNum].chunkvec.size()"
                       << ", chunkIndexInSegment = "
                       << chunkIndexInSegment
                       << ", size = "
                       << it->second.chunkvec.size()
                       << ", uuid = " << task->GetUuid();
            return kErrCodeInternalError;
        }
    }

    auto tracker = std::make_shared<TaskTracker>();
    for (auto &chunkIndex : chunkIndexVec) {
        ChunkDataName chunkDataName;
        indexData.GetChunkDataName(chunkIndex, &chunkDataName);
        uint64_t segNum = chunkIndex / chunkPerSegment;
        uint64_t chunkIndexInSegment = chunkIndex % chunkPerSegment;

        auto it = segInfos.find(segNum);
        if (it != segInfos.end()) {
            ChunkIDInfo cidInfo =
                it->second.chunkvec[chunkIndexInSegment];
            if (!filter(chunkDataName)) {
                auto taskInfo =
                    std::make_shared<TransferSnapshotDataChunkTaskInfo>(
                        chunkDataName, chunkSize, cidInfo, chunkSplitSize_,
                        clientAsyncMethodRetryTimeSec_,
                        clientAsyncMethodRetryIntervalMs_,
                        readChunkSnapshotConcurrency_);
                UUID taskId = UUIDGenerator().GenerateUUID();
                // 每个chunk构建一个task任务,后台调用TransferSnapshotDataChunk
                // 进行单个chunk的转储
                auto task = new TransferSnapshotDataChunkTask(
                    taskId,
                    taskInfo,
                    client_,
                    dataStore_);
                task->SetTracker(tracker);
                tracker->AddOneTrace();
                threadPool_->PushTask(task);
            } else {
                DLOG(INFO) << "find data object exist, skip chunkDataName = "
                           << chunkDataName.ToDataChunkKey();
            }
        }
        if (tracker->GetTaskNum() >= snapshotCoreThreadNum_) {
            tracker->WaitSome(1);
        }
        ret = tracker->GetResult();
        if (ret < 0) {
            LOG(ERROR) << "TransferSnapshotDataChunk tracker GetResult fail"
                       << ", ret = " << ret
                       << ", uuid = " << task->GetUuid();
            return ret;
        }

        task->SetProgress(static_cast<uint32_t>(
                kProgressTransferSnapshotDataStart + index * progressPerData));
        task->UpdateMetric();
        index++;
        if (task->IsCanceled()) {
            return kErrCodeSuccess;
        }
    }
    // 最后剩余数量不足的任务
    tracker->Wait();
    ret = tracker->GetResult();
    if (ret < 0) {
        LOG(ERROR) << "TransferSnapshotDataChunk tracker GetResult fail"
                   << ", ret = " << ret
                   << ", uuid = " << task->GetUuid();
        return ret;
    }

    return kErrCodeSuccess;
}
目前CurveBS还不支持存储池内扩容,如果要扩容集群,可以新增存储池(逻辑池),与Ceph不同的是,CurveBS卷可以跨存储池分配空间,因此原有的存储池容量也可以通过扩容存储池来实现扩容。
手动扩容存储池的操作步骤通常为(相关操作已集成到CurveAdm工具中可以自动化完成,这里是为了展示更具体的操作步骤):
首先备份etcd数据:
   ETCDCTL_API=3 sudo etcdctl --endpoints {ip}:{port} snapshot save /etcd/snapshot_`date +%Y-%m-%d-%H:%M:%S`.db
   其中,ip和port分别是主etcd的ip和端口。

以下操作均在第一个mds上执行
1、创建物理池
   curve-tool -op=create_physicalpool
2、curve_ops_tool status确认物理池数量为2
3、进入/data/curve-deploy/curve/curve-ansible目录,拉起chunkserver
   ansible-playbook start_curve.yml -i server.ini --tags chunkserver
4、curve_ops_tool status查看chunkserver数量符合预期。此时会报许多Some copysets not found on chunkserver, may be tranfered,这是因为还没创建copyset,忽略。
5、创建逻辑池
    curve-tool -op=create_logicalpool
6、curve_ops_tool确认集群健康。
7、用工具触发快速leader均衡:curve_ops_tool rapid-leader-schedule -logical-pool-id={ID},其中ID是新创建的逻辑池的id,可以使用curve_ops_tool logical-pool-list查看逻辑池id
8、 curl {主mdsip}:{mds端口}/vars | grep leadernum_range查看新创建的池子的leadernum_range。如果大于3,就等待一会,如果变化比较慢就再触发一次快速leader均衡
create_physicalpool会执行如下3个资源的创建操作:
- 创建物理池
- 创建zone
- 创建server
create_logicalpool会创建逻辑池。
相关流程基本没有区别,都是通过命令行工具根据入参执行对应的check之后,发生rpc请求给MDS,将相关信息保存到etcd中返回。
- RPC proto:proto/topology.proto
- MDS服务端实现:src/mds/topology/topology_service.cpp
- 相关实现函数:CreateXX,如CreateZone等
物理资源创建完毕之后,需要启动chunkserver服务,启动后会注册chunkserver到MDS,但此时并不会上报磁盘空间等资源信息,而是会随chunkserver心跳信息上报到MDS,之后就可以创建逻辑池了,否则会创建失败(找不到合适的copyset),因此在部署过程中如果刚启动chunkserver就立即创建逻辑存储池就会偶尔失败。
启动chunkserver的大致流程介绍可以参考:chunkserver初始化
chunkserver心跳上报流程可以参考:HeartBeat上报流程
心跳上报涉及到的模块和函数主要包括:
- proto:
proto/heartbeat.proto - chunkserver:
src/chunkserver/heartbeat.cpp:Heartbeat::HeartbeatWorker() --> Heartbeat::BuildRequest() --> Heartbeat::SendHeartbeat() - MDS:
src/mds/heartbeat/heartbeat_service.cpp:HeartbeatServiceImpl::ChunkServerHeartbeat() --> src/mds/heartbeat/heartbeat_manager.cpp:HeartbeatManager::UpdateChunkServerDiskStatus()
逻辑池的分配量情况和总空间情况,都是心跳上报流程各个chunkserver的容量情况累加出来的,相关流程比较简单清晰,这里不再详述。
MDS用到的一些与空间分配相关的配置项(用在src/mds/topology/topology_chunk_allocator.cpp):
/// 物理池使用百分比,即使用量超过这个值即不再往这个池分配
mds.topology.PoolUsagePercentLimit=85

/// 多pool选pool策略 0:Random, 1:Weight
mds.topology.choosePoolPolicy=0

/// enable LogicalPool ALLOW/DENY status
mds.topology.enableLogicalPoolStatus=false
分配流程涉及到的主要模块和函数为:
- proto:
proto/nameserver2.proto:CurveFSService::GetOrAllocateSegment() - client:
src/client/splitor.cpp:Splitor::GetOrAllocateSegment() --> src/client/mds_client.cpp:MDSClient::GetOrAllocateSegment() --> src/client/mds_client_base.cpp:MDSClientBase::GetOrAllocateSegment() - MDS:
src/mds/nameserver2/namespace_service.cpp:NameSpaceService::GetOrAllocateSegment() --> src/mds/nameserver2/curvefs.cpp:CurveFS::GetOrAllocateSegment() --> src/mds/nameserver2/chunk_allocator.cpp:ChunkSegmentAllocatorImpl::AllocateChunkSegment() --> src/mds/topology/topology_chunk_allocator.cpp:TopologyChunkAllocatorImpl::AllocateChunkRoundRobinInSingleLogicalPool() --> TopologyChunkAllocatorImpl::ChooseSingleLogicalPool() --> AllocateChunkPolicy::ChooseSingleLogicalPoolRandom() - snapshot:
src/snapshotcloneserver/clone/clone_task.h:CloneTask --> src/snapshotcloneserver/clone/clone_core.cpp:CloneCoreImpl::HandleCloneOrRecoverTask() --> CloneCoreImpl::BuildFileInfoFromFile() --> src/client/libcurve_snapshot.cpp:SnapshotClient::GetOrAllocateSegmentInfo() --> src/client/mds_client.cpp:MDSClient::GetOrAllocateSegment() --> src/client/mds_client_base.cpp:MDSClientBase::GetOrAllocateSegment()
核心逻辑位于MDS模块,如果有多个逻辑pool(目前仅支持一个物理池上创建一个逻辑池)目前默认采用随机分配策略,也就是pool上空间足够的前提下随机分配segment到其中一个pool上。上述逻辑也比较简单清晰,这里不再详述。
从上述空间分配流程可以看出,CurveBS目前一个集群支持创建多个物理池,并且每个物理池上只能创建一个逻辑池,也即物理池和逻辑池一一对应。另外也可以看出segment的分配是在所有逻辑池(一一对应到物理池)上随机挑选进行空间分配的,所以也就意味着一个卷可以使用所有逻辑池上的空间。如果一个集群里想要配置多种存储介质(如SSD、HDD等),目前是无法控制卷分配到哪种介质上的(如果强制使用多种存储介质会导致卷的性能不均衡,部分segment/chunkfile在SSD上,部分在HDD上),因此后续我们需要支持根据存储介质划分存储池及空间分配。
CurveBS中目前只有chunkserver会上报心跳给MDS,因此这里只分析chunkserver的心跳上报流程。
心跳上报相关流程可以参考2.6节。
CurveBS、CurveFS的MDS服务以及snapshotcloneserver服务的高可用都是通过主备模式实现的,当主节点异常退出时,备节点可以立即发现并接管承担主节点的功能,多个节点之间协调选主的过程通常比较流行的是用zookeeper,也有使用etcd实现选主功能的,CurveBS在实现MDS的高可用之前,已经依赖了etcd来存储集群topo等信息,因此继续使用etcd来实现选主功能。
使用etcd实现元数据节点的leader主要依赖于它的两个核心机制: TTL和CAS。TTL(time to live)指的是给一个key设置一个有效期,到期后key会被自动删掉。这在很多分布式锁的实现上都会用到,可以保证锁的实时性和有效性。CAS(Atomic Compare-and-Swap)指的是在对key进行赋值的时候,客户端需要提供一些条件,当这些条件满足后才能赋值成功。
我们主要是用其中两个方法:
- Campagin用于leader竞选
- Observe用于监测集群中leader的变化
相关补丁是为了解决session异常情况下会出现双主的问题(实际测试中发现的bug),位于thirdparties/etcdclient目录下。
详细设计方案可参考:Curve元数据节点高可用.pdf
FUSE(Filesystem in Userspace)是用户空间程序将文件系统导出到 Linux 内核的接口。 FUSE项目由两个组件组成:fuse内核模块(在内核代码库中维护)和 libfuse用户空间库(Github)。 libfuse 提供了与 FUSE 内核模块通信的参考实现。
FUSE 文件系统通常实现为与 libfuse 链接的独立应用程序。 libfuse 提供了挂载文件系统、卸载文件系统、从内核读取请求以及发回响应的函数。 libfuse 提供两种 API:“high-level”同步 API 和“low-level”异步 API。在这两种情况下,来自内核的传入请求都使用回调传递给主程序。使用high-level API 时,回调可以使用文件名和路径而不是 inode,并且在回调函数返回时完成请求的处理。使用low-level API 时,回调必须与 inode 一起使用,并且必须使用一组单独的 API 函数显式发送响应。相比high-level API,low-level API有更高的自由度,使用起来也更困难,目前CurveFS使用的low-level API。
libfuse有2个主流版本,分别为v2和v3,二者区别不大,只是部分函数名称有调整或新增,CurveFS使用的是libfuse3。
FUSE默认的最大请求长度是32个pages,也即32×4K=128K。定义在fs/fuse/fuse_i.h:https://docs.huihoo.com/doxygen/linux/kernel/3.7/fuse__i_8h.html#a291aa3ad297976be4e00793a43e88af8 ,如需修改需要编译fuse内核模块:https://chubaofs.readthedocs.io/zh_CN/latest/user-guide/fuse.html
curve-fuse进程的main函数实现是在curvefs/src/client/main.c中,可以看到实现了如下接口:
static const struct fuse_lowlevel_ops curve_ll_oper = {
    .init       = FuseOpInit,
    .destroy    = FuseOpDestroy,
    .lookup     = FuseOpLookup,
    .rename     = FuseOpRename,
    .write      = FuseOpWrite,
    .read       = FuseOpRead,
    .open       = FuseOpOpen,
    .create     = FuseOpCreate,
    .mknod      = FuseOpMkNod,
    .mkdir      = FuseOpMkDir,
    .unlink     = FuseOpUnlink,
    .rmdir      = FuseOpRmDir,
    .opendir    = FuseOpOpenDir,
    .readdir    = FuseOpReadDir,
    .getattr    = FuseOpGetAttr,
    .setattr    = FuseOpSetAttr,
    .getxattr   = FuseOpGetXattr,
    .listxattr  = FuseOpListXattr,
    .symlink    = FuseOpSymlink,
    .link       = FuseOpLink,
    .readlink   = FuseOpReadLink,
    .release    = FuseOpRelease,
    .fsync      = FuseOpFsync,
    .releasedir = FuseOpReleaseDir,
    .flush      = FuseOpFlush,
    .bmap       = FuseOpBmap,
    .statfs     = FuseOpStatFs,
};
上述函数的具体实现是在curvefs/src/client/curve_fuse_op.cpp,这部分源码在相关IO流程分析小节中有详细介绍,这里不细述。
main函数的主要内容包括命令行参数解析、日志模块初始化、fuse参数准备、curvefs客户端初始化、fuse session构造、信号处理函数注册、fuse文件系统挂载,以及进程daemonize化,均属于low-level API的常规使用流程,与libfuse的示例代码区别不大(https://github.com/libfuse/libfuse/blob/master/example/hello_ll.c )。
关于FUSE的介绍文章网上有很多资料可以参考:
- 官方简介:https://www.kernel.org/doc/html/latest/filesystems/fuse.html
- 个人解读(包含流程分析及示例代码):https://www.cnblogs.com/xuyaowen/p/fuse.html
创建文件系统主要涉及到MDS和MetaServer两个组件或服务,分别可以参考二者的设计文档:
- MDS:https://github.com/opencurve/curve/blob/master/docs/cn/curvefs_architecture.md#%E5%85%83%E6%95%B0%E6%8D%AE%E9%9B%86%E7%BE%A4
- MetaServer:https://github.com/opencurve/curve/blob/master/docs/cn/curvefs-metaserver-overview.md
需要使用命令行工具创建文件系统,相关的配置项:
#
# topology config
#
# max partition number in copyset 2^8
mds.topology.MaxPartitionNumberInCopyset=256
# id number in each partition 2^24 [0, 2^24-1]
mds.topology.IdNumberInPartition=16777216
# initial copyset number in cluster
mds.topology.InitialCopysetNumber=10
# min avaiable copyset num in cluster
mds.topology.MinAvailableCopysetNum=10
# default create partition number 3
mds.topology.CreatePartitionNumber=3
# max copyset num in metaserver
mds.topology.MaxCopysetNumInMetaserver=100
// tools相关流程(命令行工具重构中,此流程仅供参考)
curvefs/src/tools/curvefs_tool_main.cpp:main()
    curvefs/src/tools/create/curvefs_create_fs.cpp:CreateFsTool::Init()
    curvefs/src/tools/curvefs_tool.cpp:Run()
        curvefs/src/tools/curvefs_tool.h:RunCommand()
            curvefs/src/tools/curvefs_tool.h:SendRequestToServices()
                curvefs/src/tools/create/curvefs_create_fs.cpp:CreateFsTool::AfterSendRequestToHost()

// MDS相关流程
curvefs/src/mds/mds_service.cpp:MdsServiceImpl::CreateFs()
    curvefs/src/mds/fs_manager.cpp:FsManager::CreateFs()
        curvefs/src/mds/fs_storage.cpp:PersisKVStorage::Insert() --> PersisKVStorage::PersitToStorage() --> src/kvstorageclient/etcd_client.cpp:EtcdClientImp::Put()  // etcd存储后端
            curvefs/src/mds/topology/topology_manager.cpp:TopologyManager::CreatePartitionsAndGetMinPartition()     // 默认创建数量为mds.topology.CreatePartitionNumber=3默认预先创建3个partition并优先使用最小id的partition
                curvefs/src/mds/topology/topology_manager.cpp:TopologyManager::CreatePartitions() // 随机选择copyset,发送RPC请求给metaserver创建partition,需要发送3次创建partition的RPC请求
                    curvefs/src/mds/topology/topology_manager.cpp:TopologyManager::CreateEnoughCopyset()  // 检查是否有足够的copyset可以用来创建partition,少于mds.topology.MinAvailableCopysetNum=10则创建copyset,保持可用copyset数量在10个
        curvefs/src/mds/metaserverclient/metaserver_client.cpp:MetaserverClient::CreateRootInode()  // 发送RPC给metaserver创建fs的根Inode,inodeid默认为1,curvefs/src/common/define.h:const uint64_t ROOTINODEID = 1; 这部分流程与创建inode基本一致,也可以参考创建fs流程

// MetaServer相关流程
// 由于metaserver被RPC调用了多次,包括创建copyset、partition、root inode等请求,这里仅分析创建partition请求,其他请求流程也类似
// partition是个逻辑概念,实际数据是保存在raft的copyset(raftlog)+内存或rocksdb(数据)中。
curvefs/src/metaserver/metaserver_service.cpp:MetaServerServiceImpl::CreatePartition()   // 提交op到raft状态机流程,写入op数据到copyset,会执行OnApply()持久化数据
    curvefs/src/metaserver/copyset/meta_operator.h:CreatePartitionOperator::OnApply()
        curvefs/src/metaserver/copyset/meta_operator.cpp:OPERATOR_ON_APPLY(CreatePartition)   // OPERATOR_ON_APPLY是宏定义
            curvefs/src/metaserver/metastore.cpp:MetaStoreImpl::CreatePartition()    // 这里只更新内存中partition信息,CopysetNode::on_snapshot_save会定期dump copyset的raft状态数据到metafile(也即本地磁盘上),即使配置了copyset的持久化存储为rocksdb也是一样
3.3.1 mds
与创建文件系统类似,主要涉及 mds 和 metaserver 两个组件。如果要删除某一个文件系统,需要通过 rpc DeleteFs(DeleteFsRequest) returns (DeleteFsResponse)。将要删除 的文件系统名发送给mds。
message DeleteFsRequest {
    required string fsName = 1;
}

message DeleteFsResponse {
    required FSStatusCode statusCode = 1;
}

rpc DeleteFs(DeleteFsRequest) returns (DeleteFsResponse);
mds 收到删除文件系统的请求后,调用文件系统的管理模块(FsManager)删除对应的fs,并根据结果设置response的状态码返回。
3.3.2 FsManager
FsManager会从 fs 的存储模块 FsStorage 中获取 fs 的信息,以此来检查 fs 是否存在,并根据 fs 的信息来检查 fs 能否删除 fs (是否存在挂载点等等)。如果可以删除fs 会将fs的状态标记为deleting,并重命名fs名字(fsname+"deleting"+fsid+时间),然后返回删除成功。不可删除返回原因。
会有后台删除服务进程(backEndThread_管理)进行扫描,清理要删除的fs。
隶属于FsManager。 会对 FsStorage 进行扫描,从 FsStorage 删除状态的 fs 信息,并调用 DeletePartiton(std::string fsName, const PartitionInfo& partition) 来清理要删除fs名下的所有partition。
void FsManager::BackEndFunc() {
    while (sleeper_.wait_for(
        std::chrono::seconds(option_.backEndThreadRunInterSec))) {
        std::vector<FsInfoWrapper> wrapperVec;
        fsStorage_->GetAll(&wrapperVec);
        for (const FsInfoWrapper& wrapper : wrapperVec) {
            ScanFs(wrapper); // 扫描并删除
        }
    }
}
一般是由 client的发起 创建inode的rpc请求,然后 metaserver 响应并处理应该请求,并返回创建结果。 相关内容可参考文档: docs/cn/curvefs-client-design.md#L50
message CreateInodeRequest {
    required uint32 poolId = 1;
    required uint32 copysetId = 2;
    required uint32 partitionId = 3;
    required uint32 fsId = 4;
    required uint64 length = 5;
    required uint32 uid = 6;
    required uint32 gid = 7;
    required uint32 mode = 8;
    required FsFileType type = 9;
    required uint64 parent = 10;
    optional uint64 rdev = 11;
    optional string symlink = 12;   // TYPE_SYM_LINK only
}

message CreateInodeResponse {
    required MetaStatusCode statusCode = 1;
    optional Inode inode = 2;
    optional uint64 appliedIndex = 3;
}
rpc CreateInode(CreateInodeRequest) returns (CreateInodeResponse);
metaserver 收到创建 inode 请求后创建createrInode的流程(MetaOperator)并执行。 createInde的流程调用inode的管理者InodeManager创建inode的函数,然后检查创建的结果,创建成功后设置inode的AppliedIndex的参数,并创建该inode的metric。
根据参数创建inode,然后从Inode的存储模块中插入对应的inode。并根据插入的的状态码返回创建的结果.
写IO流程主要分为3个阶段,首先写入内存buffer,也即通常理解的pagecache,之后异步flush落盘,只是这里的落盘可能分为两种场景,一种是配置了本地磁盘写缓存,一种是没配置磁盘写缓存(可能是只配置了读缓存,也可能没有配置缓存盘)。落到本地磁盘缓存后,之后异步刷新到S3存储引擎,如果没有配置磁盘写缓存则直接flush到S3上。关于缓存的介绍可以参考1.6节。
相关的配置项包括:
#### s3
# the max size that fuse send
s3.fuseMaxSize=131072    # fuse内核模块控制的最大IO大小,用于粗略计算IO队列中IO总大小,队列IO个数乘以最大IO大小
s3.pagesize=65536        # 内存buffer的最小分配单元
# start sleep when mem cache use ratio is greater than nearfullRatio,
# sleep time increase follow with mem cache use raito, baseSleepUs is baseline.
s3.nearfullRatio=70    # 内存buffer警戒水位百分比,超出这个水位,写入时要进行sleep等待,异步flush线程要立即下刷数据
s3.baseSleepUs=500     # 更上面的水位搭配使用,每次等待的时间根据水位动态计算:exponent = pow(2, (exceedRatio) / 10); throttleBaseSleepUs_ * exceedRatio * exponent,exceedRatio为超出警戒水位的百分比数值

# TODO(huyao): use more meaningfull name
# background thread schedule time
s3.intervalSec=3   # 后台flush线程的轮询等待时间,间隔这个时间检查有没有要flush的内存buffer数据
# data cache flush wait time
s3.flushIntervalSec=5  # 内存buffer中的数据要在内存中留存这个间隔才会下刷(除非用户主动flush),等待而不是立即下刷主要是为了做IO合并以及读加速
s3.writeCacheMaxByte=838860800  # 内存写buffer容量上限
s3.readCacheMaxByte=209715200   # 内存读buffer容量上限

# TODO(hongsong): limit bytes、iops/bps
#### disk cache options
# 0:not enable disk cache 1:onlyread 2:read/write
diskCache.diskCacheType=2
# the file system writes files use flush or not
diskCache.forceFlush=true   # 写本地磁盘缓存时是否执行fdatasync
# the interval of check to trim disk cache
diskCache.trimCheckIntervalSec=5  # 淘汰本地磁盘缓存的后台线程轮询间隔时间
# the interval of check to trim load file to s3
diskCache.asyncLoadPeriodMs=5     # 异步上传磁盘缓存到S3之后等待上传完毕的轮询间隔
# start trim file when disk cache use ratio is Greater than fullRatio,
# util less than safeRatio
diskCache.fullRatio=90          # 本地磁盘缓存90%的水位开始淘汰缓存文件
diskCache.safeRatio=70          # 本地磁盘缓存安全水位,淘汰到这个水位结束
diskCache.threads=5             # 从本地磁盘缓存异步上传文件到S3的线程数
# the max size disk cache can use
diskCache.maxUsableSpaceBytes=107374182400  # 最大可用的本地磁盘缓存空间,多个fuse客户端共用同一个缓存盘的时候可以分开控制使用量
# the max time system command can run
diskCache.cmdTimeoutSec=300     # du命令获取磁盘使用量的超时时间:timeout 300 du -sb /cachedir
# directory of disk cache
diskCache.cacheDir=/mnt/curvefs_cache
# the write throttle bps of disk cache, default no limit
diskCache.avgFlushBytes=0       # 本地磁盘缓存的QoS平均写带宽限制
# the write burst bps of disk cache, default no limit
diskCache.burstFlushBytes=0     # 突发写带宽
# the times that write burst bps can continue, default 180s
diskCache.burstSecs=180         # 突发持续时间
# the write throttle iops of disk cache, default no limit
diskCache.avgFlushIops=0        # 本地磁盘缓存的QoS平均写iops限制
# the read throttle bps of disk cache, default no limit
diskCache.avgReadFileBytes=0    # 本地磁盘缓存的QoS平均读带宽限制
# the read throttle iops of disk cache, default no limit
diskCache.avgReadFileIops=0     # 本地磁盘缓存的QoS平均读iops限制
主要流程:
curvefs/src/client/curve_fuse_op.cpp:FuseOpWrite()
    curvefs/src/client/fuse_s3_client.cpp:FuseS3Client::FuseOpWrite()   // 检查direct IO对齐情况,512字节对齐
        curvefs/src/client/s3/client_s3_adaptor.cpp:S3ClientAdaptorImpl::Write()        // 写io主流程入口
        curvefs/src/client/inode_cache_manager.cpp:InodeCacheManagerImpl::GetInode()    // 获取inode信息以备更新inode使用
        curvefs/src/client/inode_cache_manager.cpp:InodeCacheManagerImpl::ShipToFlush() // 异步更新inode信息,mtime、ctime、length等
        curvefs/src/client/fuse_client.cpp:FuseClient::UpdateParentInodeXattr()         // 可选步骤,异步更新目录统计信息,加速子目录信息查询

curvefs/src/client/s3/client_s3_adaptor.cpp:S3ClientAdaptorImpl::Write()
    curvefs/src/client/s3/client_s3_cache_manager.cpp:FsCacheManager::FindOrCreateFileCacheManager()    // 创建file cache管理实例,每个inode一个
    curvefs/src/client/s3/client_s3_cache_manager.h:FsCacheManager::WaitFlush()                         // 如果写buffer使用量估算值超出s3.writeCacheMaxByte则等待flush下刷数据
    bthread_usleep()                                                                                    // 内存buffer水位超出s3.nearfullRatio则暂时等待
    curvefs/src/client/s3/client_s3_cache_manager.cpp:FileCacheManager::Write()                         // file cache写IO入口

curvefs/src/client/s3/client_s3_cache_manager.cpp:FileCacheManager::Write()  //   chunksize是文件系统级别的配置,在创建fs的时候指定,默认为64M(s3.chunksize=67108864),chunk存储在内存buffer里
    curvefs/src/client/s3/client_s3_cache_manager.cpp:FileCacheManager::WriteChunk()      // 根据文件写入的offset和length计算写入的chunk index,一般最多跨2个chunk(fuse写入最大length为128KB)
        curvefs/src/client/s3/client_s3_cache_manager.cpp:ChunkCacheManager::FindWriteableDataCache()  // 查询是否已经有data cache也即chunk cache,有的话就要考虑数据合并,没有的话申请内存写入即可,这里以有的场景分析
        curvefs/src/client/s3/client_s3_cache_manager.cpp:DataCache::Write()    // 这里主要是chunk上数据的合并过程比较复杂,需要根据写入数据的起始位置chunkPos和当前chunk上已写入数据的    起始位置chunkPos_,以及写入数据的len和已有数据的len_来确定合并操作,具体流程参考下面的内存buffer chunk数据合并逻辑
file cache包含多个data cache(64M chunk,保存在内存buffer中),data cache也即chunk的关键数据结构:
std::map<uint64_t, PageDataMap> dataMap_;  // first is block index, block index -> page data map, blocksize默认为4M

using PageDataMap = std::map<uint64_t, PageData *>;  // page index -> page data,page size默认为64K

pageData->data = new char[pageSize];   // s3.pagesize=65536,64KB
64M chunk全写满的情况下,一个data cache实例也即一个64M内存chunk,dataMap_里包含16个PageDataMap也即16个4M block,每个PageDataMap也即block包含64个64K的page。map的索引都是相应类型数据的index。如果没写满,则最终page data(64K)的数量会少于 16×64 个,64K是最小空间单元,引入page概念也是为了尽量减少连续空间分配(大内存块分配失败率很高和内存利用率极低)。
所以下面的数据合并场景也都是这几级数据结构的映射关系换算和数据copy流程(chunk -- block -- page)。
CopyBufToDataCache的3个参数分别为chunk的起始位置,copy数据的len,要copy的数据(指针),函数的功能就是把长度为len的数据copy到chunk指定位置。只是因为引入了block和page的层级,所以需要计算block和page的index,并且以page为最小单位进行copy。
chunk
    |-    block1
    |           |-    page1
    |           |-    page2
    |           |-    ...
    |           |-    pageN
    |-    block2
    |           |-    page1
    |           |-    page2
    |           |-    ...
    |           |-    pageN
    |
    |     ...
    |-    blockN
// 场景1:
/*
    ------       DataCache   # chunk已有数据
 ===...          WriteData   # 新写入的数据
*/
- actualChunkPos_:
- actualLen_:实际分配page的len总和,chunk可能有空洞没有分配page
- chunkPos_:chunk上已有数据的起始位置
- chunkPos:新写入该chunk数据的起始位置
- len_:chunk已有数据的len
- len:新写入该chunk数据的len
新数据的起始位置更靠前,分为两次copy,先覆盖已有数据(...部分),再在已有数据起始位置之前填充新数据(===部分)。
覆盖是调用CopyBufToDataCache(0, chunkPos + len - chunkPos_, data + chunkPos_ - chunkPos);,chunk前填充新数据是调用AddDataBefore(chunkPos_ - chunkPos, data);。
先分析CopyBufToDataCache:
第一个参数是chunk的起始位置,第二个是copy的长度(chunkPos + len - chunkPos_就是...这部分数据的长度),第三个是copy的数据(data + chunkPos_ - chunkPos就是新写入数据...的起始位置)。
再看AddDataBefore:
第一个参数是copy的长度(chunkPos_ - chunkPos就是===这部分的长度),第二个是copy的数据(data就是新写入数据===的起始位置)
上述两个copy数据的过程,还需要考虑block和page的切分和index计算,这两个函数中的切分和计算过程也非常类似,因此只分析CopyBufToDataCache。
// curvefs/src/client/s3/client_s3_cache_manager.cpp
void DataCache::CopyBufToDataCache(uint64_t dataCachePos, uint64_t len,
                                    const char *data) {
    uint64_t blockSize = s3ClientAdaptor_->GetBlockSize();  // 配置项,创建fs指定,与客户端无关,默认4M
    uint32_t pageSize = s3ClientAdaptor_->GetPageSize();    // 配置项,各客户端单独配置,默认64K
    uint64_t pos = chunkPos_ + dataCachePos;                // chunk上起始位置
    uint64_t blockIndex = pos / blockSize;                  // 计算写入的起始block,根据len不同可能写入一个或多个block
    uint64_t blockPos = pos % blockSize;                    // 计算起始block的写入位置
    uint64_t pageIndex, pagePos;
    uint64_t n, blockLen, m;
    uint64_t dataOffset = 0;
    uint64_t addLen = 0;
    ......
    if (dataCachePos + len > len_) {
        len_ = dataCachePos + len;  // 更新chunk len
    }
    while (len > 0) {   // 可能跨block
        if (blockPos + len > blockSize) {
            n = blockSize - blockPos;   // 跨block
        } else {
            n = len;
        }
        blockLen = n;
        PageDataMap &pdMap = dataMap_[blockIndex];
        PageData *pageData;
        pageIndex = blockPos / pageSize;    // 计算写入的第一个page
        pagePos = blockPos % pageSize;      // 计算写入的第一个page的起始位置
        while (blockLen > 0) {  // 同一个block内,可能跨page
            if (pagePos + blockLen > pageSize) {
                m = pageSize - pagePos; // 跨page
            } else {
                m = blockLen;
            }
            if (pdMap.count(pageIndex)) {
                pageData = pdMap[pageIndex];    // 覆盖写page
            } else {
                pageData = new PageData();
                pageData->data = new char[pageSize];    // 给page分配内存
                memset(pageData->data, 0, pageSize);
                pageData->index = pageIndex;
                pdMap.emplace(pageIndex, pageData); // 添加page到block
                addLen += pageSize;
            }
            memcpy(pageData->data + pagePos, data + dataOffset, m); // copy数据到page
            pageIndex++;    // 下一个page
            blockLen -= m;  // 计算block上剩余可写长度
            dataOffset += m;
            pagePos = (pagePos + m) % pageSize; // 跨page的话新的位置是page的起始位置0
        }

        blockIndex++;   // 下一个block
        len -= n;
        blockPos = (blockPos + n) % blockSize;
    }
    actualLen_ += addLen;   // 实际分配page的len总和,chunk可能有空洞没有分配page
    ......
}
// 场景2:
/*
    ------         ---***    DataCache
 ===..................       WriteData
*/
这种场景分3次copy,第一次copy头部数据(===)和第二次中间数据copy(...)参考场景1,第三次是MergeDataCacheToDataCache,这个是把末尾的已有的chunk数据(***)合并过来。
mergeDataCacheVer: 这个保存的是跨chunk合并的其他chunk数据,第一个chunk不包括在内。
其他几个场景也类似逻辑,不再分析。
// 场景3:
/*
         ------    ------         DataCache
      ---------------------       WriteData
*/


// 场景4:
/*
    --------       DataCache
     -----         WriteData
*/


// 场景5:
/*
      ------         ------    DataCache
        ----------------       WriteData
*/


// 场景6:
/*
         ------         ------         DataCache
            --------------------       WriteData
*/
用户数据写入buffer(chunk - block - page)之后,会通过flush接口进行下刷落盘(可能是本地磁盘缓存或S3集群,根据是否开启磁盘写缓存配置决定),flush有2种场景会触发,一是用户主动调用fuse flush api ,二是定时任务定期调用。
taskPool线程池(具体实现是在src/common/concurrent/task_thread_pool.h)会进行实际flush操作,初始化是在curvefs/src/client/s3/client_s3_adaptor.cpp:S3ClientAdaptorImpl::Init() --> taskPool_.Start(chunkFlushThreads_); // chunkFlushThreads_是配置项,决定线程池线程数量,默认值s3.chunkFlushThreads=5。
后台定期刷新线程的初化是在curvefs/src/client/s3/client_s3_adaptor.cpp:S3ClientAdaptorImpl::Init() --> bgFlushThread_ = Thread(&S3ClientAdaptorImpl::BackGroundFlush, this); --> S3ClientAdaptorImpl::BackGroundFlush(),定期刷新的间隔有2个配置项:
- s3.intervalSec=3   // 后台flush线程的轮询等待时间,间隔这个时间检查有没有要flush的内存buffer数据
- s3.flushIntervalSec=5 // 内存buffer中的数据要在内存中留存这个间隔才会下刷(除非用户主动flush),等待而不是立即下刷主要是为了做IO合并以及读加速,force刷新场景下忽略这个时间
flush请求Enqueue线程池的逻辑是在触发flush函数调用里进行的,也就是用户主动调用fuse flush接口或者定时任务调用如:
-
curvefs/src/client/s3/client_s3_adaptor.cpp:S3ClientAdaptorImpl::Flush()// 用户主动调用fuse flush api场景调用FileCacheManager::Flush()进行Enqueue操作,Enqueue之前会封装回调函数和相关参数 -
curvefs/src/client/s3/client_s3_cache_manager.cpp:FsCacheManager::FsSync()// 定时任务场景调用FileCacheManager::Flush()进行Enqueue操作
线程池处理线程是src/common/concurrent/task_thread_pool.h:TaskThreadPool::virtual void ThreadFunc(),之后流程是:
curvefs/src/client/s3/client_s3_adaptor.cpp:S3ClientAdaptorImpl::FlushChunkClosure()
    curvefs/src/client/s3/client_s3_cache_manager.cpp:ChunkCacheManager::Flush()    // flush结束会把写buffer转存成读buffer
        curvefs/src/client/s3/client_s3_cache_manager.cpp:DataCache::Flush()        // 以4M block为单位flush到本地磁盘缓存或S3集群
            s3ClientAdaptor_->AllocS3ChunkId(fsId, &chunkId);       // 每次flush block会从MDS申请chunk id,保证新数据不会覆盖老数据
            curvefs::common::s3util::GenObjName(chunkId, blockIndex, 0, fsId, inodeId);  // 用申请到的chunk id生成S3对象名,本地磁盘上的文件名与S3对象名一一对应完全一致

            for (auto iter = uploadTasks.begin(); iter != uploadTasks.end();
                ++iter) {
                if (!useDiskCache) {
                    s3ClientAdaptor_->GetS3Client()->UploadAsync(*iter);        // 未配置本地磁盘写缓存,异步上传到S3集群
                } else {
                    s3ClientAdaptor_->GetDiskCacheManager()->Enqueue(*iter);    // 异步下刷到本地磁盘缓存
                }
            }
异步下刷磁盘写缓存操作流程与flush的后台刷新流程类似,也是通过taskPool线程池来实现多线程并发操作,相关实现函数为:
- 初始化线程池:
curvefs/src/client/s3/disk_cache_manager_impl.cpp:DiskCacheManagerImpl::Init() --> taskPool_.Start(threads_), threads_为配置项diskCache.threads=5 - task入队:
curvefs/src/client/s3/disk_cache_manager_impl.cpp:DiskCacheManagerImpl::Enqueue() - 线程处理task:
curvefs/src/client/s3/disk_cache_manager_impl.cpp:DiskCacheManagerImpl::WriteClosure(),最终会调用到本地文件系统的write接口PosixWrapper::write(),配置项diskCache.forceFlush=true决定是否在调用本地文件系统write接口后执行fdatasync。写完本地磁盘缓存之后,还会创建硬链接到读缓存目录,供读缓存使用DiskCacheManagerImpl::WriteDiskFile() --> diskCacheManager_->LinkWriteToRead()。
TODO
读IO的大致流程如下图所示:

其中用户态读IO系统调用到内核态再到fuse这块的逻辑这里不详细分析,可以参考3.1节内容。
curve-fuse到curve-metaserver的RPC请求流程也比较简单,可以参考上面几节的内容,或者1.1节内容。这里重点分析curve-fuse到S3或者CurveBS volume存储引擎的相关流程。
S3和volume存储引擎的curve-fuse client实现分别是在curvefs/src/client/fuse_s3_client.h:FuseS3Client和curvefs/src/client/fuse_volume_client.h:FuseVolumeClient中,他们都继承自curvefs/src/client/fuse_client.h:FuseClient。
首先分析S3存储引擎的读IO流程,首先会尝试从cache中读数据,读cache的相关流程概述可参考1.5节的数据磁盘缓存介绍。这里简要描述下,cache层级关系为: file cache - disk cache - chunk,其中chunk就是本地磁盘上缓存的chunk文件。
相关处理函数入口是curvefs/src/client/fuse_s3_client.cpp:FuseS3Client::FuseOpRead,
CURVEFS_ERROR FuseS3Client::FuseOpRead(fuse_req_t req, fuse_ino_t ino,
                                       size_t size, off_t off,
                                       struct fuse_file_info *fi, char *buffer,
                                       size_t *rSize) {
    // check align
    ......
    // check inode
    std::shared_ptr<InodeWrapper> inodeWrapper;
    CURVEFS_ERROR ret = inodeManager_->GetInode(ino, inodeWrapper);
    ......
    // check offset and len
    uint64_t fileSize = inodeWrapper->GetLength();
    ......
    // Read do not change inode. so we do not get lock here.
    int rRet = s3Adaptor_->Read(ino, off, len, buffer);   // S3ClientAdaptorImpl::Read
    if (rRet < 0) {
        LOG(ERROR) << "s3Adaptor_ read failed, ret = " << rRet;
        return CURVEFS_ERROR::INTERNAL;
    }
    *rSize = rRet;
    // update atime/ctime async  // https://github.com/opencurve/curve/issues/1393
    ......
    return ret;
}
读IO请求的关键逻辑在于IO跨chunk的拆分,以及读文件offset到chunk offset的映射计算,按目前的默认配置,blocksize为4M(对应到S3上对象大小),chunksize为64M(内存逻辑空间管理大小),另外FUSE层下发的IO大小默认最大为128K,因此最多跨2个chunk。
还有一个关键点是S3对象名称规则,具体实现如下:
// curvefs/src/common/s3util.h
inline std::string GenObjName(uint64_t chunkid, uint64_t index,     // index是block序号
                              uint64_t compaction, uint64_t fsid,   // compaction是碎片整理序号
                              uint64_t inodeid) {
    return std::to_string(fsid) + "_" + std::to_string(inodeid) + "_" +
           std::to_string(chunkid) + "_" + std::to_string(index) + "_" +
           std::to_string(compaction);
}
从上面的实现和配置项默认值可以看出,针对大小文件,对应保存到S3上的文件名分别为(前提是一次性顺序写入一遍):
- 超过64M的文件,比如65M:
1_10001_10_0_0~1_10001_10_15_0以及1_10001_11_0_0,共17个block对象,前16个大小为4M同属于一个chunk 10,第17个为1M属于第二个chunk 11 - 大于4M但不超过64M的文件,如8M:
1_10001_10_0_0~1_10001_10_1_0,共2个4M block对象同属于一个chunk 10 - 小于4M的文件:
1_10001_10_0_0,共一个与文件实际大小相同的对象属于一个chunk 10
针对随机写入场景的大文件,其S3对象名格式与上述类似,会根据写入的offset和length来计算其所属的chunk和block来生成对象名,因为都是追加写,所以如果同属一个chunk,则chunkid会增长(如果能在内存中合并两次写入则不增长,一旦要上传到S3则从MDS申请新的chunk id),block id不变,读某个offset的时候如果有多个chunk文件都包含这个offset的数据,则读取最新的chunk也就是id最大的那个,读不到的老数据(比如最新的length小于原来已写入的length)则从更小的chunk中读取。
本地磁盘缓存中的文件命名格式与S3上的完全一致,一一对应。目前异步刷新本地磁盘数据到S3上时不会做文件合并操作,后续会考虑增强这块功能。
S3ClientAdaptorImpl::Read函数非常简单,直接看其调用的FileCacheManager::Read函数(TODO:这个函数的实现有点复杂,可以拆分成多个子函数):
// curvefs/src/client/s3/client_s3_cache_manager.cpp
int FileCacheManager::Read(uint64_t inodeId, uint64_t offset, uint64_t length,
                           char *dataBuf) {
    uint64_t chunkSize = s3ClientAdaptor_->GetChunkSize();  // 配置项s3.chunksize=67108864,64M
    uint64_t index = offset / chunkSize;        // 计算chunk index,读哪个chunk
    uint64_t chunkPos = offset % chunkSize;     // 计算chunk上的偏移量,读chunk的哪个位置
    uint64_t readLen = 0;
    int ret = 0;
    uint64_t readOffset = 0;
    std::vector<ReadRequest> totalRequests;

    //  Find offset~len in the write and read cache,
    //  and The parts that are not in the cache are placed in the totalRequests
    while (length > 0) {
        std::vector<ReadRequest> requests;
        if (chunkPos + length > chunkSize) {    // 跨chunk读,要读2次或更多次
            readLen = chunkSize - chunkPos;
        } else {                                // 不跨chunk,只需要一次读
            readLen = length;
        }
        ReadChunk(index, chunkPos, readLen, dataBuf, readOffset, &requests);    // 首先尝试读本地cache,读不到就放到totalRequests里,然后发送给S3读数据
        totalRequests.insert(totalRequests.end(), requests.begin(),
                             requests.end());
        ......
    }
    ......
    {
        unsigned int maxRetry = 3;  // hardcode, fixme
        unsigned int retry = 0;
        ......
        std::vector<S3ReadResponse> responses;
        while (retry < maxRetry) {
            std::vector<S3ReadRequest> totalS3Requests;
            auto iter = totalRequests.begin();
            uint64_t fileLen;
            {   // 把请求转换成可以发送给S3的请求格式
                ......
                    std::vector<S3ReadRequest> s3Requests;
                    GenerateS3Request(*iter, s3InfoListIter->second, dataBuf,
                                      &s3Requests, inode->fsid(),
                                      inode->inodeid());
                    totalS3Requests.insert(totalS3Requests.end(),
                                           s3Requests.begin(),
                                           s3Requests.end());
                }
            }
            ......
            ret = ReadFromS3(totalS3Requests, &responses, fileLen);  // 读S3数据
            if (ret < 0) {
                retry++;
                responses.clear();
                if (ret != -2 || retry == maxRetry) {   // 非预期错误或者达到重试次数
                    LOG(ERROR) << "read from s3 failed. ret:" << ret;
                    return ret;
                } else {       // 预期错误是指s3对象不存在,目前可能是metaserver碎片整理服务合并了S3对象导致,重试
                    // ret -2 refs s3obj not exist
                    // clear inodecache && get again
                    LOG(INFO) << "inode cache maybe steal, try to get latest";
                    ::curve::common::UniqueLock lgGuard =
                        inodeWrapper->GetUniqueLock();
                    auto r = inodeWrapper->RefreshS3ChunkInfo();    // 重新获取inode的s3info信息,看对象是否能读到
                    if (r != CURVEFS_ERROR::OK) {
                        LOG(WARNING) << "refresh inode fail, ret:" << ret;
                        return -1;
                    }
    ......
        // 合并读到的数据
        auto repIter = responses.begin();
        for (; repIter != responses.end(); repIter++) {
            VLOG(6) << "readOffset:" << repIter->GetReadOffset()
                    << ",bufLen:" << repIter->GetBufLen();
            memcpy(dataBuf + repIter->GetReadOffset(),
                repIter->GetDataBuf(), repIter->GetBufLen());
        }
    }
    return readOffset;
}


int FileCacheManager::ReadFromS3(const std::vector<S3ReadRequest> &requests,
                                 std::vector<S3ReadResponse> *responses,
                                 uint64_t fileLen) {
    uint64_t chunkSize = s3ClientAdaptor_->GetChunkSize();   // 配置项:默认4M
    uint64_t blockSize = s3ClientAdaptor_->GetBlockSize();   // 配置项:默认64M
    std::vector<S3ReadRequest>::const_iterator iter = requests.begin();
    std::atomic<uint64_t> pendingReq(0);
    curve::common::CountDownEvent cond(1);
    bool async = false;             // 目前写死同步下载S3对象
    ......
    for (; iter != requests.end(); iter++) {
        uint64_t blockIndex = iter->offset % chunkSize / blockSize; // 计算要读的block,以及block上的offset,chunk以及其上的offset
        uint64_t blockPos = iter->offset % chunkSize % blockSize;
        uint64_t chunkIndex = iter->offset / chunkSize;
        uint64_t chunkPos = iter->offset % chunkSize;
        uint64_t len = iter->len;
        uint64_t n = 0;
        uint64_t readOffset = 0;
        uint64_t objectOffset = iter->objectOffset;

        std::vector<uint64_t> &dataCacheVec = dataCacheMap[chunkIndex];
        dataCacheVec.push_back(chunkPos);
        S3ReadResponse response(len);
        ......
        // prefetch read
        if (s3ClientAdaptor_->HasDiskCache()) {
            ......
            // 默认预读1个block,也就是4M,s3.prefetchBlocks=1
            // prefetch object from s3
            PrefetchS3Objs(prefetchObjs);
        }
        while (len > 0) {
            if (blockPos + len > blockSize) {   // 跨block读
                n = blockSize - blockPos;
            } else {
                n = len;
            }
            assert(blockPos >= objectOffset);
            std::string name = curvefs::common::s3util::GenObjName(
                iter->chunkId, blockIndex, iter->compaction, iter->fsId,
                iter->inodeId);
            ......
                if (s3ClientAdaptor_->HasDiskCache() &&
                    s3ClientAdaptor_->GetDiskCacheManager()->IsCached(name)) {
                    VLOG(9) << "cached in disk: " << name;
                    ret = s3ClientAdaptor_->GetDiskCacheManager()->Read(    // 尝试从缓存盘读
                        name, response.GetDataBuf() + readOffset,
                        blockPos - objectOffset, n);
                    ......
                } else {
                    VLOG(9) << "not cached in disk: " << name;
                    ret = s3ClientAdaptor_->GetS3Client()->Download(    // 从S3下载对象
                        name, response.GetDataBuf() + readOffset,
                        blockPos - objectOffset, n);
            ......
            }
            // 读下一block
            len -= n;
            readOffset += n;
            blockIndex++;
            blockPos = (blockPos + n) % blockSize;
            objectOffset = 0;
        }
        // 汇总读到的数据
        response.SetReadOffset(iter->readOffset);
        VLOG(6) << "response readOffset:" << response.GetReadOffset()
                << ",response len:" << response.GetBufLen()
                << ",bufLen:" << readOffset;
        responses->emplace_back(std::move(response));
        ......
    // 更新本地磁盘缓存
    uint32_t i = 0;
    for (auto &dataCacheMapIter : dataCacheMap) {
        ......
    }

    return 0;
}
TODO
请参考2.7节,CurveBS的数据恢复流程,CurveFS metaserver数据的故障恢复流程与CurveBS的chunkserver数据恢复流程完全一致。
请参考2.9节,CurveBS MDS选主流程,相关实现逻辑完全一致。