Documentation Area Viewer

BG2 Docks at day in the Area Viewer using "Auto-fit" zoom with all available layers enabled
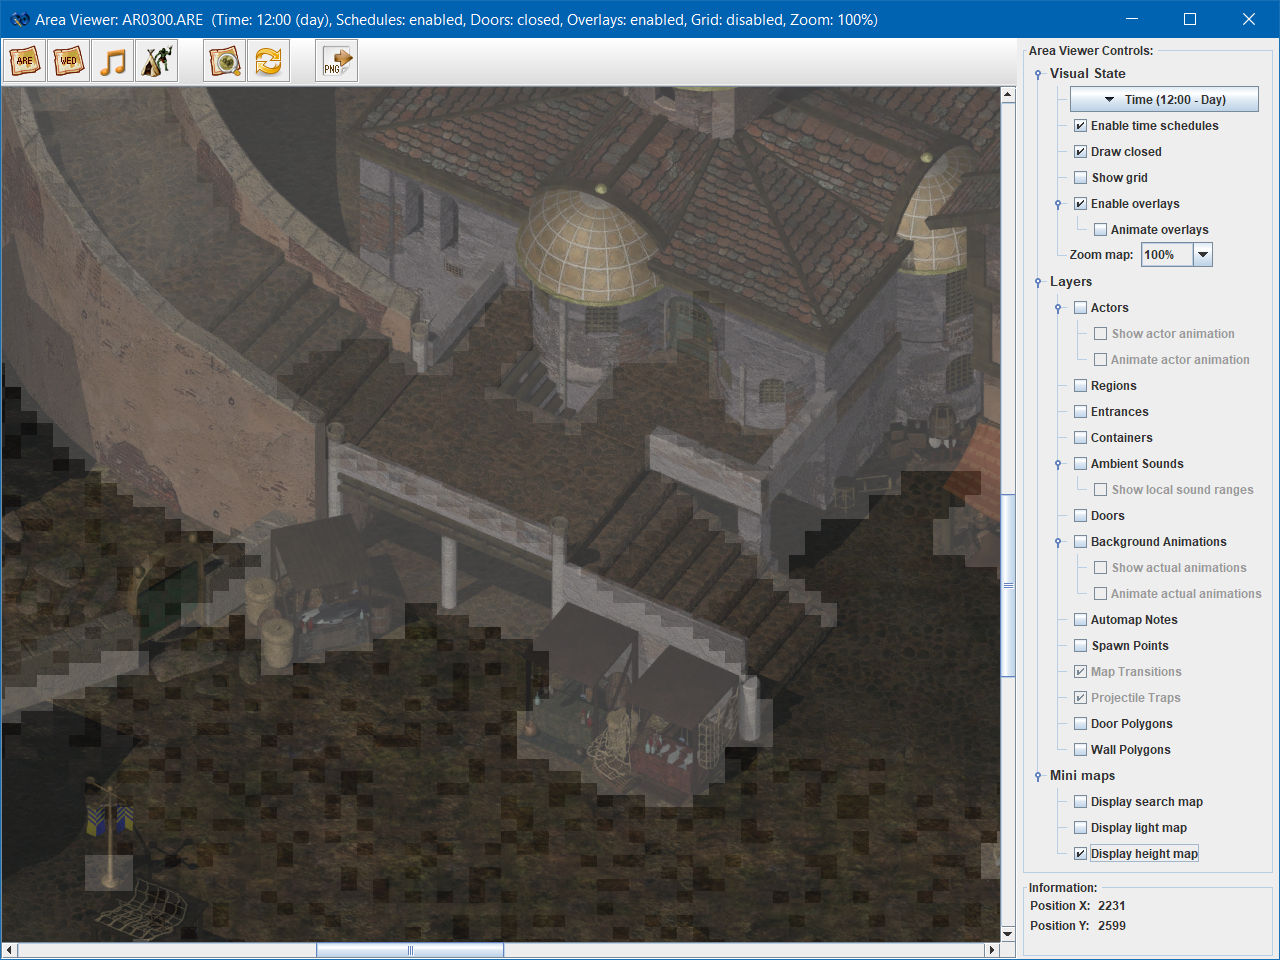
The Area Viewer can be used to create a graphical representation of a map with any of its content, such as actors, regions, door and wall polygons, or optionally display search, height or light maps as semi-transparent overlays. You can choose specific daylight conditions, enable time schedules or display still or animated (water) overlays.
The viewer is divided into the main view, a control bar on the right side, and a button bar at the top of the viewer.
Note: The Area Viewer requires a lot of system and video memory. If it doesn't open or you can't see the map in the main view you may have to reserve more memory for Near Infinity. The FAQ provides possible solutions for this issue.
Here you can inspect the visual representation of the map. You can move the map by either using the scrollbars at the edges of the view or by pressing the left mouse button on any unoccupied region and moving the mouse cursor around.
While you're moving the mouse cursor over the map the Information Panel will show the map coordinates at the cursor position and additional information about any layered objects under the cursor.
Layered objects on the map can be selected to open their respective resource structures in a new window. If two or more objects are placed over each other at the same map location you can select the desired object from a context menu opened by right-clicking on the object or objects. The mouse cursor transforms into a "Hand" symbol when you are over a selectable layered object.
The controls on the right side of the viewer window allow you to manipulate various aspects about how the map is represented in the main view area. It is divided into a Visual State section for setting global states of the map, a Layers section that allows you to enable or disable individual layers of map elements, and a Mini maps section that allows you to blend in various mini "meta-maps" related to the area.
The high number of elements in the controls panel use up a lot of vertical space. You can reduce the vertical space somewhat by clicking on the small node symbols next to the section labels to collapse or expand the respective sections if needed.
Below the controls panel you can find the Information panel. It provides additional information about the map location and potential layered objects under the mouse cursor.
The Visual State section provides options applied to the map as a whole. With the Time button you can select a specific time of day. The map will automatically adapt the lighting conditions when needed or even display a separate night map if available. If Enable time schedules is active it will also update the visibility of certain map elements at a specific time, such as actors or ambient sounds.

Map by day.

Map at dusk or dawn.

Map at night (using separate night map).
With the Draw closed checkbox you can control whether to display open or closed doors. The term door is used very loosely in this context. A number of maps are making use of doors in very creative ways (e.g. for displaying the evil/good challenge room designs on the BG2 Pocket Plane map).
Show tile grid will overlay a 64x64 pixels grid on the map to make individual tiles of the map background more visible.
Show cell grid will overlay a 16x12 pixels grid on the map to visualize individual search map cells.
Enable overlays is useful to display water or lava overlays seen on many maps. You can also animate them by activating the Animate overlays checkbox. This option requires a lot of CPU power, however, which may cause the map to become less responsive for bigger areas.
With the Zoom map feature you can freely zoom in or out of the map. The Auto-fit option will show the whole map in the current main view without the need to scroll the map.
This section includes all elements found in ARE and WED resources that can be placed somewhere on the map, such as ARE's actors, regions or background animations or WED's door and wall polygons. These objects are either displayed as icons on the map or are using polygons if available.
Actors
Actors can be displayed as icons in different colors to visualize their initial allegiance. It is also possible to display the actual creature animation, either as still frame or as animated version. Not all actors are defined directly in the ARE resource though. Actors spawned by associated INI files can be made out by a small "INI" text at the top-right of their icons. Global actors from saved games can be made out by a small "GAM" text instead. Hovering over them with the mouse cursor displays their actual creature name in the Information panel as well as a tooltip. Selecting an actor icon opens its associated Actor structure from the ARE resource, the relevant INI file or the associated saved game structure.
Available icons:
-
 Neutral actors defined directly in the ARE resources.
 -
 Neutral actors defined in an associated INI resource.
 -
 Neutral global actors defined in the associated saved game.
 -
 Friendly actors defined directly in the ARE resource.
 -
 Friendly actors defined in an associated INI resource.
 -
 Friendly global actors defined in the associated saved game.
 -
 Hostile actors defined directly in the ARE resource.
 -
 Hostile actors defined in an associated INI resource.
 -
 Hostile global actors defined in the associated saved game.

Real actor animations with their visible selection circles.
Regions
Regions are displayed as red polygons. You can find out more about individual regions by hovering over them with the mouse cursor. The Information panel on the right as well as a tooltip will show the name and type of the region. Selecting a region polygon opens its associated Trigger structure from the ARE resource.
Activate the option Show target locations to display activation points of the regions. They are represented by red marker icons for launch points (![]() ), alternate activation points (
), alternate activation points (![]() ) and speaker locations (
) and speaker locations (![]() ).
).
Entrances
Entrances are represented by a small door symbol (![]() ). Selecting an entrance symbol opens its associated
). Selecting an entrance symbol opens its associated Entrance structure from the ARE resource.
Containers
Containers are displayed as cyan/turquoise colored polygons. Hovering over them with the mouse cursor displays their name and type in the Information panel as well as a tooltip. Selecting a container polygon opens its associated Container structure from the ARE resource.
Activate the option Show target locations to display activation points of the containers. They are represented by cyan/turquoise marker icons for launch points (![]() ) and access location (
) and access location (![]() ).
).
Ambient Sounds
Ambient sounds are represented as a small speaker symbol. Depending on the type you can see the global sound symbol (![]() ) or the local sound symbol (
) or the local sound symbol (![]() ) which is also associated with a sound range. The sound range can be made visible by activating the
) which is also associated with a sound range. The sound range can be made visible by activating the Show local sound ranges checkbox. It is represented by a bluish alpha-blended circle. The alpha-blending strength depends on the sound volume.
Selecting a sound symbol (or its associated range circle) opens its associated Ambient structure from the ARE resource.
Doors
Doors are displayed as dark purple polygons. Hovering over them with the mouse cursor displays their name and open/closed state in the Information panel as well as a tooltip. Selecting a door polygon opens its associated Door structure from the ARE resource.
Activate the option Show target locations to display launch points of associated scripts and activation points for opened and closed door states. They are represented by purple marker icons for launch points (![]() ), opened doors (
), opened doors (![]() ) and closed doors (
) and closed doors (![]() ).
).
Impeded Door Cells
Impeded door cells are represented as green colored cell blocks. Their number and location depends on the opened/closed state of the associated door.
Background Animations
Background animations can be displayed as a movie icon or by its actual content. In many cases the icon also shows the resource type of the animation, such as BAM (![]() ), WBM (
), WBM (![]() ) or PVRZ (
) or PVRZ (![]() ). Deactivated background animations are visualized by a grayed out icon (
). Deactivated background animations are visualized by a grayed out icon (![]() ).
).
Activating the option Show actual animations attempts to display the first frame for all background animations. Currently WBM and PVRZ animations are not supported. Selecting the option Animate actual animations attempts to display the whole animation sequence. This option requires some CPU power, however, which may cause the map to become less responsive at times. Hovering over the animation displays a red frame around it. You can also configure the Area Viewer to display the colored frame never or all the time in the Viewer Settings.
Selecting a background animation opens its associated Animation structure from the ARE resource.
Automap Notes
Automap notes are represented by a map marker of familiar design (![]() ). Hovering over them with the mouse cursor displays their content in the
). Hovering over them with the mouse cursor displays their content in the Information panel as well as a tooltip. Selecting an automap note opens its associated Automap note structure from the ARE resource.
Spawn Points
Spawn points are represented by a question mark icon (![]() ). Selecting it opens its associated
). Selecting it opens its associated Spawn point structure from the ARE resource.
Map Transitions
Map transitions are not actual map elements. They are rather defined as simple fields in the ARE resources themselves. This feature is mainly used by BG1. Map transitions are displayed as yellow polygons at the borders of the map. Selecting a map transition simply opens the associated ARE resource in a new window.
Projectile Traps
Projectile traps are represented as trap icons (![]() ). They are rarely used directly on maps. Instead you can find them on maps in saved games after setting traps by your thieves. Selecting a trap opens its associated
). They are rarely used directly on maps. Instead you can find them on maps in saved games after setting traps by your thieves. Selecting a trap opens its associated Projectile trap structure from the ARE resource.
Door Polygons
Door polygons are displayed as light purple polygons. These objects are defined in WED resources and only indirectly linked to the "Door" structures from ARE resources. Hovering over them with the mouse cursor displays their structure name and cover state defined by their respective polygon flags in the Information panel as well as a tooltip. Selecting a door polygon opens its associated Door structure from the WED resource.
Wall Polygons
Wall polygons are displayed as green polygons. These objects define how objects behind it are covered. Hovering over them with the mouse cursor displays their structure name and cover state defined by their respective polygon flags in the Information panel as well as a tooltip. Selecting a wall polygon opens its associated Wall polygon structure from the WED resource.

BG2 "Docks" map with many active layers.
Areas in Infinity Engine games are always accompanied by small maps that define walkable areas, lighting conditions and relative heights. These maps can be blended into the current map by using one of the available options:
-
Display search map- Defines walkable and blocked areas. Also defines the footstep sounds for walkable areas. (Example screenshot) -
Display light map- Defines whether a region is shadowed or not. It also affects the Hide in Shadows ability of thieves and rangers. (Example screenshot) -
Display height map- Controls the vertical offset character animations are rendered on the map to simulate the effect of different heights. (Example screenshot)
You can only select one map at a time. The map opacity can be modified in the Area Viewer Settings.
This panel displays information about the map location and potential layered objects under the current mouse cursor position.
The area viewer also contains a small toolbar at the top of the window. The first two buttons can be used to display the associated ARE ( ) and WED (
 ) resources respectively. The two buttons next to it open the
 Songs ( ) and
) and Rest encounters ( ) structures from the associated ARE resource.
The first button ( ) of the second icon group can be used to open the
 Settings dialog. It is described in more detail below. With the second button ( ) you can force the viewer to reload the whole map. This operation requires a lot of memory though.
The single button of the third group ( ) can be used to export the current map state to a graphics file in PNG format. It includes the map background, enabled overlays and activated mini maps. Whether layered objects are included as well can be controlled in the Settings dialog.

In the Settings dialog you can define the behavior of the Area Viewer and some of its elements.
On the left side you can define the stacking order of layered objects. Since objects of different layers can overlap each other it is important to place objects on top that are smaller and therefore more difficult to select. The default order follows this principle and places small and/or more frequently used layers on top of others. You can change this order at any time.
Directly below is the Show icon labels for section, where you can control whether layer icons should also show additional info labels. Otherwise, more details about a layer object can found in tooltips or the information panel when you hover the mouse cursor over the object.
The Actor animations section controls the visual appearance of actors on the map. The options Draw selection circle and Draw personal space indicator toggle visibility of additional markers for the animated view of actors. Enable accurate color blending allows you to enable or disable special blending modes of selected creature animations (such as gaseous clouds or wisps). Special blending modes may incur a noticeable performance penalty. In this case it is recommended to turn this option off.
The Background animations section controls whether and how background animations are displayed with a border around their frames. The option Show animations regardless of their active state controls whether disabled animations (indicated by gray symbols) are displayed when selecting either of the "Show actual animation" options.
In the Visual quality section you can define how map tilesets (i.e. background graphics) or background animations are filtered when you zoom into or out of the map. Nearest neighbor filtering is fast and produces sharp pixels. Bilinear filtering interpolates neighboring pixels to create smoother graphics. Optimal filtering will automatically select Nearest neighbor filtering when zooming in and Bilinear filtering when zooming out.
The Frame rates section controls how fast overlays and background animations are played back when animated. The defaults are usually fine unless you are running Near Infinity on a slower system.
The Mini map opacity section lets you choose how translucent overlayed mini maps should be. The default of 50% is a good balance to see both the mini map colors as well as the underlying map background.
The Misc. settings section provides several options that define the general behavior of the viewer:
-
Include layer items when exporting maps as graphicswill include all enabled layers in the graphics file export if activated. -
Use individual color shades for region typeswill add some color variations to layers that are represented as polygons to make it easier to tell layer elements of the same type apart. -
Use mouse wheel to zoom mapwill increase or decrease map zoom when yuu use the mouse wheel. -
Remember all visual settingsstores the current state of selected controls in theArea Viewer Controlssection and restores them when another map is opened in the viewer.
Pressing the Set defaults button resets all settings in the dialog to the defaults.